Slurm on LUMI
Who is this for?
We assume some familiarity with job scheduling in this section. The notes will cover some of the more basic aspects of Slurm also, though as this version of the notes is intended for Belgian users and since all but one HPC site in Belgium currently teaches Slurm to their users, some elements will be covered only briefly.
Even if you have a lot of experience with Slurm, it may still be useful to have a quick look at this section as Slurm is not always configured in the same way.
Links to Slurm material
Links to Slurm material on this web page are all for the version on LUMI at the time of the course. Some of the links in the PDF of the slides however are to the newest version.
What is Slurm

Slurm is both a resource manager and job scheduler for supercomputers in a single package.
A resource manager manages all user-exposed resources on a supercomputer: cores, GPUs or other accelerators, nodes, ... It sets up the resources to run a job and cleans up after the job, and may also give additional facilities to start applications in a job. Slurm does all this.
But Slurm is also a job scheduler. It will assign jobs to resources, following policies set by sysadmins to ensure a good use of the machine and a fair distribution of resources among projects.
Slurm is the most popular resource manager and job scheduler at the moment and is used on more than 50% of all big supercomputers. It is an open source package with commercial support. Slurm is a very flexible and configurable tool with the help of tens or even hundreds of plugins. This also implies that Slurm installations on different machines can also differ a lot and that not all features available on one computer are also available on another. So do not expect that Slurm will behave the same on LUMI as on that other computer you're familiar with, even if that other computer may have hardware that is very similar to LUMI.
Slurm is starting to show its age and has trouble dealing in an elegant and proper way with the deep hierarcy of resources in modern supercomputers. So Slurm will not always be as straightforward to use as we would like it, and some tricks will be needed on LUMI. Yet there is no better option at this moment that is sufficiently mature.
Other systems in Belgium
Previously at the VSC Torque was used as the resource manager and Moab as the scheduler. All VSC sites now use Slurm, though at UGent it is still hidden behind wrappers that mimic Torque/Moab. As we shall see in this and the next session, Slurm, which is a more modern resource manager and scheduler than the Torque-Moab combination, has already trouble dealing well with the hierarchy of resources in a modern supercomputer. Yet it is still a lot better at it than Torque and Moab. So no, the wrappers used on the HPC systems managed by UGent will not be installed on LUMI.
Nice to know...
Lawrence Livermore National Laboratory, the USA national laboratory that originally developed Slurm is now working on the development of another resource and job management framework called flux. It will be used on the third USA exascale supercomputer El Capitan which is currently being assembled.
Slurm concepts: Physical resources

The machine model of Slurm is bit more limited than what we would like for LUMI.
On the CPU side it knows:
-
A node: The hardware that runs a single operating system image
-
A socket: On LUMI a Slurm socket corresponds to a physical socket, so there are two sockets on the CPU nodes and a single socket on a GPU node.
Alternatively a cluster could be configured to let a Slurm socket correspond to a NUMA nore or L3 cache region, but this is something that sysadmins need to do so even if this would be useful for your job, you cannot do so.
-
A core is a physical core in the system
-
A thread is a hardware thread in the system (virtual core)
-
A CPU is a "consumable resource" and the unit at which CPU processing capacity is allocated to a job. On LUMI a Slurm CPU corresponds to a physical core, but Slurm could also be configured to let it correspond to a hardware thread.
The first three bullets already show the problem we have with Slurm on LUMI: For three levels in the hierarchy of CPU resources on a node: the socket, the NUMA domain and the L3 cache domain, there is only one concept in Slurm, so we are not able to fully specify the hierarchy in resources that we want when sharing nodes with other jobs.
A GPU in Slurm is an accelerator and on LUMI corresponds to one GCD of an MI250X, so one half of an MI250X.
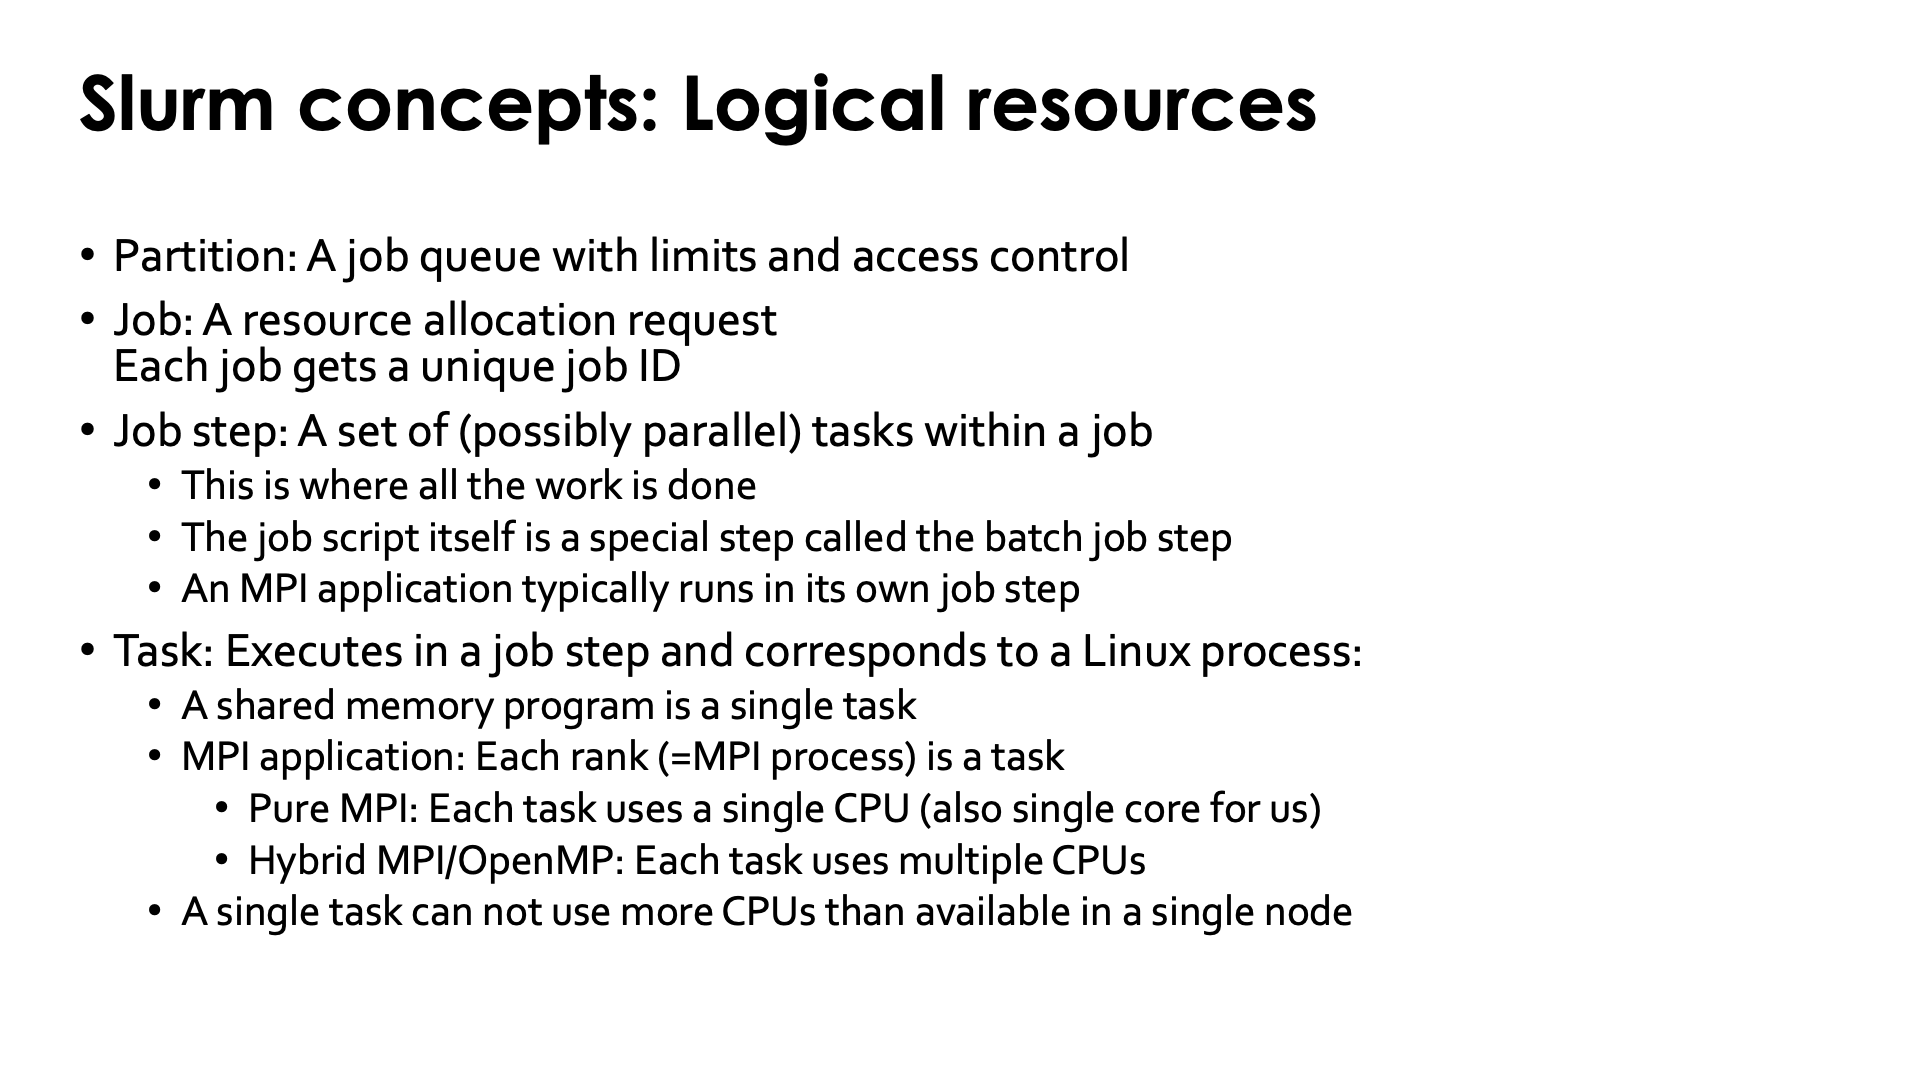
Slurm concepts: Logical resources
-
A partition: is a job queue with limits and access control. Limits include maximum wall time for a job, the maximum number of nodes a single job can use, or the maximum number of jobs a user can run simultaneously in the partition. The access control mechanism determines who can run jobs in the partition.
It is different from what we call LUMI-C and LUMI-G, or the
partition/Candpartition/Gmodules in the LUMI software stacks.Each partition covers a number of nodes, but partitions can overlap. This is not the case for the partitions that are visible to users on LUMI. Each partition covers a disjunct set of nodes. There are hidden partitions though that overlap with other partitions, but they are not accessible to regular users.
-
A job in Slurm is basically only a resource allocation request.
-
A job step is a set of (possibly parallel) tasks within a job
-
Each batch job always has a special job step called the batch job step which runs the job script on the first node of a job allocation.
-
An MPI application will typically run in its own job step.
-
Serial or shared memory applications are often run in the batch job step but there can be good reasons to create a separate job step for those applications.
-
-
A task executes in a job step and corresponds to a Linux process (and possibly subprocesses)
-
A shared memory program is a single task
-
In an MPI application: Each rank (so each MPI process) is a task
-
Pure MPI: Each task uses a single CPU (which is also a core for us)
-
Hybrid MPI/OpenMP applications: Each task can use multiple CPUs
-
Of course a task cannot use more CPUs than available in a single node as a process can only run within a single operating system image.
-
Slurm is first and foremost a batch scheduler
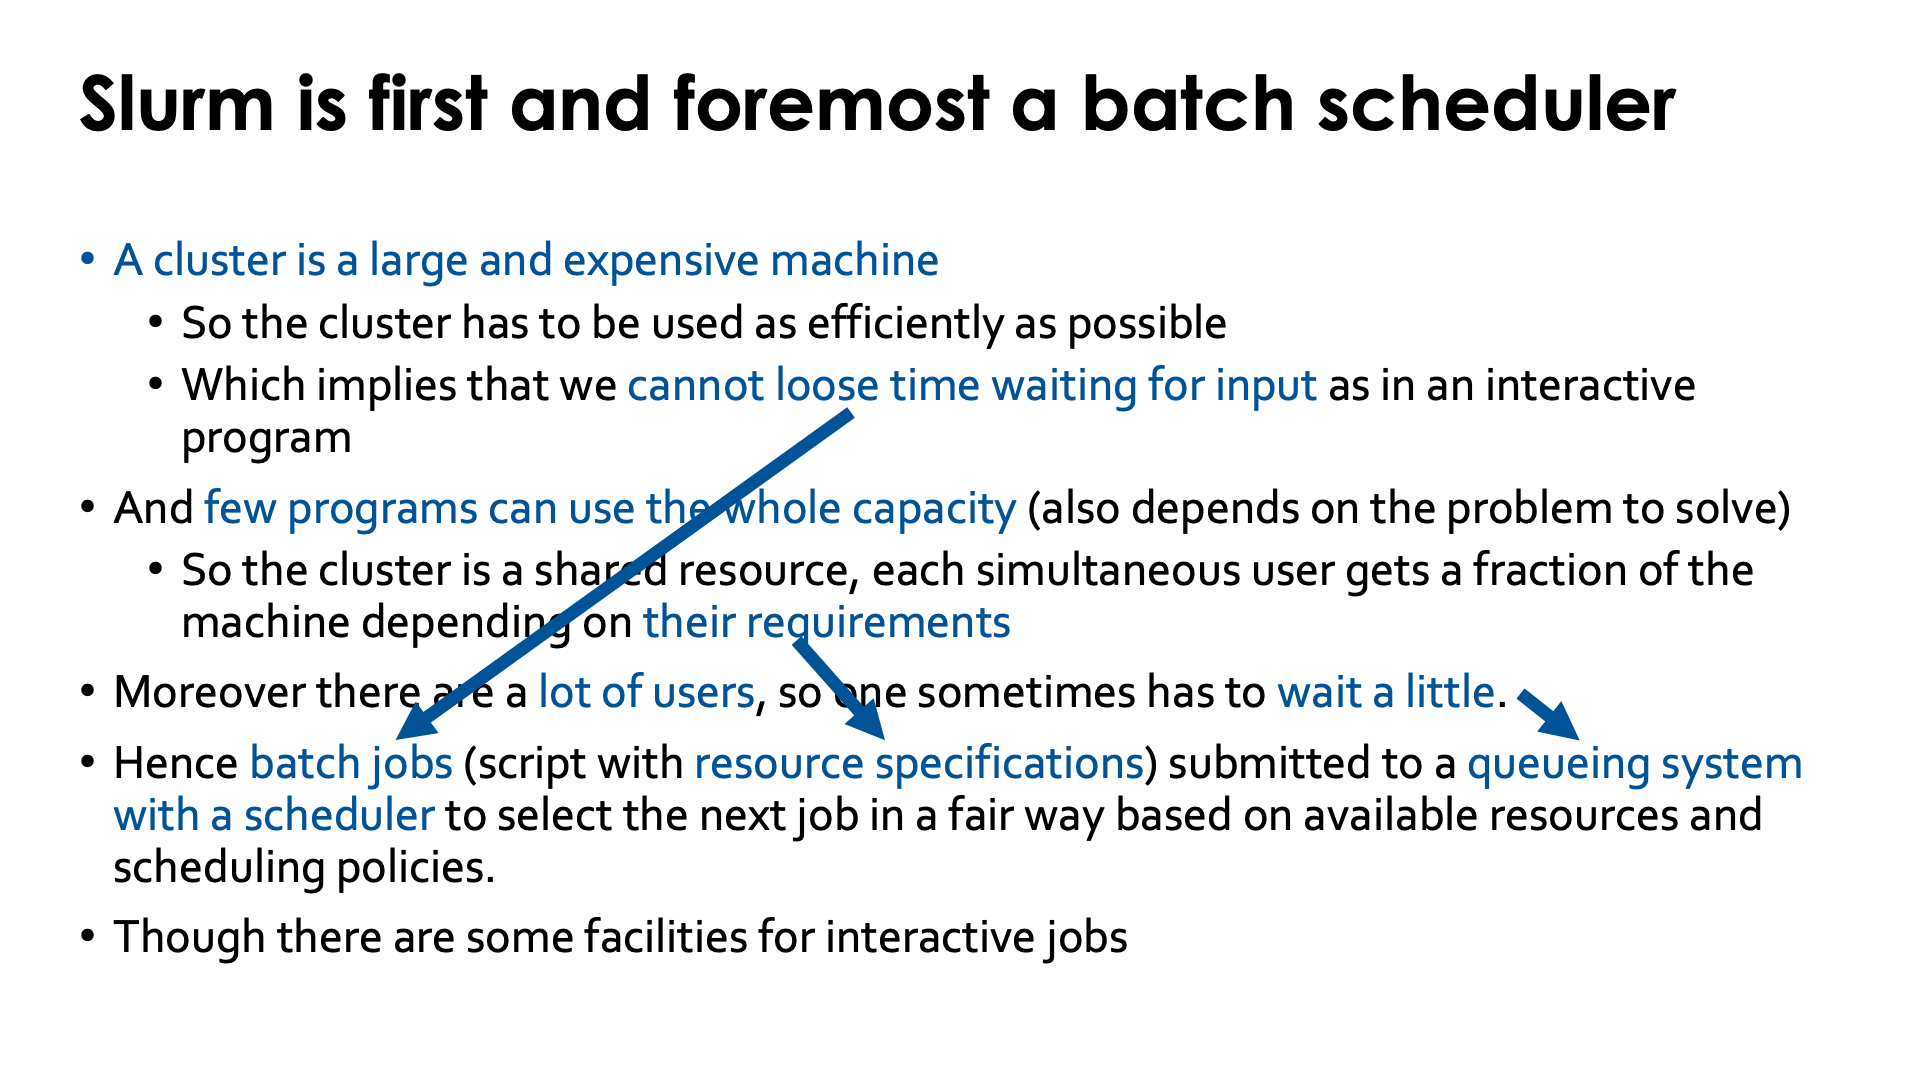
And LUMI is in the first place a batch processing supercomputer.
A supercomputer like LUMI is a very large and very expensive machine. This implies that it also has to be used as efficiently as possible which in turn implies that we don't want to wast time waiting for input as is the case in an interactive program.
On top of that, very few programs can use the whole capacity of the supercomputer, so in practice a supercomputer is a shared resource and each simultaneous user gets a fraction on the machine depending on the requirements that they specify. Yet, as parallel applications work best when performance is predictable, it is also important to isolate users enough from each other.
Research supercomputers are also typically very busy with lots of users so one often has to wait a little before resources are available. This may be different on some commercial supercomputers and is also different on commercial cloud infrastructures, but the "price per unit of work done on the cluster" is also very different from an academic supercomputer and few or no funding agencies are willing to carry that cost.
Due to all this the preferred execution model on supercomputer is via batch jobs as they don't have to wait for input from the user, specified via batch scripts with resource specification where the user asks precisely the amount of resources needed for the job, submitted to a queueing system with a scheduler to select the next job in a fair way based on available resources and scheduling policies set by the compute centre.
LUMI does have some facilities for interactive jobs, and with the introduction of Open On Demand some more may be available. But it is far from ideal, and you will also be billed for the idle time of the resources you request. In fact, if you only need some interactive resources for a quick 10-minute experiment and don't need too many resources, the wait may be minimal thanks to a scheduler mechanism called backfill where the scheduler looks for small and short jobs to fill up the gaps left while the scheduler is collecting resources for a big job.
A Slurm batch script
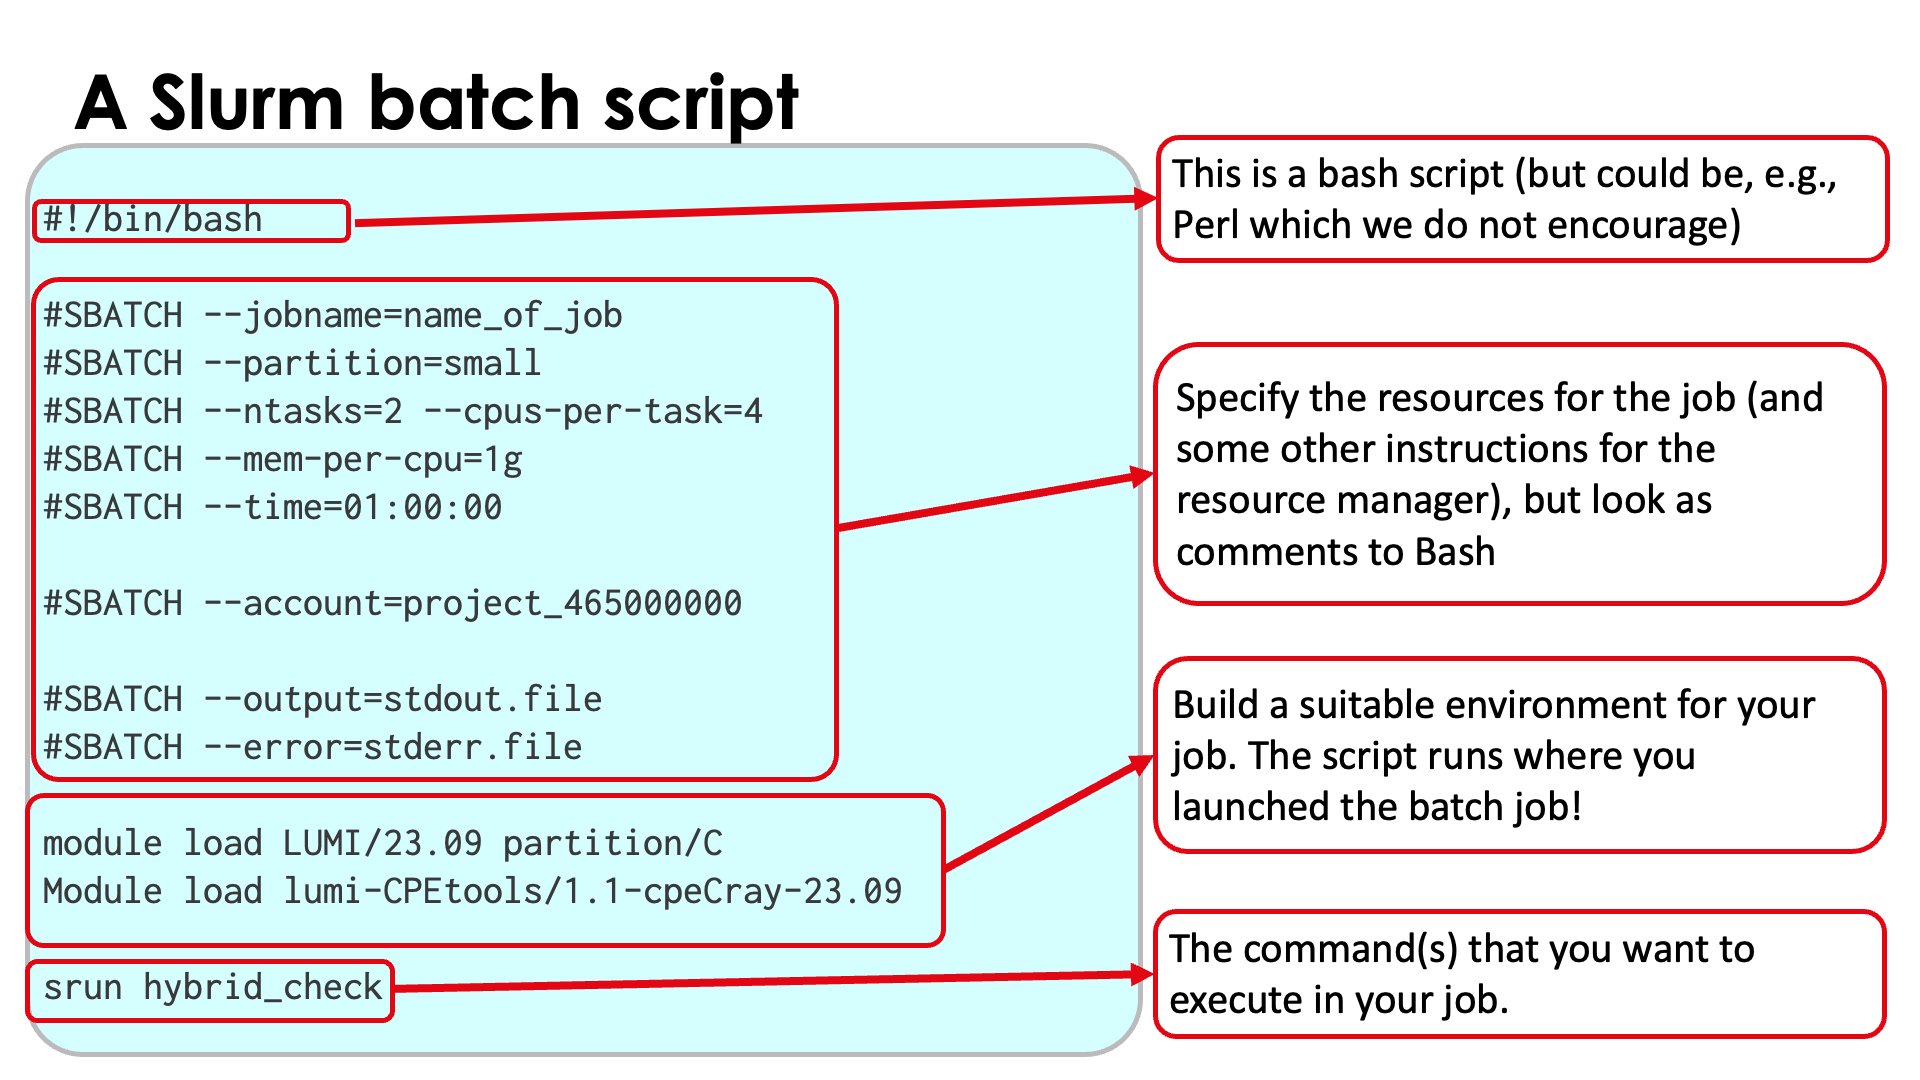
Slurm batch scripts (also called job scripts) are conceptually not that different from batch scripts for other HPC schedulers. A typical batch script will have 4 parts:
-
The shebang line with the shell to use. We advise to use the bash shell (
/bin/bashor/usr/bin/bash) If omitted, a very restricted shell will be used and some commands (e.g., related to modules) may fail. In principle any shell language that uses a hashtag to denote comments can be used, but we would advise against experimenting and the LUMI User Support Team and VSC support teams will only support bash. -
Specification of resources and some other instructions for the scheduler and resource manager. This part is also optional as one can also pass the instructions via the command line of
sbatch, the command to submit a batch job. But again, we would advise against omitting this block as specifying all options on the command line can be very tedious. -
Building a suitable environment for the job. This part is also optional as on LUMI, Slurm will copy the environment from the node from which the job was submitted. This may not be the ideal envrionment for your job, and if you later resubmit the job you may do so accidentally from a different environment so it is a good practice to specify the environment.
-
The commands you want to execute.
Blocks 3 and 4 can of course be mixed as you may want to execute a second command in a different environment.
On the following slides we will explore in particular the second block and to some extent how to start programs (the fourth block).
lumi-CPEtools module
The lumi-CPEtools module
will be used a lot in this session of the course and in the next one on binding. It contains among
other things a number of programs to quickly visualise how a serial, OpenMP, MPI or hybrid OpenMP/MPI
application would run on LUMI and which cores and GPUs would be used. It is a very useful tool to
discover how Slurm options work without using a lot of billing units and we would advise you to
use it whenever you suspect Slurm isn't doing what you meant to do.
It has its documentation page in the LUMI Software Library.
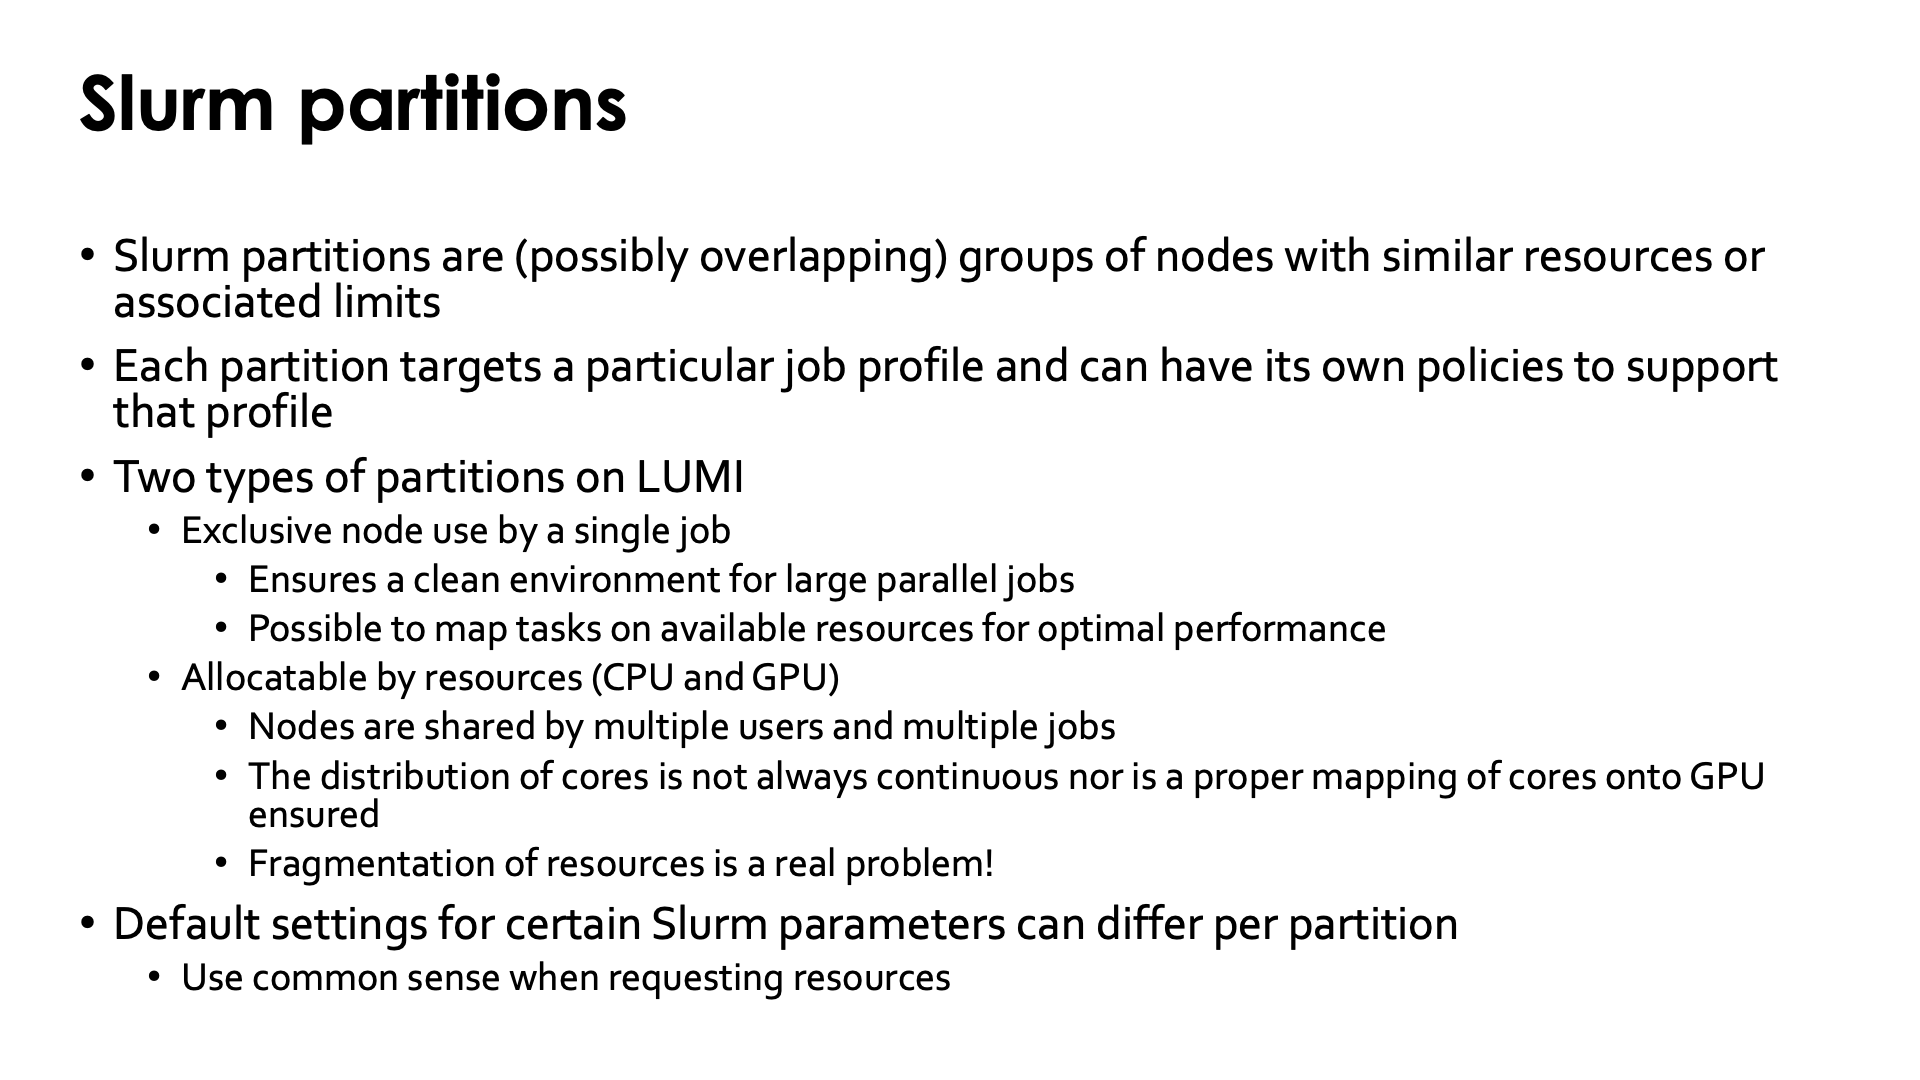
Partitions
Remark
Jobs run in partitions so the first thing we should wonder when setting up a job is which partition to use for a job (or sometimes partitions in case of a heterogeneous job which will be discussed later).
Slurm partitions are possibly overlapping groups of nodes with similar resources or associated limits. Each partition typically targets a particular job profile. E.g., LUMI has partitions for large multi-node jobs, for smaller jobs that often cannot fill a node, for some quick debug work and for some special resources that are very limited (the nodes with 4TB of memory and the nodes with GPUs for visualisation). The number of jobs a user can have running simultaneously in each partition or have in the queue, the maximum wall time for a job, the number of nodes a job can use are all different for different partitions.
There are two types of partitions on LUMI:
-
Exclusive node use by a single job. This ensures that parallel jobs can have a clean environment with no jitter caused by other users running on the node and with full control of how tasks and threads are mapped onto the available resources. This may be essential for the performance of a lot of codes.
-
Allocatable by resources (CPU and GPU). In these partitions nodes are shared by multiple users and multiple jobs, though in principle it is possible to ask for exclusive use which will however increase your waiting time in the queue. The cores you get are not always continuously numbered, nor do you always get the minimum number of nodes needed for the number of tasks requested. A proper mapping of cores onto GPUs is also not ensured at all. The fragmentation of resources is a real problem on these nodes and this may be an issue for the performance of your code.
It is also important to realise that the default settings for certain Slurm parameters may differ between partitions and hence a node in a partition allocatable by resource but for which exclusive access was requested may still react differently to a node in the exclusive partitions.
In general it is important to use some common sense when requesting resources and to have some understanding of what each Slurm parameter really means. Overspecifying resources (using more parameters than needed for the desired effect) may result in unexpected conflicts between parameters and error messages.
For the overview of Slurm partitions, see the LUMI documentation, "Slurm partitions" page. In the overview on the slides we did not mention partitions that are hidden to regular users.
The policies for partitions and the available partitions may change over time to fine tune the operation of LUMI and depending on needs observed by the system administrators and LUMI User Support Team, so don't take the above tables in the slide for granted.
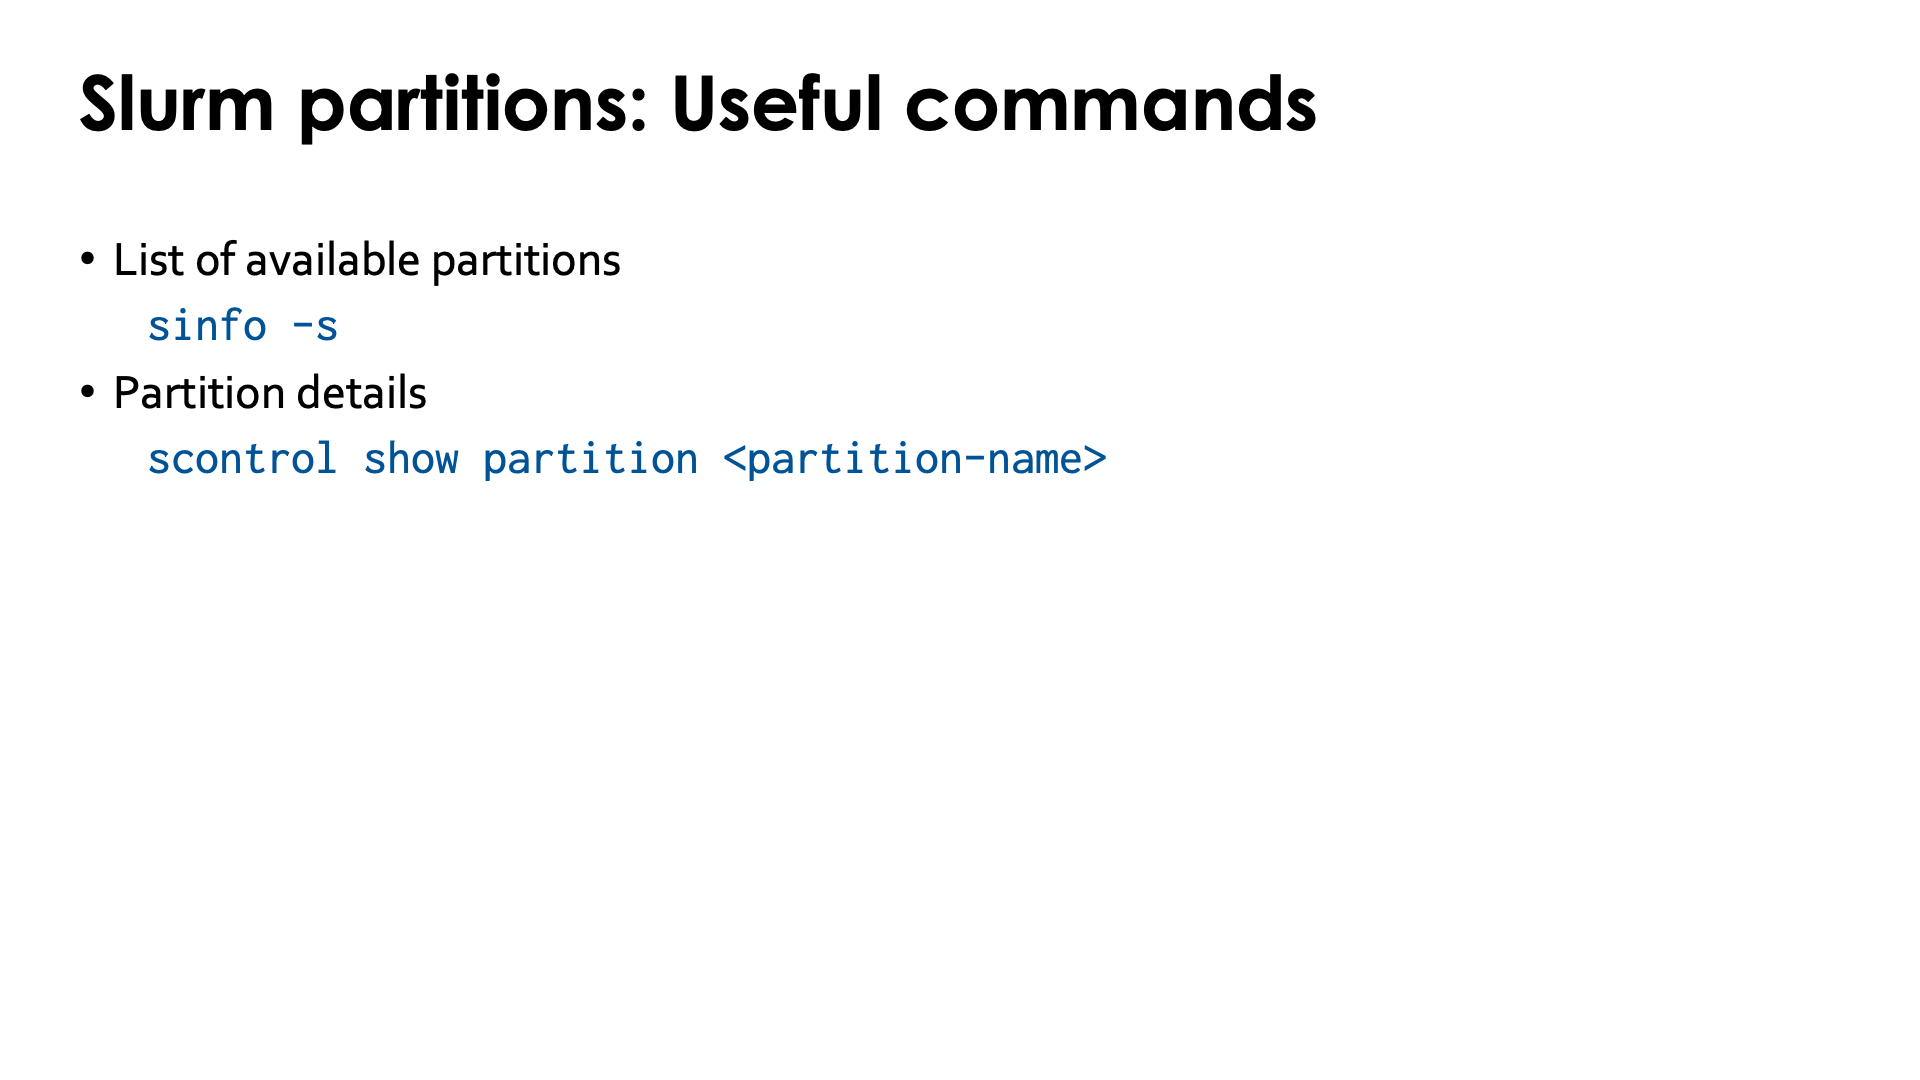
Some useful commands with respect to Slurm partitions:
-
To request information about the available partitions, use
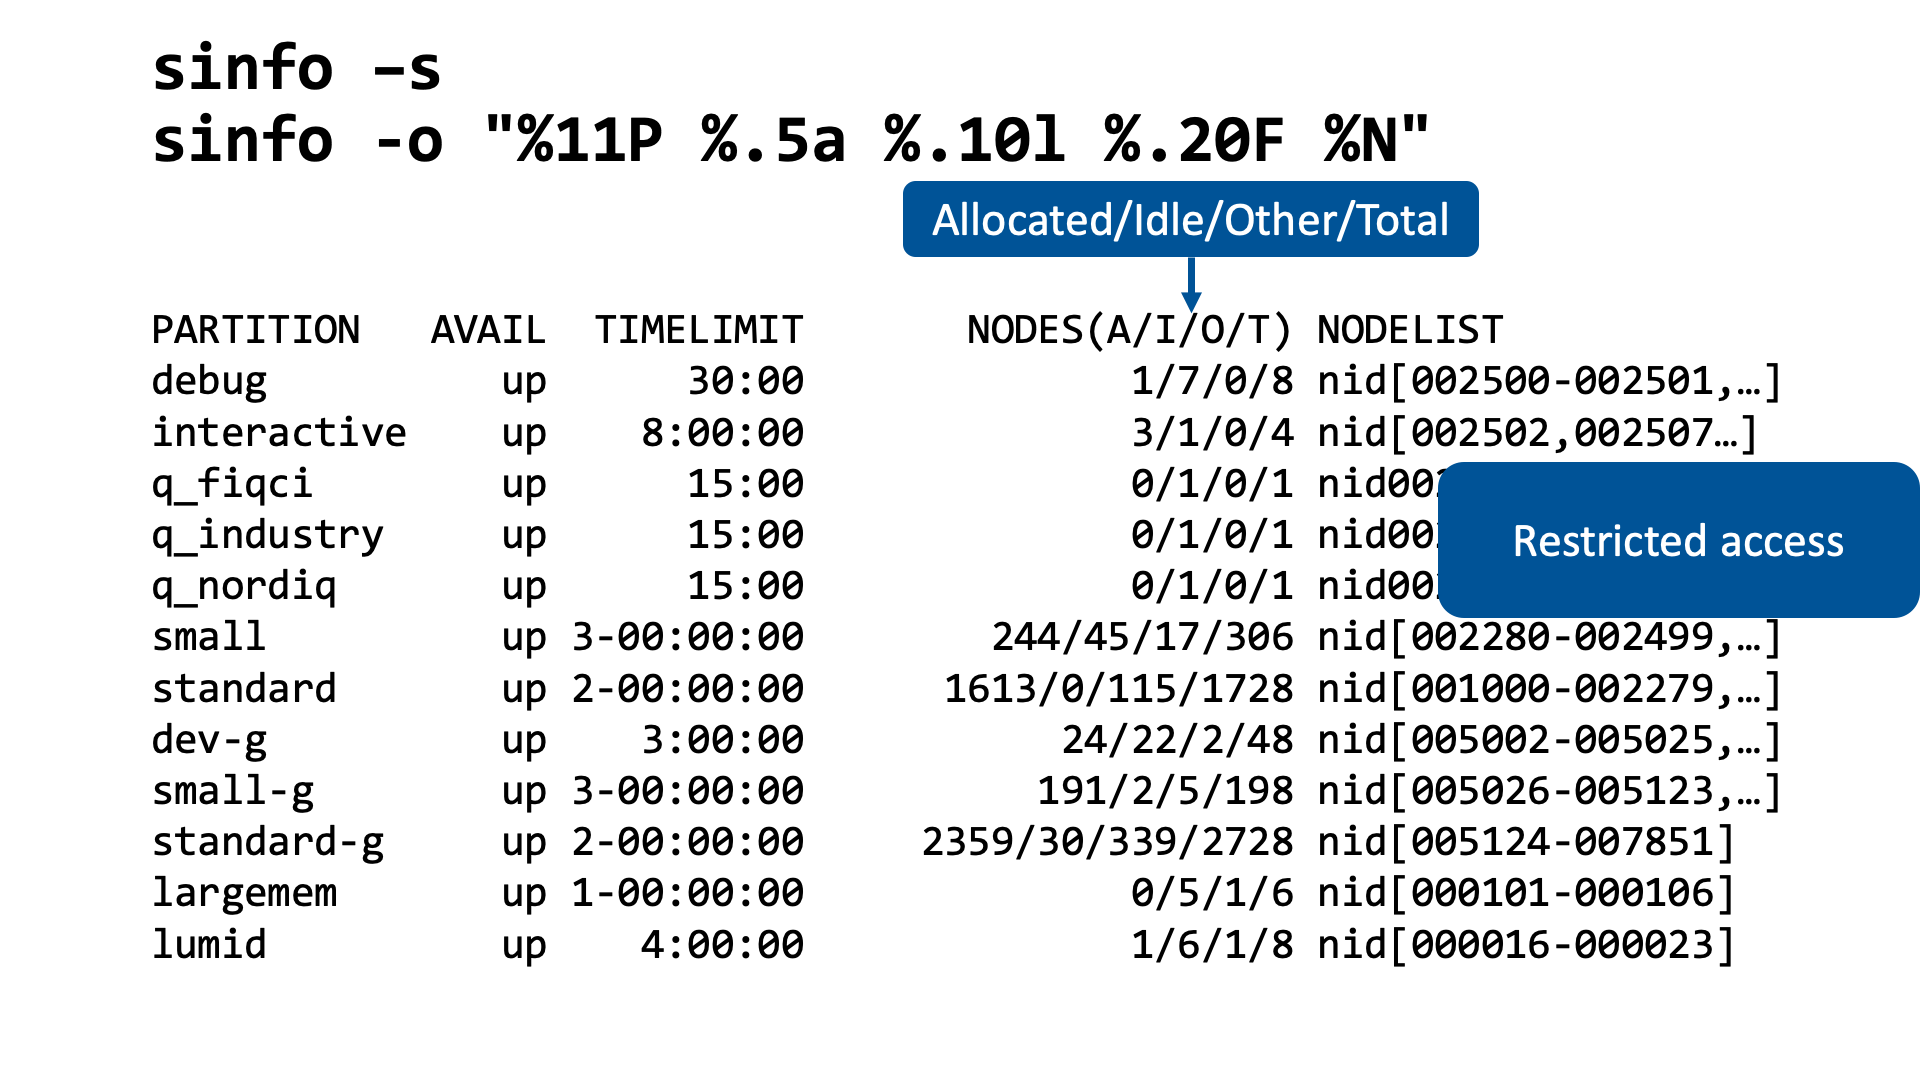
sinfo -s:$ sinfo -s PARTITION AVAIL TIMELIMIT NODES(A/I/O/T) NODELIST debug up 30:00 1/7/0/8 nid[002500-002501,002504-002506,002595-002597] interactive up 8:00:00 2/2/0/4 nid[002502,002507,002594,002599] q_fiqci up 15:00 0/1/0/1 nid002598 q_industry up 15:00 0/1/0/1 nid002598 q_nordiq up 15:00 0/1/0/1 nid002503 small up 3-00:00:00 281/8/17/306 nid[002280-002499,002508-002593] standard up 2-00:00:00 1612/1/115/1728 nid[001000-002279,002600-003047] dev-g up 3:00:00 44/2/2/48 nid[005002-005025,007954-007977] small-g up 3-00:00:00 191/2/5/198 nid[005026-005123,007852-007951] standard-g up 2-00:00:00 1641/749/338/272 nid[005124-007851] largemem up 1-00:00:00 0/5/1/6 nid[000101-000106] lumid up 4:00:00 1/6/1/8 nid[000016-000023]The fourth column shows 4 numbers: The number of nodes that are currently fully or partially allocated to jobs, the number of idle nodes, the number of nodes in one of the other possible states (and not user-accessible) and the total number of nodes in the partition. Sometimes a large number of nodes can be in the "O" column, e.g., when mechanical maintenance is needed (like problem with the cooling). Also note that the width of the
NODESfield is not enough as the total number of nodes forstandard-gdoesn't make sense, but this is easyly solved, e.g., usingsinfo -o "%11P %.5a %.10l %.20F %N"Note that this overview may show partitions that are not hidden but also not accessible to everyone. E.g., the
q_nordicandq_fiqcipartitions are used to access experimental quantum computers that are only available to some users of those countries that paid for those machines, which does not include Belgium.It is not clear to the LUMI Support Team what the
interactivepartition, that uses dome GPU nodes, is meant for as it was introduced without informing the support. The resources in that partition are very limited so it is not meant for widespread use. -
For technically-oriented people, some more details about a partition can be obtained with
scontrol show partition <partition-name>.
Additional example with sinfo
Try
$ sinfo --format "%4D %10P %25f %.4c %.8m %25G %N"
NODE PARTITION  AVAIL_FEATURES            CPUS   MEMORY GRES                      NODELIST
5    debug      AMD_EPYC_7763,x1005        256   229376 (null)                    nid[002500-002501,002504-002506]
3    debug      AMD_EPYC_7763,x1006        256   229376 (null)                    nid[002595-002597]
2    interactiv AMD_EPYC_7763,x1005        256   229376 (null)                    nid[002502,002507]
2    interactiv AMD_EPYC_7763,x1006        256   229376 (null)                    nid[002594,002599]
256  ju-standar AMD_EPYC_7763,x1001        256   229376 (null)                    nid[001256-001511]
256  ju-standar AMD_EPYC_7763,x1004        256   229376 (null)                    nid[002024-002279]
96   ju-standar AMD_EPYC_7763,x1006        256   229376 (null)                    nid[002600-002695]
256  ju-strateg AMD_EPYC_7763,x1000        256   229376 (null)                    nid[001000-001255]
1    q_fiqci    AMD_EPYC_7763,x1006        256   229376 (null)                    nid002598
1    q_industry AMD_EPYC_7763,x1006        256   229376 (null)                    nid002598
1    q_nordiq   AMD_EPYC_7763,x1005        256   229376 (null)                    nid002503
248  small      AMD_EPYC_7763,x1005        256  229376+ (null)                    nid[002280-002499,002508-002535]
58   small      AMD_EPYC_7763,x1006        256   229376 (null)                    nid[002536-002593]
256  standard   AMD_EPYC_7763,x1003        256   229376 (null)                    nid[001768-002023]
256  standard   AMD_EPYC_7763,x1002        256   229376 (null)                    nid[001512-001767]
256  standard   AMD_EPYC_7763,x1007        256   229376 (null)                    nid[002792-003047]
96   standard   AMD_EPYC_7763,x1006        256   229376 (null)                    nid[002696-002791]
2    dev-g      AMD_EPYC_7A53,x1405        128   491520 gpu:mi250:8               nid[007974-007975]
22   dev-g      AMD_EPYC_7A53,x1405        128   491520 gpu:mi250:8(S:0)          nid[007954-007973,007976-007977]
24   dev-g      AMD_EPYC_7A53,x1100        128   491520 gpu:mi250:8(S:0)          nid[005002-005025]
2    ju-standar AMD_EPYC_7A53,x1102        128   491520 gpu:mi250:8               nid[005356-005357]
7    ju-standar AMD_EPYC_7A53,x1103        128   491520 gpu:mi250:8               nid[005472-005473,005478-005479,005486-005487,005493]
8    ju-standar AMD_EPYC_7A53,x1105        128   491520 gpu:mi250:8               nid[005648-005649,005679,005682-005683,005735,005738-005739]
2    ju-standar AMD_EPYC_7A53,x1200        128   491520 gpu:mi250:8               nid[005810-005811]
3    ju-standar AMD_EPYC_7A53,x1204        128   491520 gpu:mi250:8               nid[006301,006312-006313]
1    ju-standar AMD_EPYC_7A53,x1205        128   491520 gpu:mi250:8               nid006367
2    ju-standar AMD_EPYC_7A53,x1404        128   491520 gpu:mi250:8               nid[007760-007761]
9    ju-standar AMD_EPYC_7A53,x1201        128   491520 gpu:mi250:8               nid[005881,005886-005887,005897,005917,005919,005939,005969,005991]
90   ju-standar AMD_EPYC_7A53,x1102        128   491520 gpu:mi250:8(S:0)          nid[005280-005355,005358-005371]
117  ju-standar AMD_EPYC_7A53,x1103        128   491520 gpu:mi250:8(S:0)          nid[005372-005471,005474-005477,005480-005485,005488-005492,005494-005495]
116  ju-standar AMD_EPYC_7A53,x1105        128   491520 gpu:mi250:8(S:0)          nid[005620-005647,005650-005678,005680-005681,005684-005734,005736-005737,005740-005743]
122  ju-standar AMD_EPYC_7A53,x1200        128   491520 gpu:mi250:8(S:0)          nid[005744-005809,005812-005867]
115  ju-standar AMD_EPYC_7A53,x1201        128   491520 gpu:mi250:8(S:0)          nid[005868-005880,005882-005885,005888-005896,005898-005916,005918,005920-005938,005940-005968,005970-005990]
121  ju-standar AMD_EPYC_7A53,x1204        128   491520 gpu:mi250:8(S:0)          nid[006240-006300,006302-006311,006314-006363]
123  ju-standar AMD_EPYC_7A53,x1205        128   491520 gpu:mi250:8(S:0)          nid[006364-006366,006368-006487]
122  ju-standar AMD_EPYC_7A53,x1404        128   491520 gpu:mi250:8(S:0)          nid[007728-007759,007762-007851]
3    ju-strateg AMD_EPYC_7A53,x1101        128   491520 gpu:mi250:8               nid[005224,005242-005243]
8    ju-strateg AMD_EPYC_7A53,x1203        128   491520 gpu:mi250:8               nid[006136-006137,006153,006201,006214-006215,006236-006237]
5    ju-strateg AMD_EPYC_7A53,x1202        128   491520 gpu:mi250:8               nid[006035,006041,006047,006080-006081]
121  ju-strateg AMD_EPYC_7A53,x1101        128   491520 gpu:mi250:8(S:0)          nid[005124-005223,005225-005241,005244-005247]
32   ju-strateg AMD_EPYC_7A53,x1102        128   491520 gpu:mi250:8(S:0)          nid[005248-005279]
116  ju-strateg AMD_EPYC_7A53,x1203        128   491520 gpu:mi250:8(S:0)          nid[006116-006135,006138-006152,006154-006200,006202-006213,006216-006235,006238-006239]
119  ju-strateg AMD_EPYC_7A53,x1202        128   491520 gpu:mi250:8(S:0)          nid[005992-006034,006036-006040,006042-006046,006048-006079,006082-006115]
1    small-g    AMD_EPYC_7A53,x1100        128   491520 gpu:mi250:8               nid005059
97   small-g    AMD_EPYC_7A53,x1100        128   491520 gpu:mi250:8(S:0)          nid[005026-005058,005060-005123]
100  small-g    AMD_EPYC_7A53,x1405        128   491520 gpu:mi250:8(S:0)          nid[007852-007951]
2    standard-g AMD_EPYC_7A53,x1104        128   491520 gpu:mi250:8               nid[005554-005555]
117  standard-g AMD_EPYC_7A53,x1300        128   491520 gpu:mi250:8(S:0)          nid[006488-006505,006510-006521,006524-006550,006552-006611]
7    standard-g AMD_EPYC_7A53,x1300        128   491520 gpu:mi250:8               nid[006506-006509,006522-006523,006551]
121  standard-g AMD_EPYC_7A53,x1301        128   491520 gpu:mi250:8(S:0)          nid[006612-006657,006660-006703,006705-006735]
3    standard-g AMD_EPYC_7A53,x1301        128   491520 gpu:mi250:8               nid[006658-006659,006704]
117  standard-g AMD_EPYC_7A53,x1302        128   491520 gpu:mi250:8(S:0)          nid[006736-006740,006744-006765,006768-006849,006852-006859]
7    standard-g AMD_EPYC_7A53,x1302        128   491520 gpu:mi250:8               nid[006741-006743,006766-006767,006850-006851]
8    standard-g AMD_EPYC_7A53,x1304        128   491520 gpu:mi250:8               nid[007000-007001,007044-007045,007076-007077,007092-007093]
5    standard-g AMD_EPYC_7A53,x1305        128   491520 gpu:mi250:8               nid[007130-007131,007172-007173,007211]
2    standard-g AMD_EPYC_7A53,x1400        128   491520 gpu:mi250:8               nid[007294-007295]
1    standard-g AMD_EPYC_7A53,x1401        128   491520 gpu:mi250:8               nid007398
1    standard-g AMD_EPYC_7A53,x1403        128   491520 gpu:mi250:8               nid007655
122  standard-g AMD_EPYC_7A53,x1104        128   491520 gpu:mi250:8(S:0)          nid[005496-005553,005556-005619]
124  standard-g AMD_EPYC_7A53,x1303        128   491520 gpu:mi250:8(S:0)          nid[006860-006983]
116  standard-g AMD_EPYC_7A53,x1304        128   491520 gpu:mi250:8(S:0)          nid[006984-006999,007002-007043,007046-007075,007078-007091,007094-007107]
119  standard-g AMD_EPYC_7A53,x1305        128   491520 gpu:mi250:8(S:0)          nid[007108-007129,007132-007171,007174-007210,007212-007231]
122  standard-g AMD_EPYC_7A53,x1400        128   491520 gpu:mi250:8(S:0)          nid[007232-007293,007296-007355]
123  standard-g AMD_EPYC_7A53,x1401        128   491520 gpu:mi250:8(S:0)          nid[007356-007397,007399-007479]
124  standard-g AMD_EPYC_7A53,x1402        128   491520 gpu:mi250:8(S:0)          nid[007480-007603]
123  standard-g AMD_EPYC_7A53,x1403        128   491520 gpu:mi250:8(S:0)          nid[007604-007654,007656-007727]
6    largemem   AMD_EPYC_7742              256 4096000+ (null)                    nid[000101-000106]
8    lumid      AMD_EPYC_7742              256  2048000 gpu:a40:8,nvme:40000      nid[000016-000023]
This shows more information about the system. The xNNNN feature corresponds to groups in
the Slingshot interconnect and may be useful if you want to try to get a job running in
a single group (which is too advanced for this course).
The memory size is given in megabyte (MiB, multiples of 1024). The "+" in the second group of the small partition is because that partition also contains the 512 GB and 1 TB regular compute nodes. The memory reported is always 32 GB less than you would expect from the node specifications. This is because 32 GB on each node is reserved for the OS and the RAM disk it needs.
Accounting of jobs

The use of resources by a job is billed to projects, not users. All management is also
done at the project level, not at the "user-in-a-project" level.
As users can have multiple projects, the system cannot know to which project a job
should be billed, so it is mandatory to specify a project account (of the form
project_46YXXXXXX) with every command that creates an allocation.
Billing on LUMI is not based on which resources you effectively use, but on the amount of resources that others cannot use well because of your allocation. This assumes that you make proportional use of CPU cores, CPU memory and GPUs (actually GCDs). If you job makes a disproportionally high use of one of those resources, you will be billed based on that use. For the CPU nodes, the billing is based on both the number of cores you request in your allocation and the amount of memory compared to the amount of memory per core in a regular node, and the highest of the two numbers is used. For the GPU nodes, the formula looks at the number of cores compared to he number of cores per GPU, the amount of CPU memory compared to the amount of memory per GCD (so 64 GB), and the amount of GPUs and the highest amount determines for how many GCDs you will be billed (with a cost of 0.5 GPU-hour per hour per GCD). For jobs in job-exclusive partitions you are automatically billed for the full node as no other job can use that node, so 128 core-hours per hour for the standard partition or 4 GPU-hours per hour for the standard-g partition.
E.g., if you would ask for only one core but 128 GB of memory, half of what a regular LUMI-C node has, you'd be billed for the use of 64 cores. Or assume you want to use only one GCD but want to use 16 cores and 256 GB of system RAM with it, then you would be billed for 4 GPUs/GCDs: 256 GB of memory makes it impossible for other users to use 4 GPUs/GCDs in the system, and 16 cores make it impossible to use 2 GPUs/GCDs, so the highest number of those is 4, which means that you will pay 2 GPU-hours per hour that you use the allocation (as GPU-hours are based on a full MI250x and not on a GCD which is the GPU for Slurm).
This billing policy is unreasonable!
Users who have no experience with performance optimisation may think this way of billing is unfair. After all, there may be users who need far less than 2 GB of memory per core so they could still use the other cores on a node where I am using only one core but 128 GB of memory, right? Well, no, and this has everything to do with the very hierarchical nature of a modern compute node, with on LUMI-C 2 sockets, 4 NUMA domains per socket, and 2 L3 cache domains per NUMA domain. Assuming your job would get the first core on the first socket (called core 0 and socket 0 as computers tend to number from 0). Linux will then allocate the memory of the job as close as possible to that core, so it will fill up the 4 NUMA domains of that socket. It can migrate unused memory to the other socket, but let's assume your code does not only need 128 GB but also accesses bits and pieces from it everywhere all the time. Another application running on socket 0 may then get part or all of its memory on socket 1, and the latency to access that memory is more than 3 times higher, so performance of that application will suffer. In other words, the other cores in socket 0 cannot be used with full efficiency.
This is not a hypothetical scenario. The author of this text has seem benchmarks run on one of the largest systems in Flanders that didn't scale at all and for some core configuration ran at only 10% of the speed they should have been running at...
Still, even with this billing policy Slurm on LUMI is a far from perfect scheduler and core, GPU and memory allocation on the non-exclusive partitions are far from optimal. Which is why we spend a section of the course on binding applications to resources.
The billing is done in a postprocessing step in the system based on data from the Slurm job database, but the Slurm accounting features do not produce the correct numbers. E.g., Slurm counts the core hours based on the virtual cores so the numbers are double of what they should be. There are two ways to check the state of an allocation, though both work with some delay.
-
The
lumi-workspacesandlumi-allocationscommands show the total amount of billing units consumed. In regular operation of the system these numbers are updated approximately once an hour.lumi-workspacesis the all-in command that intends to show all information that is useful to a regular user, whilelumi-allocationsis a specialised tool that only shows billing units, but he numbers shown by both tools come from the same database and are identical. -
For projects managed via Puhuri, Puhuri can show billing unit use per month, but the delay is larger than with the
lumi-workspacescommand.
Billing unit use per user in a project
The current project management system in LUMI cannot show the use of billing units per person within a project.
For storage quota this would be very expensive to organise as quota are managed by Lustre on a group basis.
For CPU and GPU billing units it would in principle be possible as the Slurm database contains the necessary information, but there are no plans to implement such a feature. It is assumed that every PI makes sure that members of their projects use LUMI in a responsible way and ensures that they have sufficient experience to realise what they are doing.
Queueing and fairness

Remark
Jobs are queued until they can run so we should wonder how that system works.
LUMI is a pre-exascale machine meant to foster research into exascale applications.
As a result the scheduler setup of LUMI favours large jobs (though some users with large
jobs will claim that it doesn't do so enough yet). Most nodes are reserved for larger
jobs (in the standard and standard-g partitions), and the priority computation
also favours larger jobs (in terms of number of nodes).
When you submit a job, it will be queued until suitable resources are available for the requested time window. Each job has a priority attached to it which the scheduler computes based on a number of factors, such as size of the job, how much you have been running in the past days, and how long the job has been waiting already. LUMI is not a first come, first served system. Keep in mind that you may see a lot of free nodes on LUMI yet your small job may not yet start immediately as the scheduler may be gathering nodes for a big job with a higher priority.
The sprio command will list the different elements that determine the priority of your job but
is basically a command for system administrators as users cannot influence those numbers nor do
they say a lot unless you understand all intricacies of the job policies chosen by the site,
and those policies may be fine-tuned over time to optimise the operation of the cluster.
The fairshare parameter influences the priority of jobs depending on how much users or projects
(this is not clear to us at the moment) have been running jobs in the past few days and is a
very dangerous parameter on a supercomputer where the largest project is over 1000 times the size
of the smallest projects, as treating all projects equally for the fair share would make it impossible
for big projects to consume all their CPU time.
Another concept of the scheduler on LUMI is backfill. On a system supporting very large jobs as LUMI, the scheduler will often be collecting nodes to run those large jobs, and this may take a while, particularly since the maximal wall time for a job in the standard partitions is rather large for such a system. If you need one quarter of the nodes for a big job on a partition on which most users would launch jobs that use the full two days of walltime, one can expect that it takes half a day to gather those nodes. However, the LUMI scheduler will schedule short jobs even though they have a lower priority on the nodes already collected if it expects that those jobs will be finisehd before it expects to have all nodes for the big job. This mechanism is called backfill and is the reason why short experiments of half an hour or so often start quickly on LUMI even though the queue is very long.
Managing Slurm jobs
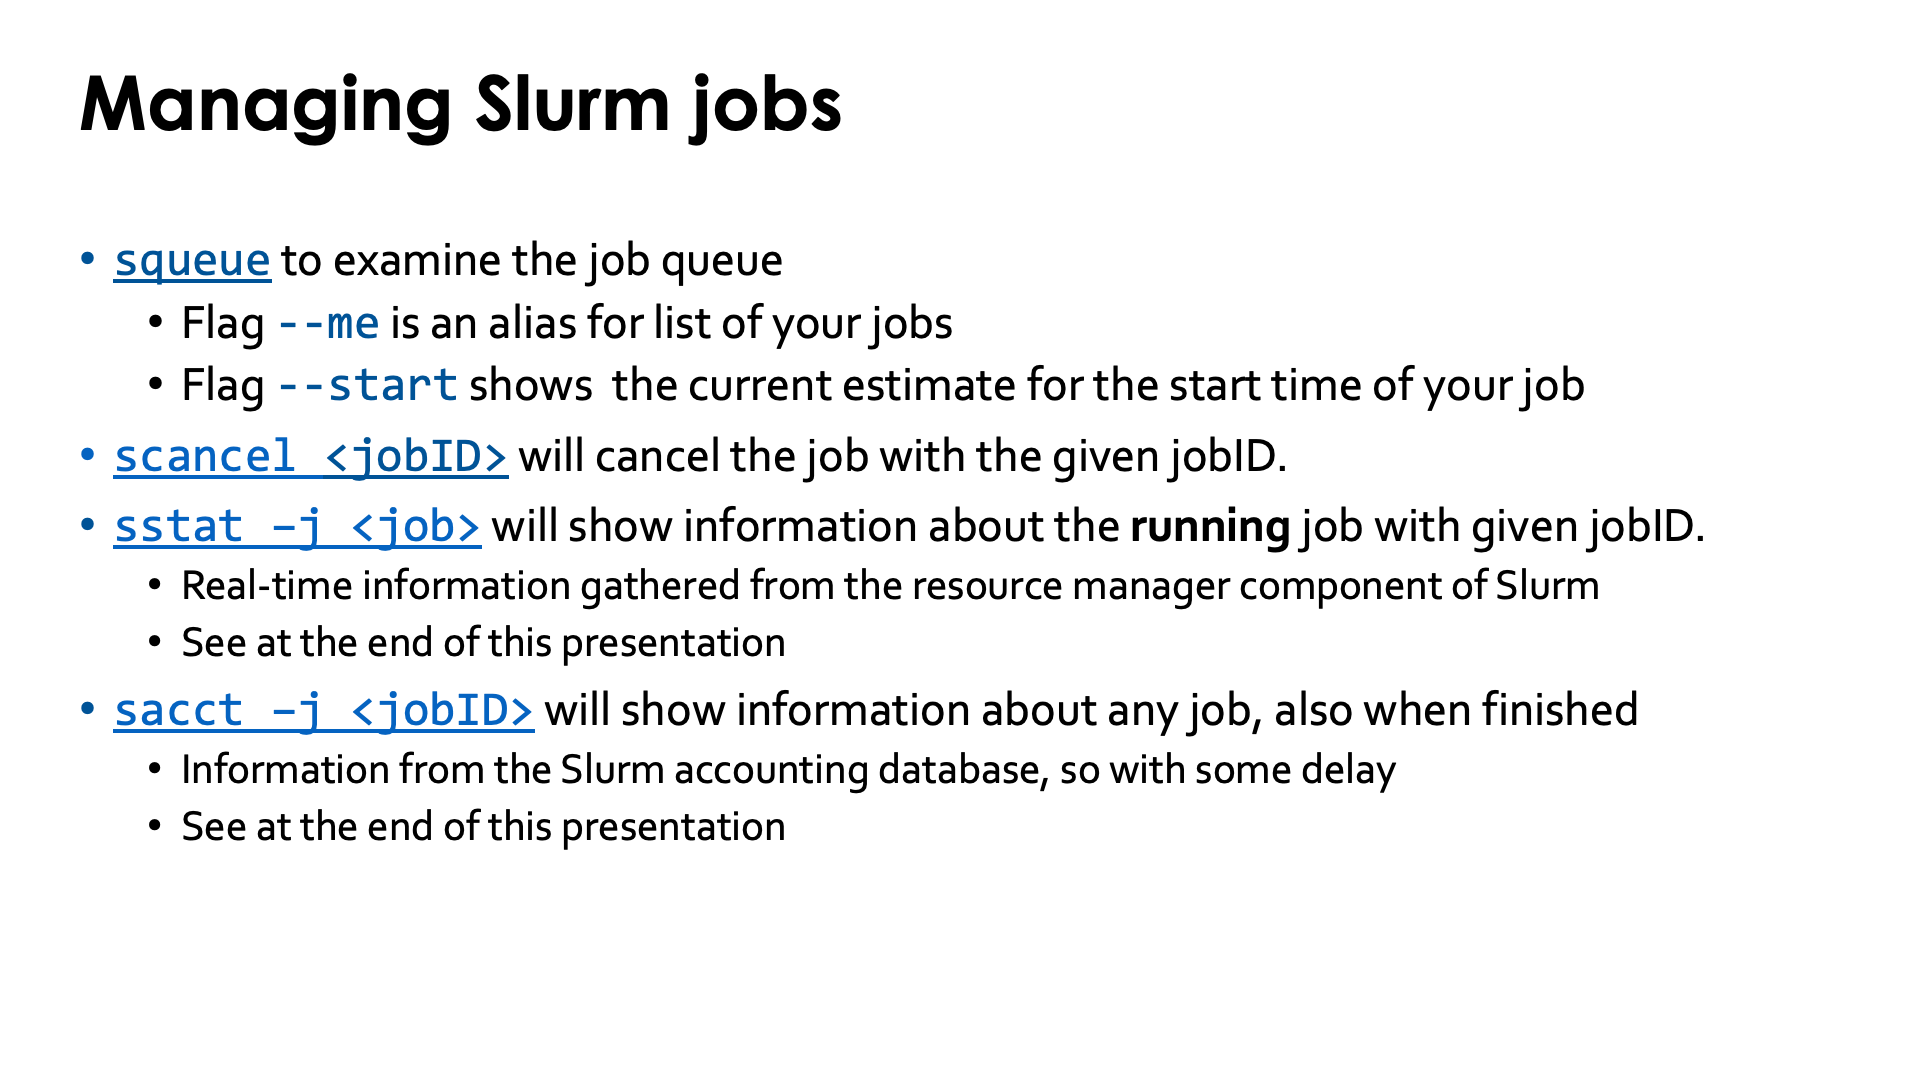
Before experimenting with jobs on LUMI, it is good to discuss how to manage those jobs. We will not discuss the commands in detail and instead refer to the pretty decent manual pages that in fact can also be found on the web.
-
The command to check the status of the queue is
squeue. It is also a good command to find out the job IDs of your jobs if you didn't write them down after submitting the job.Two command line flags are useful:
-
--mewill restrict the output to your jobs only -
--startwill give an estimated start time for each job. Note that this really doesn't say much as the scheduler cannot predict the future. On one hand, other jobs that are running already or scheduled to run before your job, may have overestimated the time they need and end early. But on the other hand, the scheduler does not use a "first come, first serve" policy so another user may submit a job that gets a higher priority than yours, pushing back the start time of your job. So it is basically a random number generator.
-
-
To delete a job, use
scancel <jobID> -
An important command to manage jobs while they are running is
sstat -j <jobID>. This command display real-time information directly gathered from the resource manager component of Slurm and can also be used to show information about individual job steps using the job step identifier (which is in most case<jobID>.0for the first regular job step and so on). We will cover this command in more detail further in the notes of this session. -
The
sacct -j <jobID>command can be used both while the job is running and when the job has finished. It is the main command to get information about a job after the job has finished. All information comes from a database, also while the job is running, so the information is available with some delay compared to the information obtained withsstatfor a running job. It will also produce information about individual job steps. We will cover this command in more detail further in the notes of this session.
The sacct command will also be used in various examples in this section of the tutorial to investigate
the behaviour of Slurm.
Creating a Slurm job
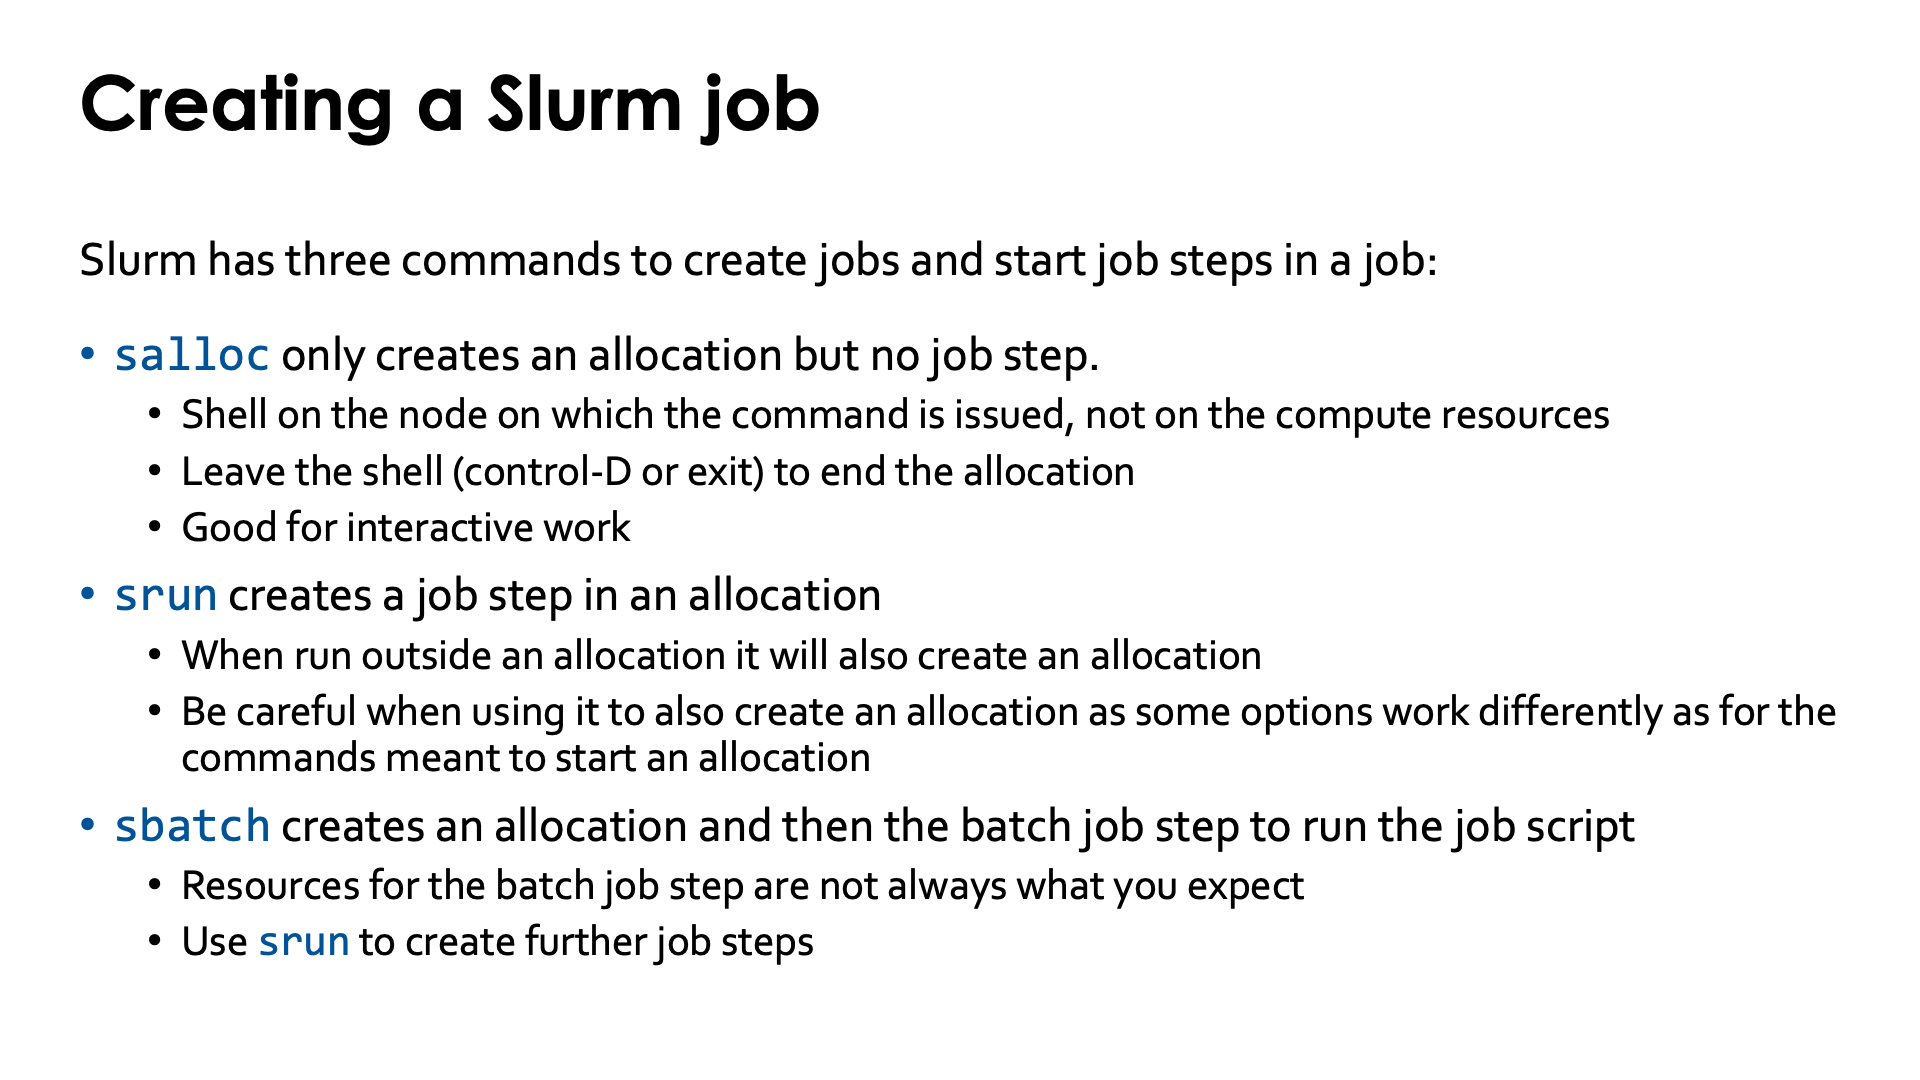
Slurm has three main commands to create jobs and job steps. Remember that a job is just a request for an allocation. Your applications always have to run inside a job step.
The salloc command only creates an allocation but does not create a job step.
The behaviour of salloc differs between clusters!
On LUMI, salloc will put you in a new shell on the node from which you issued
the salloc command, typically the login node. Your allocation will exist until
you exit that shell with the exit command or with the CONTROL-D key combination.
Creating an allocation with salloc is good for interactive work.
Differences in salloc behaviour.
On some systems salloc does not only create a job allocation but will
also create a job step, the so-called "interactive job step" on a node of
the allocation, similar to the way that the sbatch command discussed later
will create a so-called "batch job step".
The main purpose of the srun command is to create a job step in an allocation.
When run outside of a job (outside an allocation) it will also create a job allocation.
However, be careful when using this command to also create the job in which the job step
will run as some options work differently as for the commands meant to create an allocation.
When creating a job with salloc you will have to use srun to start anything on the
node(s) in the allocation as it is not possible to, e.g., reach the nodes with ssh.
The sbatch command both creates a job and then starts a job step, the so-called batch
job step, to run the job script on the first node of the job allocation.
In principle it is possible to start both sequential and shared memory processes
directly in the batch job step without creating a new job step with srun,
but keep in mind that the resources may be different from what you expect to see
in some cases as some of the options given with the sbatch command will only be
enforced when starting another job step from the batch job step. To run any
multi-process job (e.g., MPI) you will have to use srun or a process starter that
internally calls srun to start the job.
When using Cray MPICH as the MPI implementation (and it is the only one that is fully
supported on LUMI) you will have to use srun as the process starter.
Passing options to srun, salloc and sbatch
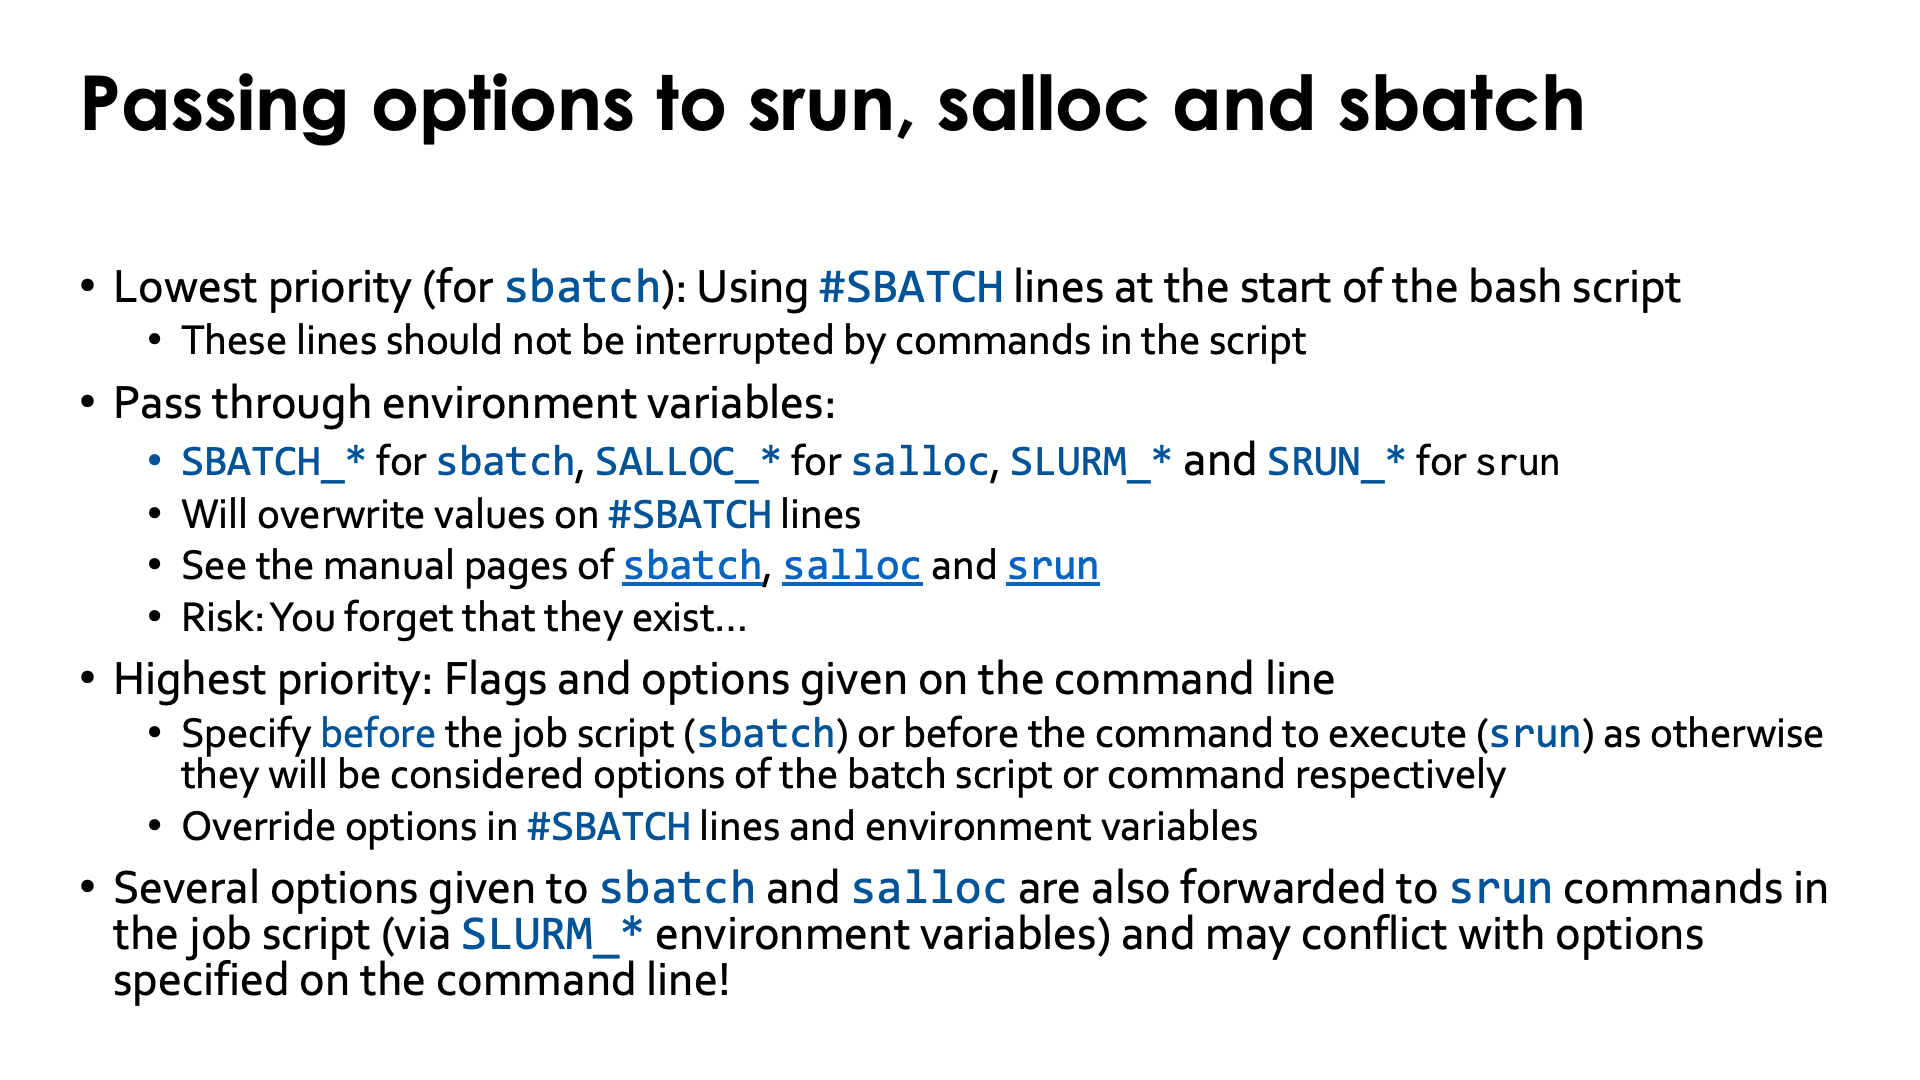
There are several ways to pass options and flags to the srun, salloc and sbatch command.
The lowest priority way and only for the sbatch command is specifying the options (mostly resource-related)
in the batch script itself on #SBATCH lines. These lines should not be interrupted by commands, and it is
not possible to use environment variables to specify values of options.
Higher in priority is specifying options and flags through environment variables.
For the sbatch command this are the SBATCH_* environment variables, for salloc
the SALLOC_* environment variables and for srun the SLURM_* and some SRUN_* environment variables.
For the sbatch command this will overwrite values on the #SBATCH lines. You can find
lists in the manual pages of the
sbatch,
salloc and
srun command.
Specifying command line options via environment variables that are hidden in your
.profile or .bashrc file or any script that you run before starting your work,
is not free of risks. Users often forget that they set those environment variables and
are then surprised that the Slurm commands act differently then expected. E.g., it
is very tempting to set the project account to use in environment variables but if you
then get a second project you may be running inadvertently in the wrong project.
The highest priority is for flags and options given on the command line. The position of
those options is important though. With the sbatch command they have to be specified before
the batch script as otherwise they will be passed to the batch script as command line options for
that script. Likewise, with srun they have to be specified before the command you want to execute
as otherwise they would be passed to that command as flags and options.
Several options specified to sbatch or salloc are also forwarded to srun via SLURM_* environment
variables set in the job by these commands. These may interfere with options specified on the srun
command line and lead to unexpected behaviour.
Example: Conflict between --ntasks and --ntasks-per-node
We'll meet this example later on in these notes,when we discuss starting a job step in per-node allocations. You'll need some Slurm experience to understand this example at this point, but keep it in mind when you read further in these notes.
Two different options to specify the number of tasks in a job step are
--ntasks and --ntasks-per-node. The --ntasks command line options specifies the
total number of tasks for the job step, and these will be distributed across nodes
according to rules we will discuss later. The --ntasks-per-node command line option
on the other hand requests that that number of tasks is launched on each node of
the job (which really only makes sense if you have entire nodes, e.g., in node-exclusive
allocations) and is attractive as it is easy to scale your allocation by just changing
the number of nodes.
Checking the
srun manual page for the --ntasks-per-node option,
you read that the --ntasks option takes precedence and if present,
--ntasks-per-node will be interpreted as the maximum number of tasks per node.
Now depending on how the allocation was made, Slurm may set the environment variables
SLURM_NTASKS and SLURM_NPROCS (the latter for historical reasons) that have the
same effect as specifying --ntasks. So if these environment variables are present in
the environment of your job script, they have effectively the effect of specifying
--ntasks even though you did not specify it explicitly on the srun command line
and --ntasks-per-node will no longer be the exact number of tasks. And this may
happen even if you have never specified any --ntasks flag anywhere simply because
Slurm fills in some defaults for certain parameters when creating an allocation...
Specifying options
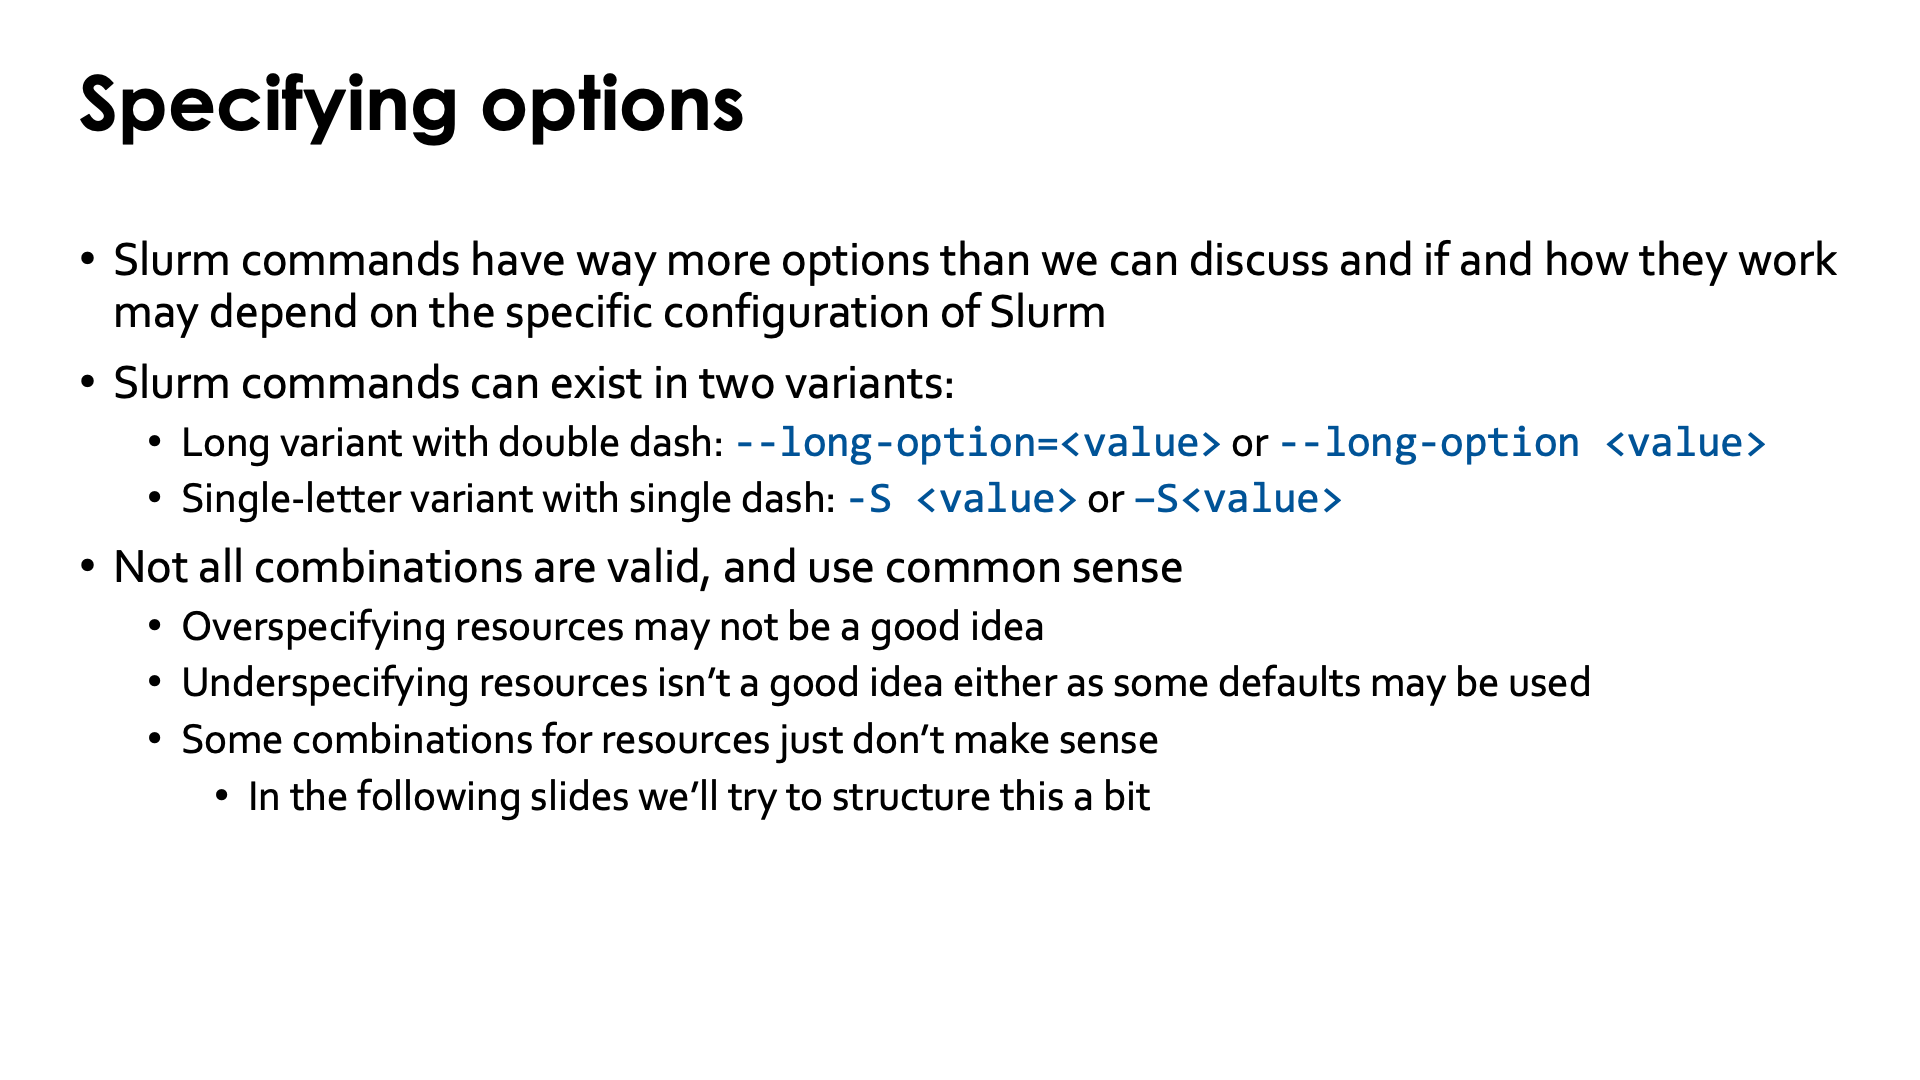
Slurm commands have way more options and flags than we can discuss in this course or even the 4-day comprehensive course organised by the LUMI User Support Team. Moreover, if and how they work may depend on the specific configuration of Slurm. Slurm has so many options that no two clusters are the same.
Slurm command can exist in two variants:
-
The long variant, with a double dash, is of the form
--long-option=<value>or--long-option <value> -
But many popular commands also have a single letter variant, with a single dash:
-S <value>or-S<value>
This is no different from many popular Linux commands.
Slurm commands for creating allocations and job steps have many different flags for specifying the allocation and the organisation of tasks in that allocation. Not all combinations are valid, and it is not possible to sum up all possible configurations for all possible scenarios. Use common sense and if something does not work, check the manual page and try something different. Overspecifying options is not a good idea as you may very well create conflicts, and we will see some examples in this section and the next section on binding. However, underspecifying is not a good idea either as some defaults may be used you didn't think of. Some combinations also just don't make sense, and we will warn for some on the following slides and try to bring some structure in the wealth of options.
Some common options to all partitions
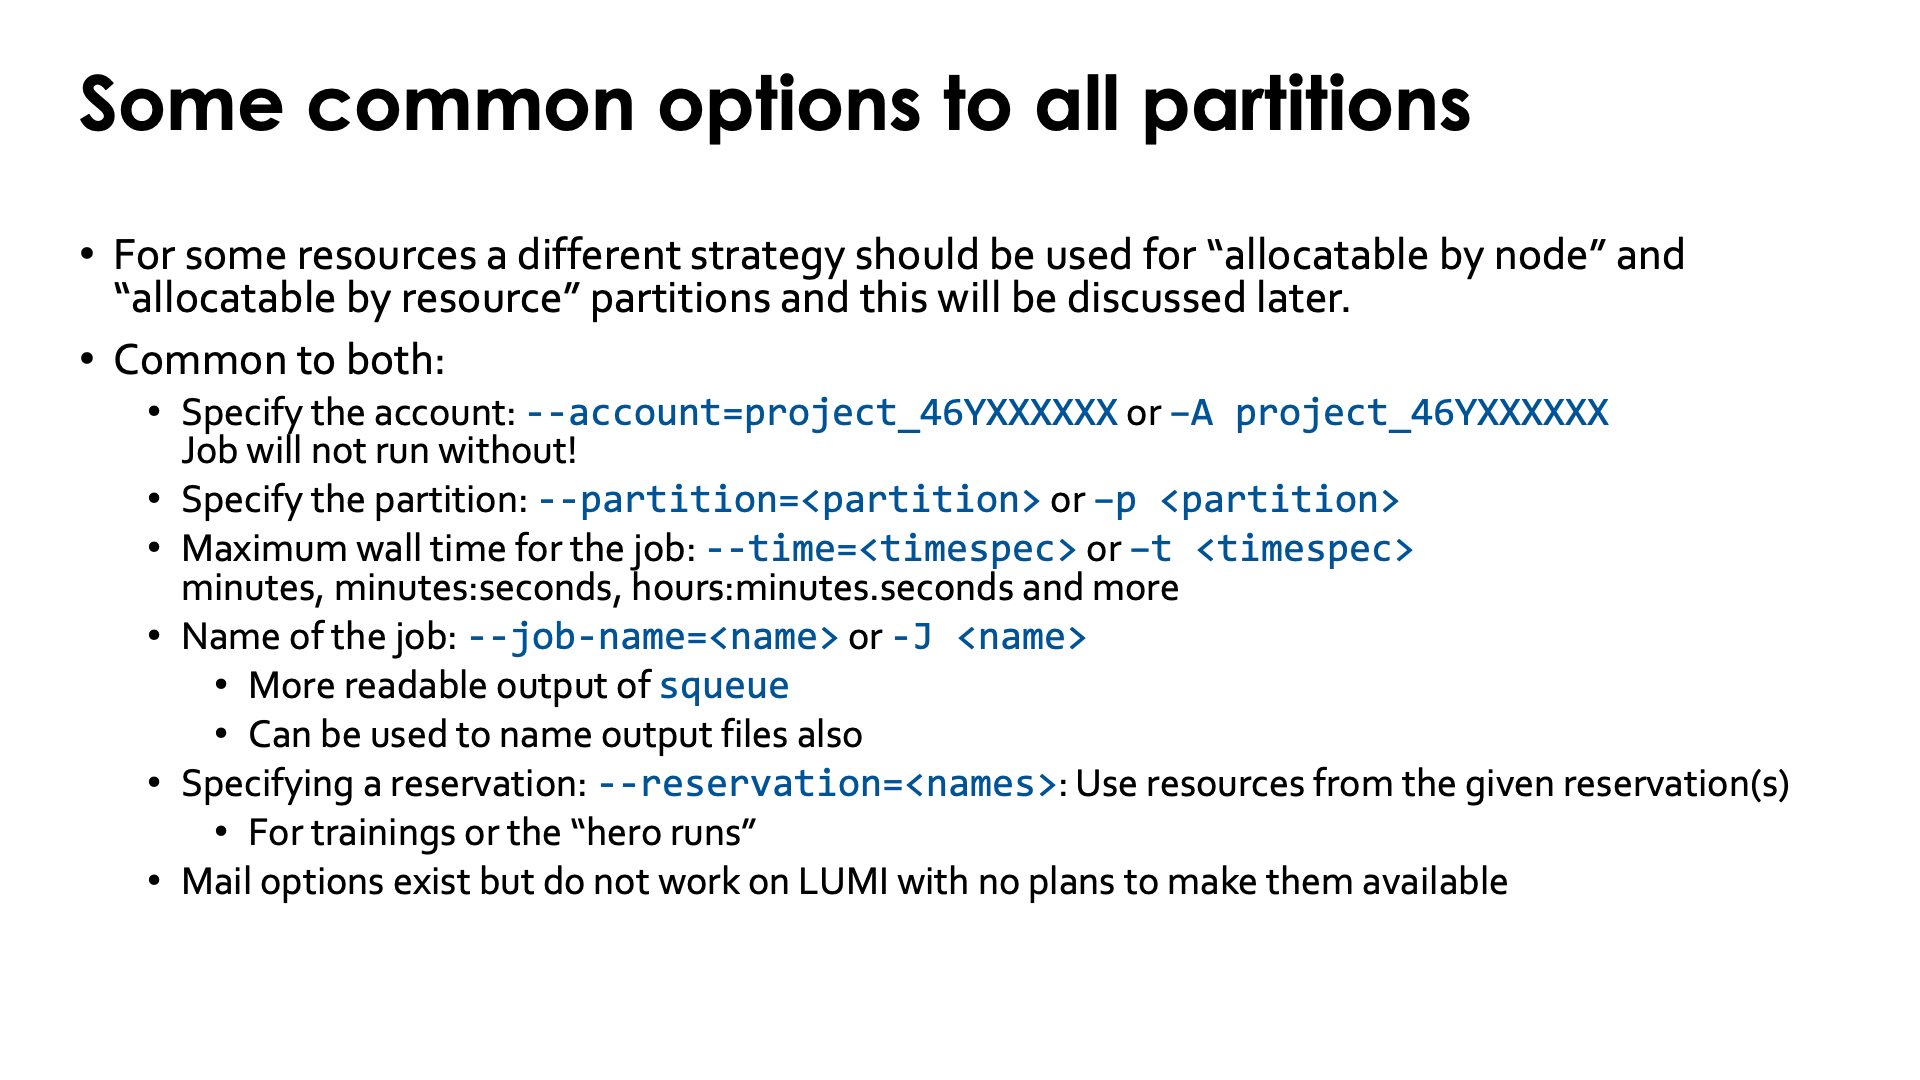
For CPU and GPU requests, a different strategy should be used for "allocatable by node" and "allocatable by resource" partitions,
and this will be discussed later. A number of options however are common to both strategies and will be discussed first.
All are typically used on #SBATCH lines in job scripts, but can also be used on the command line and the first three are
certainly needed with salloc also.
-
Specify the account to which the job should be billed with
--account=project_46YXXXXXXor-A project_46YXXXXXX. This is mandatory; without this your job will not run. -
Specify the partition:
--partition=<partition>or-p <partition>. This option is also necessary on LUMI as there is currently no default partition. -
Specify the wall time for the job:
--time=<timespec>or-t <timespec>. There are multiple formats for the time specifications, but the most common ones are minutes (one number), minutes:seconds (two numbers separated by a colon) and hours:minutes:seconds (three numbers separated by a column). If not specified, the partition-dependent default time is used.It does make sense to make a reasonable estimate for the wall time needed. It does protect you a bit in case your application hangs for some reason, and short jobs that also don't need too many nodes have a high chance of running quicker as they can be used as backfill while the scheduler is gathering nodes for a big job.
-
Completely optional: Specify a name for the job with
--job-name=<name>or-J <name>. Short but clear job names help to make the output ofsqueueeasier to interpret, and the name can be used to generate a name for the output file that captures output to stdout and stderr also. -
For courses or other special opportunities such as the "hero runs" (a system for projects that want to test extreme scalability beyond the limits of the regular partitions), reservations are used. You can specify the reservation (or even multiple reservations as a comma-separated list) with
--reservation=<name>.In principle no reservations are given to regular users for regular work as this is unfair to other users. It would not be possible to do all work in reservations and bypass the scheduler as the scheduling would be extremely complicated and the administration enormous. And empty reservations do not lead to efficient machine use. Schedulers have been developed for a reason.
-
Slurm also has options to send mail to a given address when a job starts or ends or some other job-related events occur, but this is currently not configured on LUMI.
Redirecting output
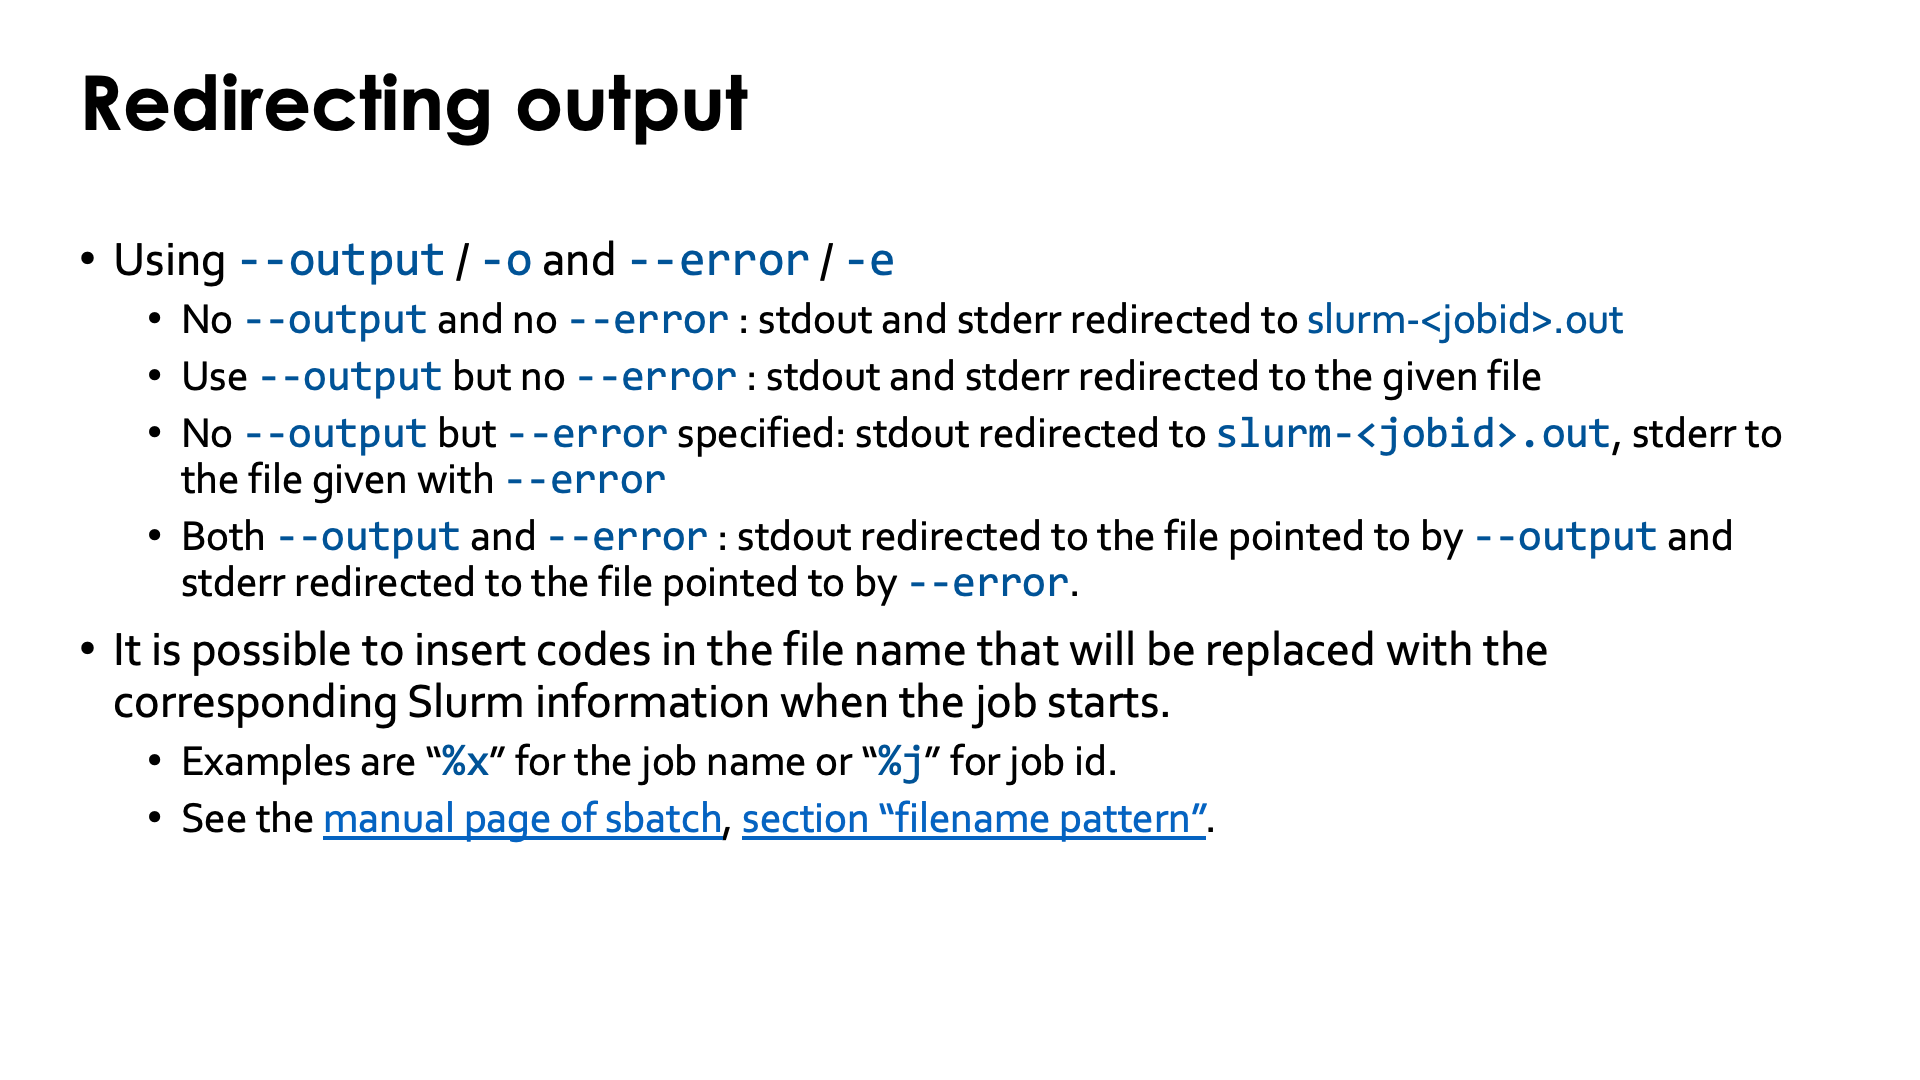
Slurm has two options to redirect stdout and stderr respectively: --output=<template> or -o <template> for stdout
and --error=<template> or -e <template> for stderr. They work together in the following way:
-
If neither
--outputnot--erroris specified, then stdout and stderr are merged and redirected to the fileslurm-<jobid>.out. -
If
--outputis specified but--erroris not, then stdout and stderr are merged and redirected to the file given with--output. -
If
--outputis not specified but--error, then stdout will still be redirected toslurm-<jobid>.out, but stderr will be redirected to the file indicated by the--erroroption. -
If both
--outputand--errorare specified, then stdout is redirected to the file given by--outputand stderr is redirected to the file given by--error.
It is possible to insert codes in the filename that will be replaced at runtime with the corresponding Slurm
information. Examples are %x which will be replaced with the name of the job (that you can then best set with
--job-name) and %j which will be replaced with the job ID (job number). It is recommended to always include
the latter in the template for the filename as this ensures unique names if the same job script would be run a
few times with different input files. Discussing all patterns that can be used for the filename is outside the
scope of this tutorial, but you can find them all in the sbatch manual page
in the "filename pattern" section.
Requesting resources: CPUs and GPUs
Slurm is very flexible in the way resources can be requested. Covering every scenario and every possible way to request CPUs and GPUs is impossible, so we will present a scheme that works for most users and jobs.
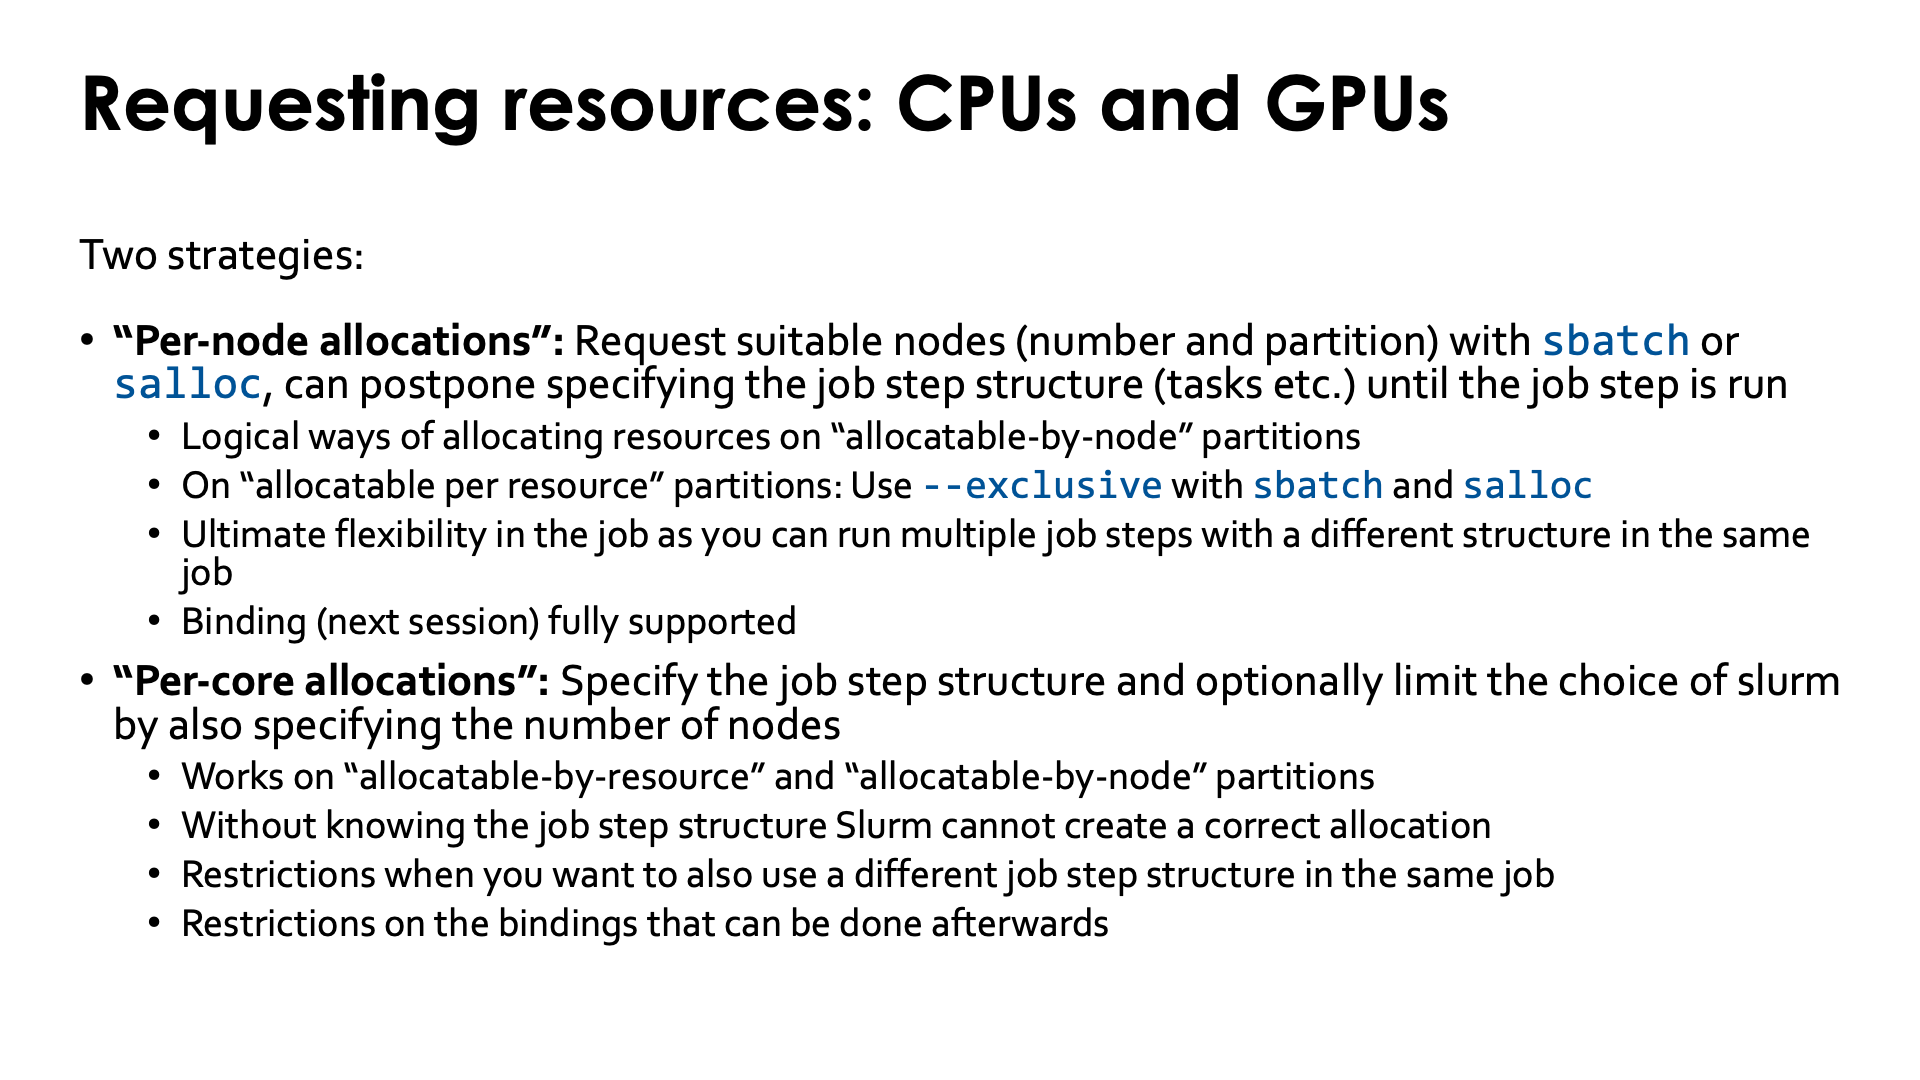
First, you have to distinguish between two strategies for requesting resources, each with their own pros and cons. We'll call them "per-node allocations" and "per-core allocations":
-
"Per-node allocations": Request suitable nodes (number of nodes and partition) with
sbatchorsallocbut postpone specifying the full structure of the job step (i.e., tasks, cpus per task, gpus per task, ...) until you actually start the job step withsrun.This strategy relies on job-exclusive nodes, so works on the
standardandstandard-gpartitions that are "allocatable-by-node" partitions, but can be used on the "allocatable-by-resource" partitions also it the--exclusiveflag is used withsbatchorsalloc(on the command line or with and#SBATCH --exclusiveline forsbatch).This strategy gives you the ultimate flexibility in the job as you can run multiple job steps with a different structure in the same job rather than having to submit multiple jobs with job dependencies to ensure that they are started in the proper order. E.g., you could first have an initialisation step that generates input files in a multi-threaded shared memory program and then run a pure MPI job with a single-threaded process per rank.
This strategy also gives you full control over how the application is mapped onto the available hardware: mapping of MPI ranks across nodes and within nodes, binding of threads to cores, and binding of GPUs to MPI ranks. This will be the topic of the next section of the course and is for some applications very important to get optimal performance on modern supercomputer nodes that have a strongly hierarchical architecture (which in fact is not only the case for AMD processors, but will likely be an issue on some Intel Sapphire Rapids processors also).
The downside is that allocations and hence billing is always per full node, so if you need only half a node you waste a lot of billing units. It shows that to exploit the full power of a supercomputer you really need to have problems and applications that can at least exploit a full node.
-
"Per-core allocations": Specify the full job step structure when creating the job allocation and optionally limit the choice fo Slurm for the resource allocation by specifying a number of nodes that should be used.
The problem is that Slurm cannot create a correct allocation on an "allocatable by resource" partition if it would only know the total number of CPUs and total number of GPUs that you need. Slurm does not automatically allocate the resources on the minimal number of nodes (and even then there could be problems) and cannot know how you intend to use the resources to ensure that the resources are actually useful for you job. E.g., if you ask for 16 cores and Slurm would spread them over two or more nodes, then they would not be useful to run a shared memory program as such a program cannot span nodes. Or if you really want to run an MPI application that needs 4 ranks and 4 cores per rank, then those cores must be assigned in groups of 4 within nodes as an MPI rank cannot span nodes. The same holds for GPUs. If you would ask for 16 cores and 4 GPUs you may still be using them in different ways. Most users will probably intend to start an MPI program with 4 ranks that each use 4 cores and one GPU, and in that case the allocation should be done in groups that each contain 4 cores and 1 GPU but can be spread over up to 4 nodes, but you may as well intend to run a 16-thread shared memory application that also needs 4 GPUs.
The upside of this is that with this strategy you will only get what you really need when used in an "allocatable-by-resources" partition, so if you don't need a full node, you won't be billed for a full node (assuming of course that you don't request that much memory that you basically need a full node's memory).
One downside is that you are now somewhat bound to the job structure. You can run job steps with a different structure, but they may produce a warning or may not run at all if the job step cannot be mapped on the resources allocated to the job.
More importantly, most options to do binding (see the next chapter) cannot be used or don't make sense anyway as there is no guarantee your cores will be allocated in a dense configuration.
However, if you can live with those restrictions and if your job size falls within the limits of the "allocatable per resource" partitions, and cannot fill up the minimal number of nodes that would be used, then this strategy ensures you're only billed for the minimal amount of resources that are made unavailable by your job.
This choice is something you need to think about in advance and there are no easy guidelines. Simply say "use the first strategy if your job fills whole nodes anyway and the second one otherwise" doesn't make sense as your job may be so sensitive to its mapping to resources that it could perform very badly in the second case. The real problem is that there is no good way in Slurm to ask for a number of L3 cache regions (CPU chiplets), a number of NUMA node or a number of sockets and also no easy way to always do the proper binding if you would get resources that way (but that is something that can only be understood after the next session). If a single job needs only a half node and if all jobs take about the same time anyway, it might be better to bundle them by hand in jobs and do a proper mapping of each subjob on the available resources (e.g., in case of two jobs on a CPU node, map each on a socket).
Resources for per-node allocations
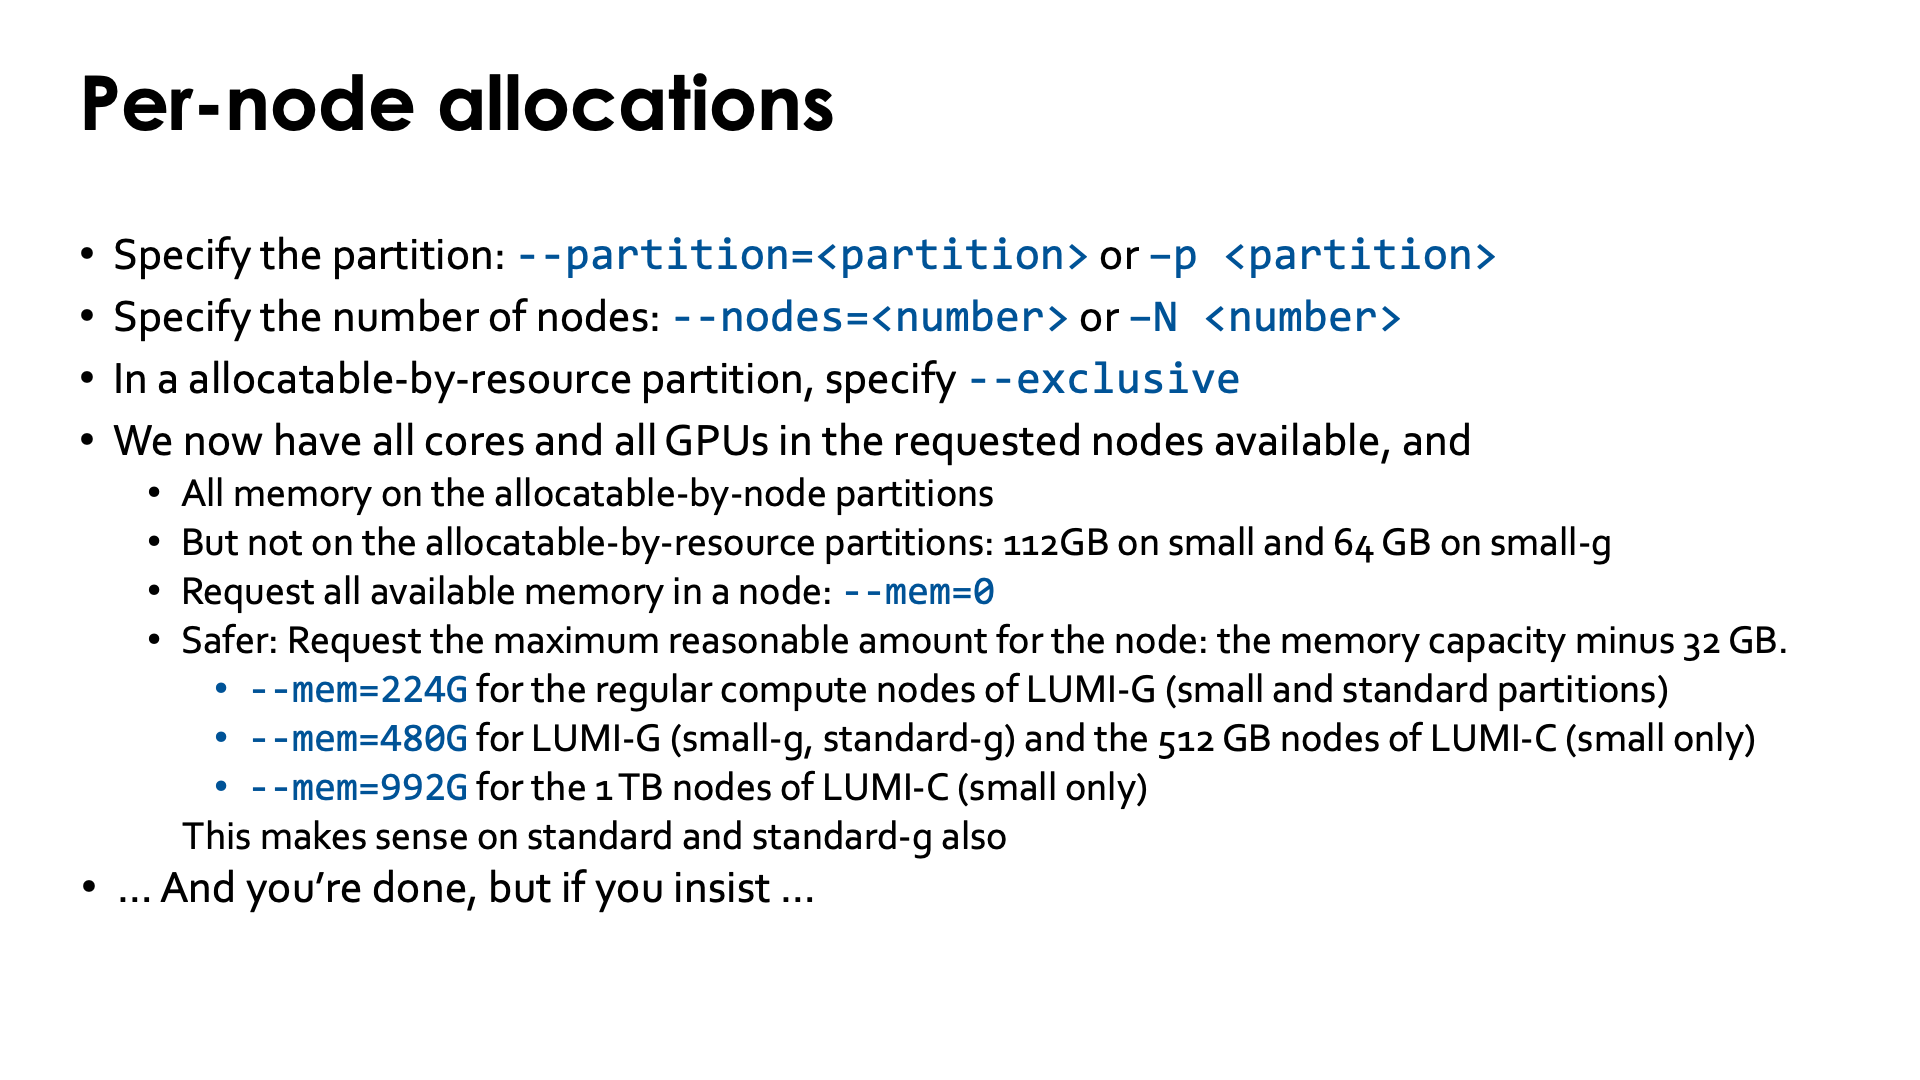
In a per-node allocation, all you need to specify is the partition and the number of nodes needed, and in some cases, the amount of memory. In this scenario, one should use those Slurm options that specify resources per node also.
The partition is specified using --partition=<partition or -p <partition>.
The number of nodes is specified with --nodes=<number_of_nodes> or its short form
-N <number_of_nodes>.
If you want to use a per-node allocation on a partition which is allocatable-by-resources such as small
and small-g, you also need to specify the --exclusive flag. On LUMI this flag does not have the same
effect as running on a partition that is allocatable-by-node. The --exclusive flag does allocate
all cores and GPUs on the node to your job, but the memory use is still limited by other parameters in
the Slurm configuration. In fact, this can also be the case for allocatable-by-node partitions, but there
the limit is set to allow the use of all available memory. Currently the interplay between various parameters
in the Slurm configuration results in a limit of 112 GB of memory on the small partition and 64 GB on the
standard partition when running in --exclusive mode. It is possible to change this with the --mem option.
You can request all memory on a node by using --mem=0. This is currently the default behaviour on nodes in
the standard and standard-g partition so not really needed there. It is needed on all of the partitions
that are allocatable-by-resource.
We've experienced that it may be a better option to actually specify the maximum amount of useable memory on
a node which is the memory capacity of the node you want minus 32 GB, so you can use
--mem=224G for a regular CPU node or --mem=480G for a GPU node. In the past we have had memory leaks on
compute nodes that were not detected by the node health checks, resulting in users getting nodes with less
available memory than expected, but specifying these amounts protected them against getting such nodes.
(And similarly you could use --mem=480G and --mem=992G for the 512 GB and 1 TB compute nodes in the small
partition, but note that running on these nodes is expensive!)
Example jobscript (click to expand)
The following job script runs a shared memory program in the batch job step, which shows that it has access to all hardware threads and all GPUs in a node at that moment:
#! /usr/bin/bash
#SBATCH --job-name=slurm-perNode-minimal-small-g
#SBATCH --partition=small-g
#SBATCH --exclusive
#SBATCH --nodes=1
#SBATCH --mem=480G
#SBATCH --time=2:00
#SBATCH --output=%x-%j.txt
#SBATCH --account=project_46YXXXXXX

module load LUMI/23.09 partition/G lumi-CPEtools/1.1-cpeCray-23.09

gpu_check

sleep 2
echo -e "\nsacct for the job:\n$(sacct -j $SLURM_JOB_ID)\n"
As we are using small-g here instead of standard-g, we added the #SBATCH --exclusive and #SBATCH --mem=480G lines.
A similar job script for a CPU-node in LUMI-C and now in the standard partition would look like:
#! /usr/bin/bash
#SBATCH --job-name=slurm-perNode-minimal-standard
#SBATCH --partition=standard
#SBATCH --nodes=1
#SBATCH --time=2:00
#SBATCH --output=%x-%j.txt
#SBATCH --account=project_46YXXXXXX

module load LUMI/23.09 partition/C lumi-CPEtools/1.1-cpeCray-23.09

omp_check

sleep 2
echo -e "\nsacct for the job:\n$(sacct -j $SLURM_JOB_ID)\n"
gpu_check and omp_check are two programs provided by the lumi-CPEtools modules to check
the allocations. Try man lumi-CPEtools after loading the module. The programs will be used
extensively in the next section on binding also, and are written to check how your program
would behave in the allocation without burning through tons of billing units.
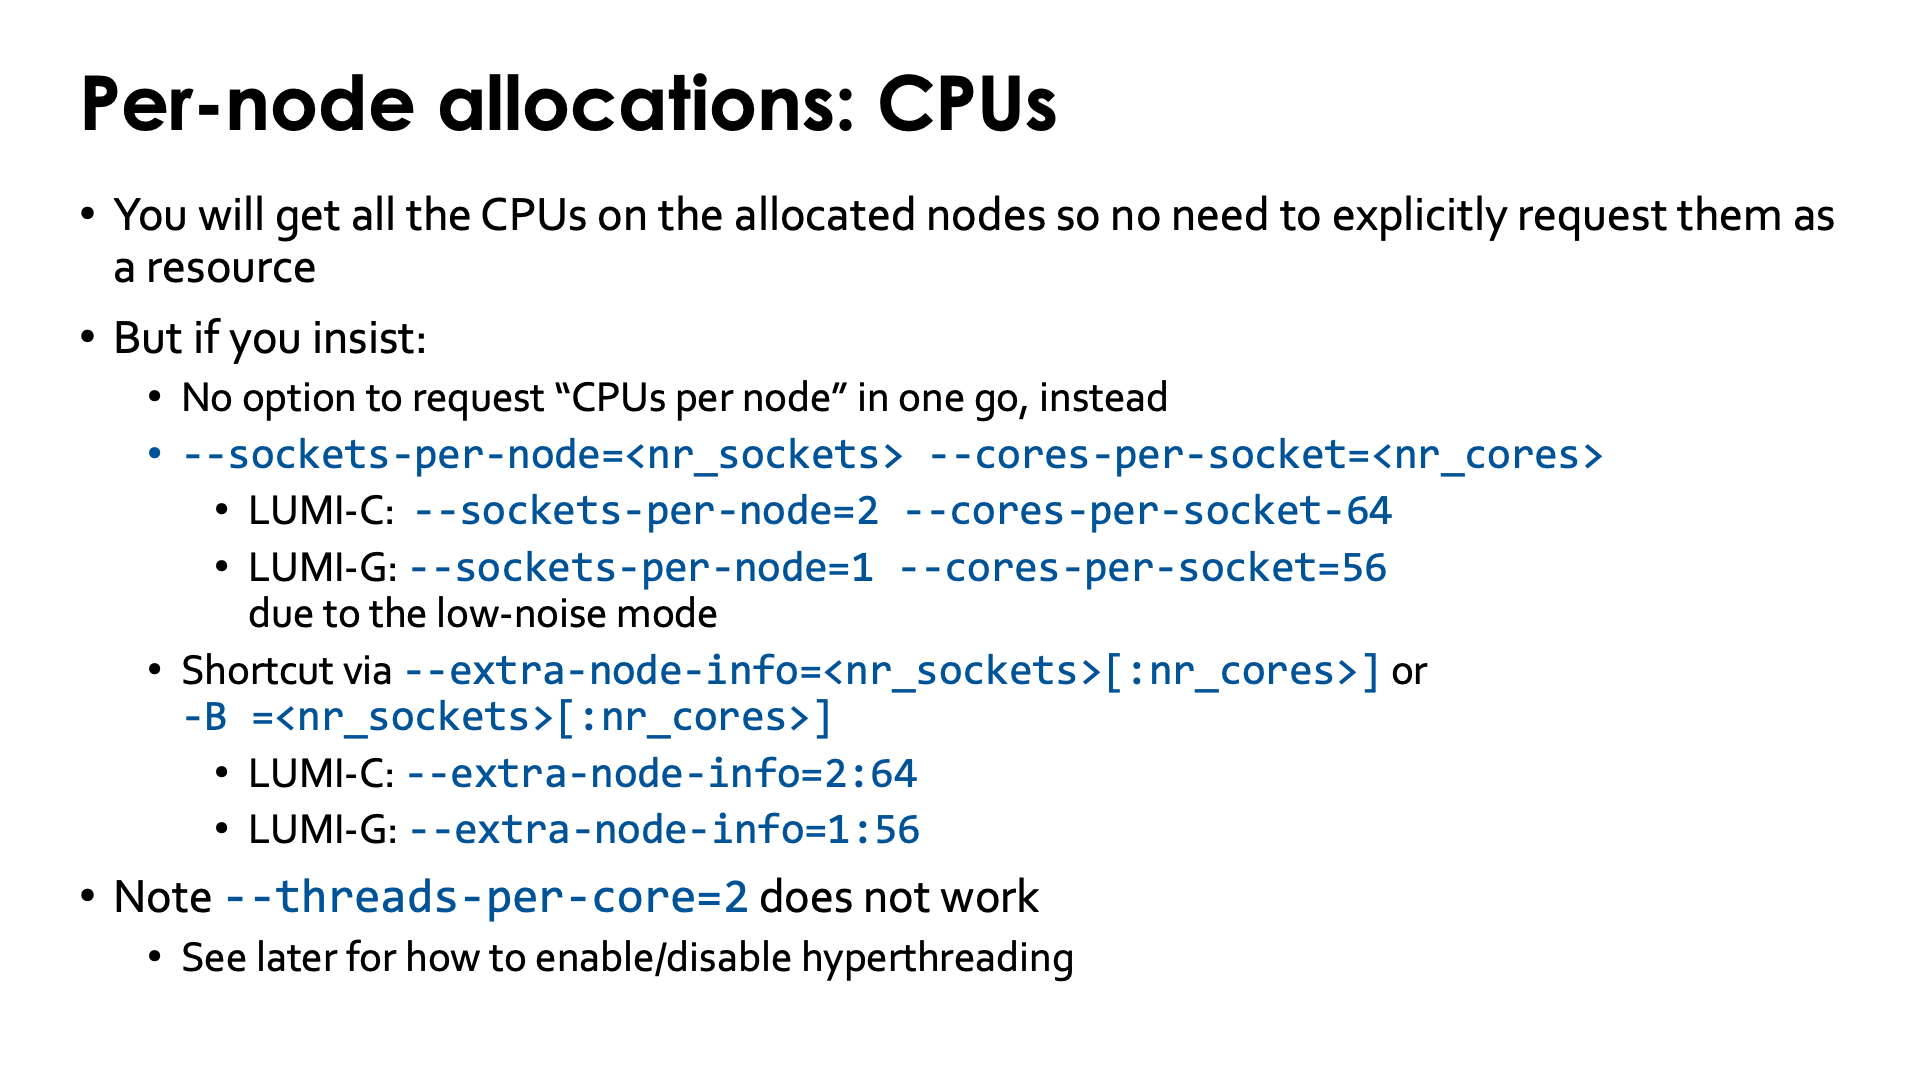
By default you will get all the CPUs in each node that is allocated in a per-node allocation. The Slurm options to request CPUs on a per-node basis are not really useful on LUMI, but might be on clusters with multiple node types in a single partition as they enable you to specify the minimum number of sockets, cores and hardware threads a node should have.
We advise against using the options to request CPUs on LUMI because it is more likely to cause problems due to user error than to solve problems. Some of these options also conflict with options that will be used later in the course.
There is no direct way to specify the number of cores per node. Instead one has to specify the number sockets and then the number of cores per socket and one can specify even the number of hardware threads per core, though we will favour another mechanism later in these course notes.
The two options are:
-
Specify
--sockets-per-node=<socketsand--cores-per-socket=<cores>and maybe even--threads-per-core=<threads>. For LUMI-C the maximal specification is--sockets-per-node=2 --cores-per-socket-64and for LUMI-G
--sockets-per-node=1 --cores-per-socket=56Note that on LUMI-G, nodes have 64 cores but one core is reserved for the operating system and drivers to reduce OS jitter that limits the scalability of large jobs. Requesting 64 cores will lead to error messages or jobs getting stuck.
-
There is a shorthand for those parameters:
--extra-node-info=<sockets>[:cores]or-B --extra-node-info=<sockets>[:cores]where the second and third number are optional. The full maximal specification for LUMI-C would be--extra-node-info=2:64and for LUMI-G--extra-node-info=1:56.
What about --threads-per-core?
Slurm also has a --threads-per-core (or a third number with --extra-node-info)
which is a somewhat misleading name. On LUMI, as hardware threads
are turned on, you would expect that you can use --threads-per-core=2 but if you try, you will see
that your job is not accepted. This because on LUMI, the smallest allocatable processor resource
(called the CPU in Slurm) is a core and not a hardware thread (or virtual core as they are also
called). There is another mechanism to enable or disable hyperthreading in regular job steps that we will
discuss later.
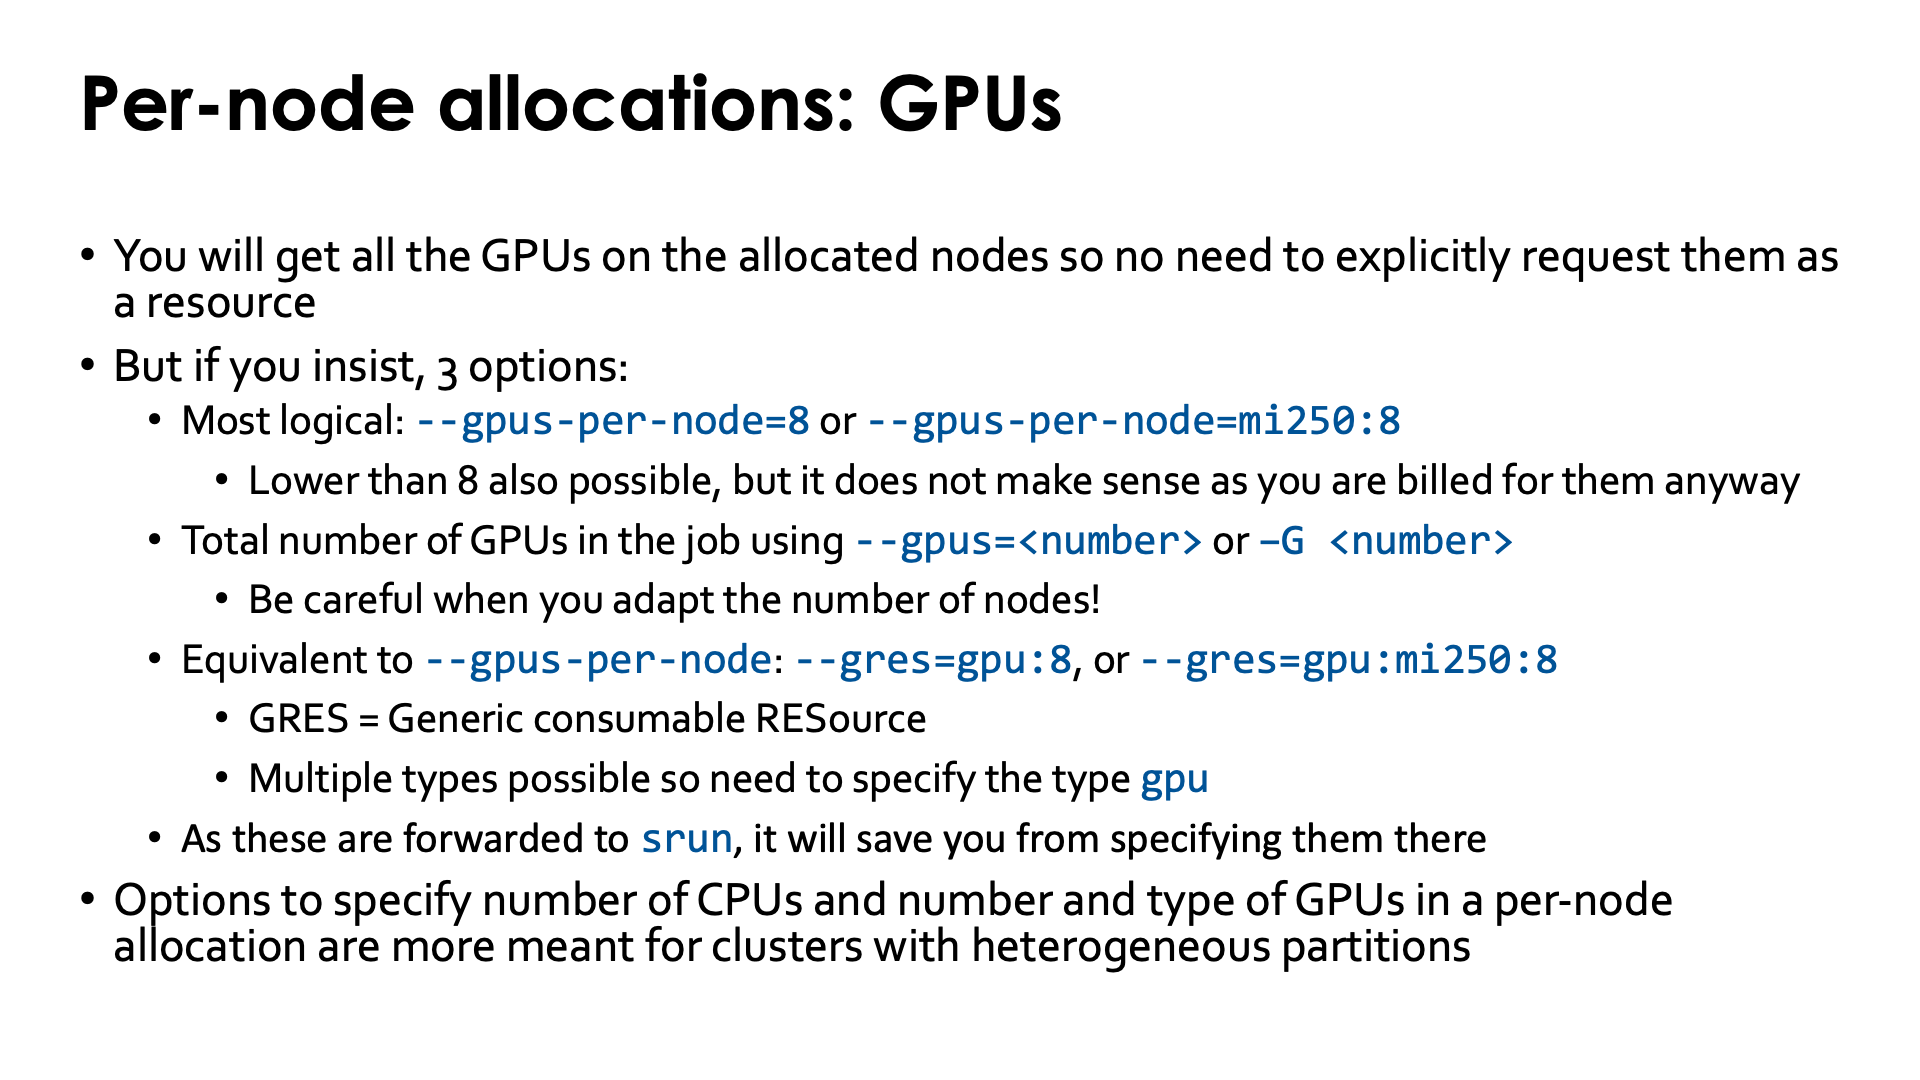
By default you will get all the GPUs in each node that is allocated in a per-node allocation. The Slurm options to request GPUs on a per-node basis are not really useful on LUMI, but might be on clusters with multiple types of GPUs in a single partition as they enable you to specify which type of node you want. If you insist, slurm has several options to specify the number of GPUs for this scenario:
-
The most logical one to use for a per-node allocation is
--gpus-per-node=8to request 8 GPUs per node. You can use a lower value, but this doesn't make much sense as you will be billed for the full node anyway.It also has an option to also specify the type of the GPU but that doesn't really make sense on LUMI. On LUMI, you could in principle use
--gpus-per-node=mi250:8. -
--gpus=<number>or-G <number>specifies the total number of GPUs needed for the job. In our opinion this is a dangerous option to use as when you change the number of nodes, you likely also want to change the number of GPUs for the job and you may overlook this. Here again it is possible to specify the type of the GPU also. Moreover, if you ask for fewer GPUs than are present in the total number of nodes you request, you may get a very strange distribution of the available GPUs across the nodes.Example of an unexpected allocation
Assuming
SLURM_ACCOUNTis set to a valid project with access to the partition used:module load LUMI/23.09 partition/G lumi-CPEtools srun --partition standard-g --time 5:00 --nodes 2 --tasks-per-node 1 --gpus 8 gpu_checkreturns
MPI 000 - OMP 000 - HWT 001 - Node nid007264 - RT_GPU_ID 0,1,2,3,4,5,6 - GPU_ID 0,1,2,3,4,5,6 - Bus_ID c1,c9,ce,d1,d6,d9,dc
MPI 001 - OMP 000 - HWT 001 - Node nid007265 - RT_GPU_ID 0 - GPU_ID 0 - Bus_ID d1
So 7 GPUs were allocated on the first node and 1 on the second.
-
A GPU belongs to the family of "generic consumable resources" (or GRES) in Slurm and there is an option to request any type of GRES that can also be used. Now you also need to specify the type of the GRES. The number you have to specify if on a per-node basis, so on LUMI you can use
--gres=gpu:8or--gres=gpu:mi250:8.
As these options are also forwarded to srun, it will save you from specifying them there.
Per-node allocations: Starting a job step
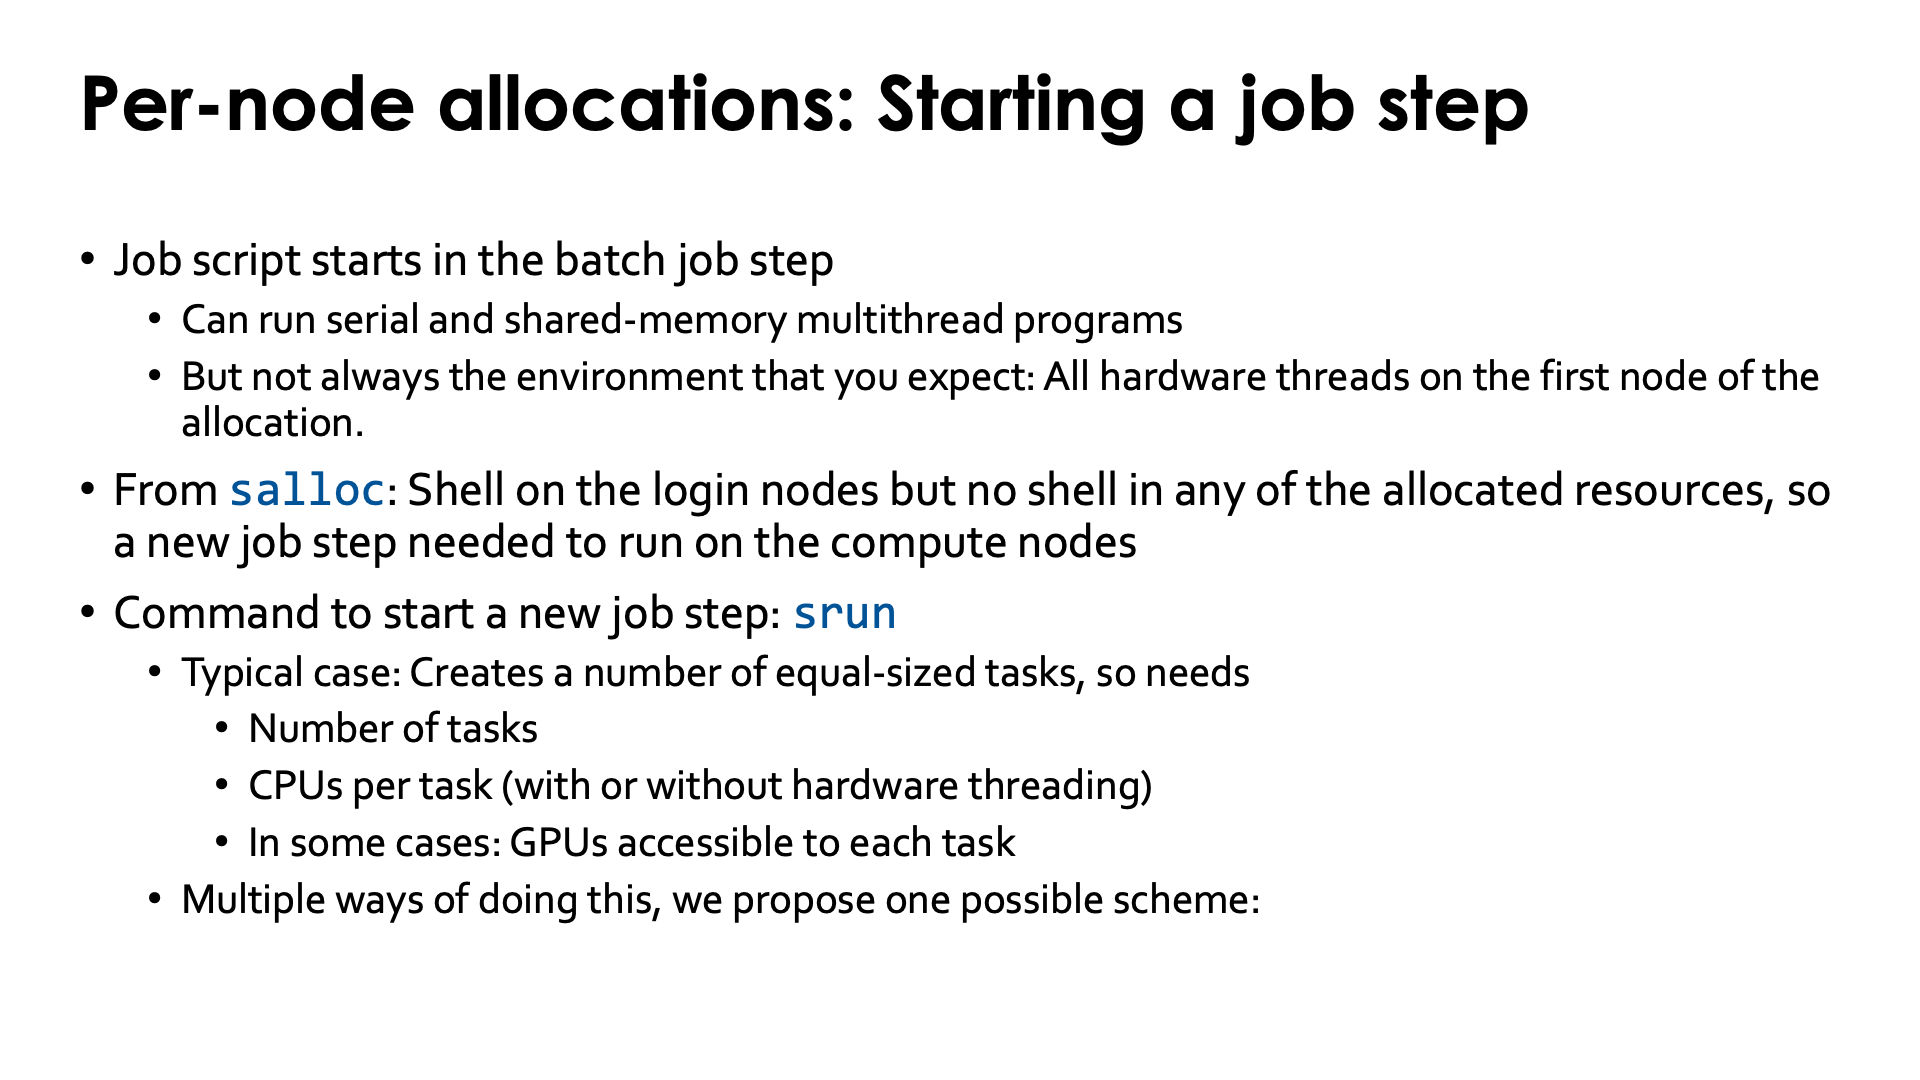
Serial or shared-memory multithreaded programs in a batch script can in principle be run in
the batch job step. As we shall see though the effect may be different from what you expect.
However, if you are working interactively via salloc, you are in a shell on the node on which
you called salloc, typically a login node, and to run anything on the compute nodes you
will have to start a job step.
The command to start a new job step is srun. But it needs a number of arguments in most
cases. After all, a job step consists of a number of equal-sized tasks (considering only
homogeneous job steps at the moment, the typical case for most users) that each need a number
of cores or hardware threads and, in case of GPU compute, access to a number of GPUs.
There are several ways telling Slurm how many tasks should be created and what the resources are for each individual task, but this scheme is an easy scheme:
-
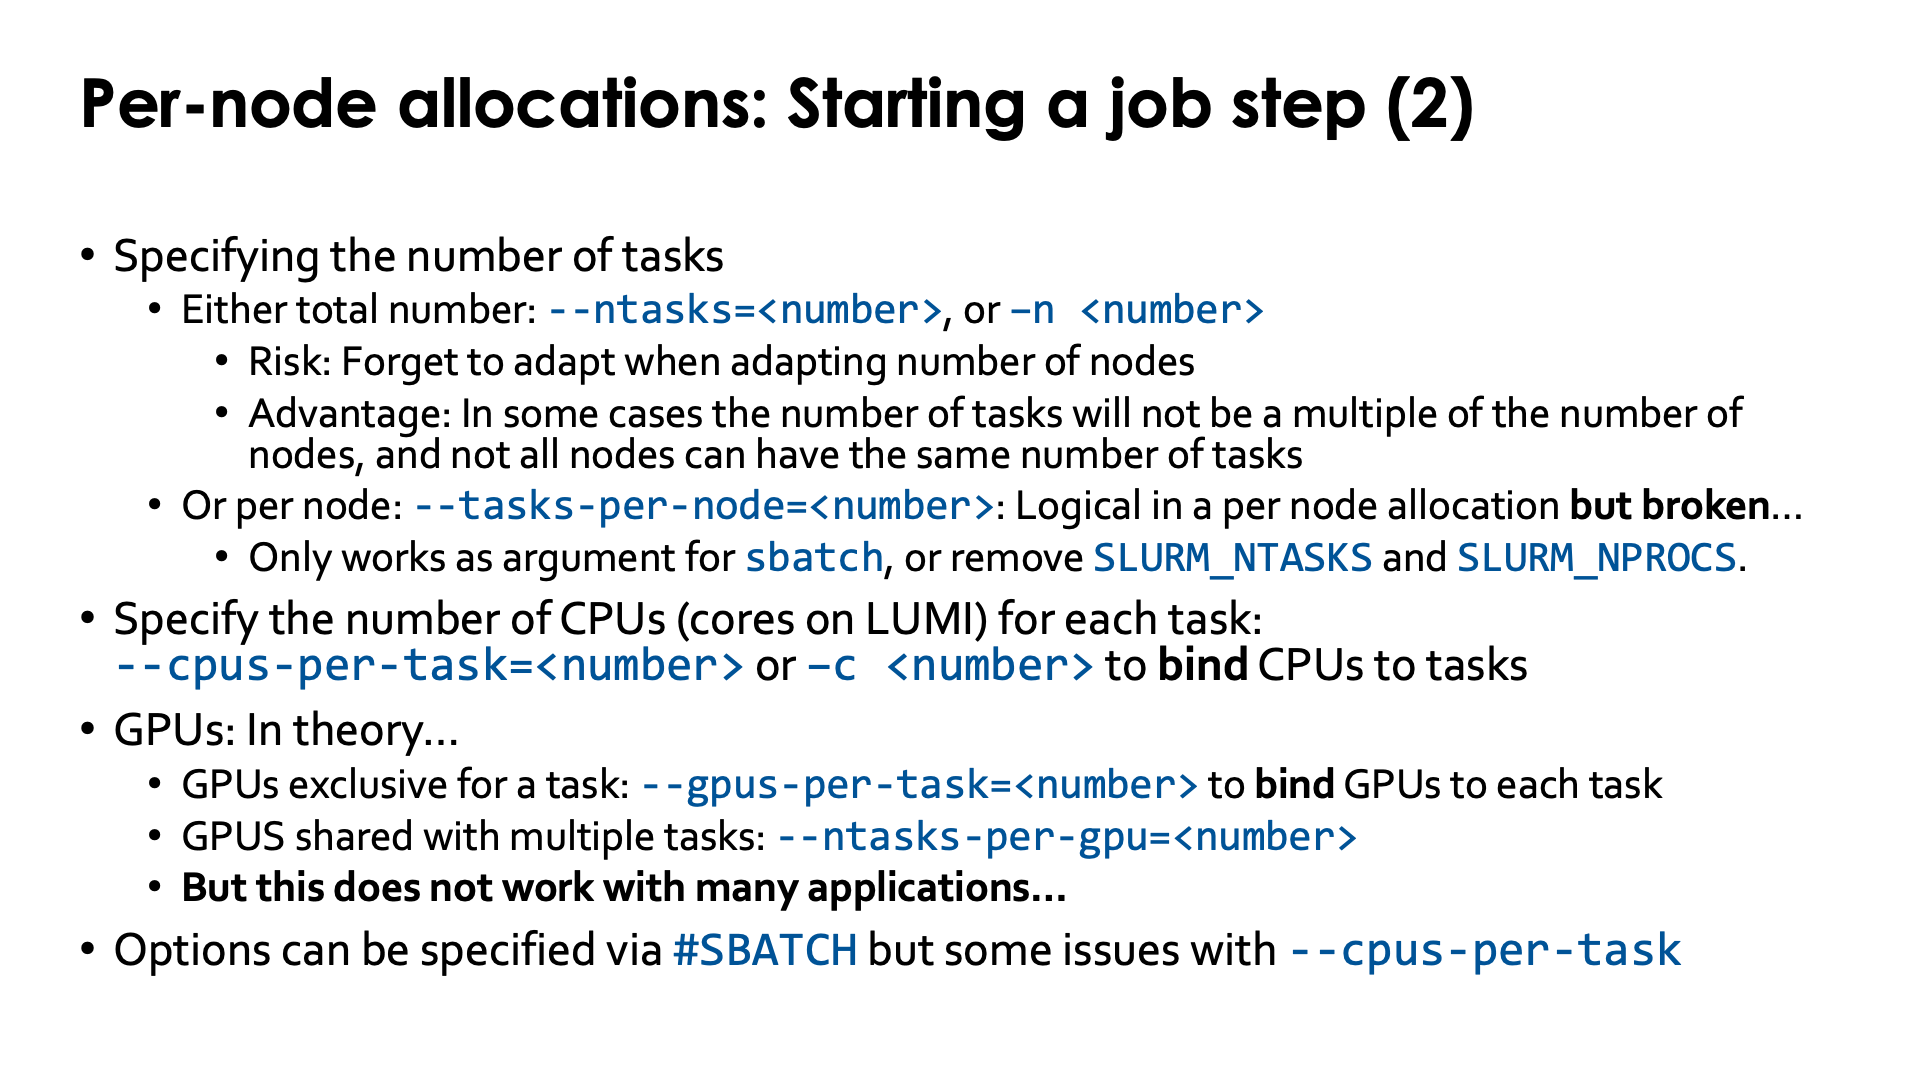
Specifying the number of tasks: You can specify per node or the total number:
-
Specifying the total number of tasks:
--ntasks=<ntasksor-n ntasks. There is a risk associated to this approach which is the same as when specifying the total number of GPUs for a job: If you change the number of nodes, then you should change the total number of tasks also. However, it is also very useful in certain cases. Sometimes the number of tasks cannot be easily adapted and does not fit perfectly into your allocation (cannot be divided by the number of nodes). In that case, specifying the total number of nodes makes perfect sense. -
Specifying on a per node basis:
--ntasks-per-node=<ntasks>is possible in combination with--nodesaccording to the Slurm manual. In fact, this would be a logical thing to do in a per node allocation. However, we see it fail on LUMI when it is used as an option forsrunand not withsbatch, even though it should work according to the documentation.The reason for the failure is that Slurm when starting a batch job defines a large number of
SLURM_*andSRUN_*variables. Some only give information about the allocation, but others are picked up bysrunas options and some of those options have a higher priority than--ntasks-per-node. So the trick is to unset bothSLURM_NTASKSandSLURM_NPROCS. The--ntasksoption triggered bySLURM_NTASKShas a higher priority than--ntasks-per-node.SLURM_NPROCSwas used in older versions of Slurm as with the same function as the current environment variableSLURM_NTASKSand therefore also implicitly specifies--ntasksifSLURM_NTASKSis removed from the environment.The option is safe to use with
sbatchthough.
Lesson: If you want to play it safe and not bother with modifying the environment that Slurm creates, use the total number of tasks
--ntasksif you want to specify the number of tasks withsrun. -
-
Specifying the number of CPUs (cores on LUMI) for each task. The easiest way to do this is by using
--cpus-per-task=<number_CPUs>or-c <number_CPUs>. -
Specifying the number of GPUs per task. Following the Slurm manuals, the following seems the easiest way:
-
Use
--gpus-per-task=<number_GPUs>to bind one or more GPUs to each task. This is probably the most used option in this scheme. -
If however you want multiple tasks to share a GPU, then you should use
--ntasks-per-gpu=<number_of_tasks>. There are use cases where this makes sense.
This however does not always work...
-
The job steps created in this simple scheme do not always run the programs at optimal efficiency. Slurm has various strategies to assign tasks to nodes, and there is an option which we will discuss in the next session of the course (binding) to change that. Moreover, not all clusters use the same default setting for this strategy. Cores and GPUs are assigned in order and this is not always the best order.
It is also possible to specify these options already on #SBATCH lines. Slurm will transform those
options into SLURM_* environment variables that will then be picked up by srun. However, this
behaviour has changed in more recent versions of Slurm. E.g., --cpus-per-task is no longer
automatically picked up by srun as there were side effects with some MPI implementations on some
clusters. CSC has modified the configuration to again forward that option (now via an SRUN_*
environment variable) but certain use cases beyond the basic one described above are not covered.
And take into account that not all cluster operators will do that as there are also good reasons not
to do so. Otherwise the developers of Slurm wouldn't have changed that behaviour in the first place.
Demonstrator for the problems with --tasks-per-node (click to expand)
Try the batch script:
#! /usr/bin/bash
#SBATCH --job-name=slurm-perNode-jobstart-standard-demo1
#SBATCH --partition=standard
#SBATCH --nodes=2
#SBATCH --time=2:00
#SBATCH --output=%x-%j.txt

module load LUMI/23.09 partition/C lumi-CPEtools/1.1-cpeCray-23.09

echo "Submitted from $SLURM_SUBMIT_HOST"
echo "Running on $SLURM_JOB_NODELIST"
echo
echo -e "Job script:\n$(cat $0)\n"
echo "SLURM_* and SRUN_* environment variables:"
env | egrep ^SLURM
env | egrep ^SRUN

set -x
# This works
srun --ntasks=32 --cpus-per-task=8 hybrid_check -r

# This does not work
srun --ntasks-per-node=16 --cpus-per-task=8 hybrid_check -r

# But this works again
unset SLURM_NTASKS
unset SLURM_NPROCS
srun --ntasks-per-node=16 --cpus-per-task=8 hybrid_check -r
set +x
echo -e "\nsacct for the job:\n$(sacct -j $SLURM_JOB_ID)\n"
A warning for GPU applications
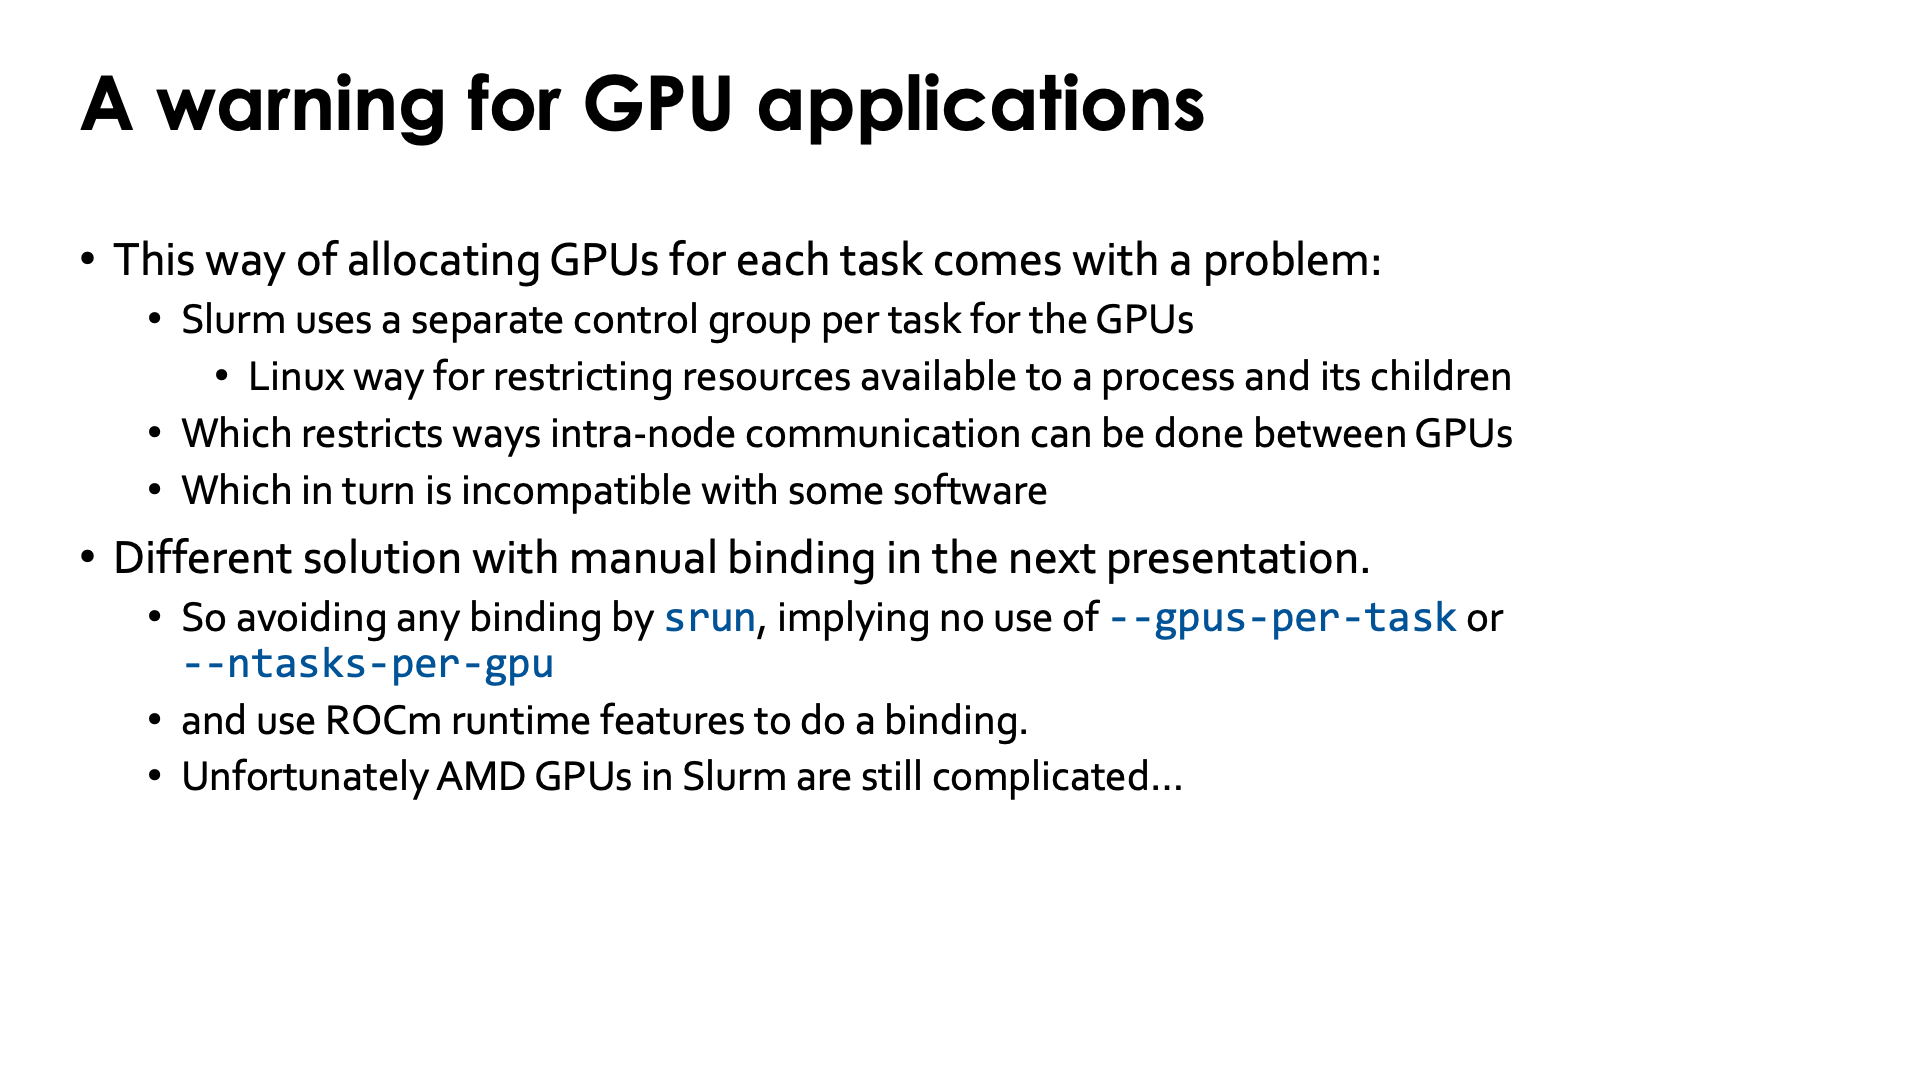
Allocating GPUs with --gpus-per-task or --tasks-per-gpu may seem the most logical thing to do
when reading the Slurm manual pages. It does come with a problem though resulting of how Slurm
currently manages the AMD GPUs, and now the discussion becomes more technical.
Slurm currently uses a separate control group per task for the GPUs. Now control groups are a mechanism in Linux for restricting resources available to a process and its childdren. Putting the GPUs in a separate control group per task limits the ways in intra-node communication can be done between GPUs, and this in turn is incompatible with some software.
The solution is to ensure that all tasks within a node see all GPUs in the node and then to
manually perform the binding of each task to the GPUs it needs using a different mechanism more
like affinity masks for CPUs. It can be tricky to do though as many options for srun do a
mapping under the hood.
As we need a mechanisms that are not yet discussed yet in this chapter, we refer to the chapter "Process and thread distribution and binding" for a more ellaborate discussion and a solution.
Unfortunately using AMD GPUs in Slurm is more complicated then it should be (and we will see even more problems).
Turning simultaneous multithreading on or off
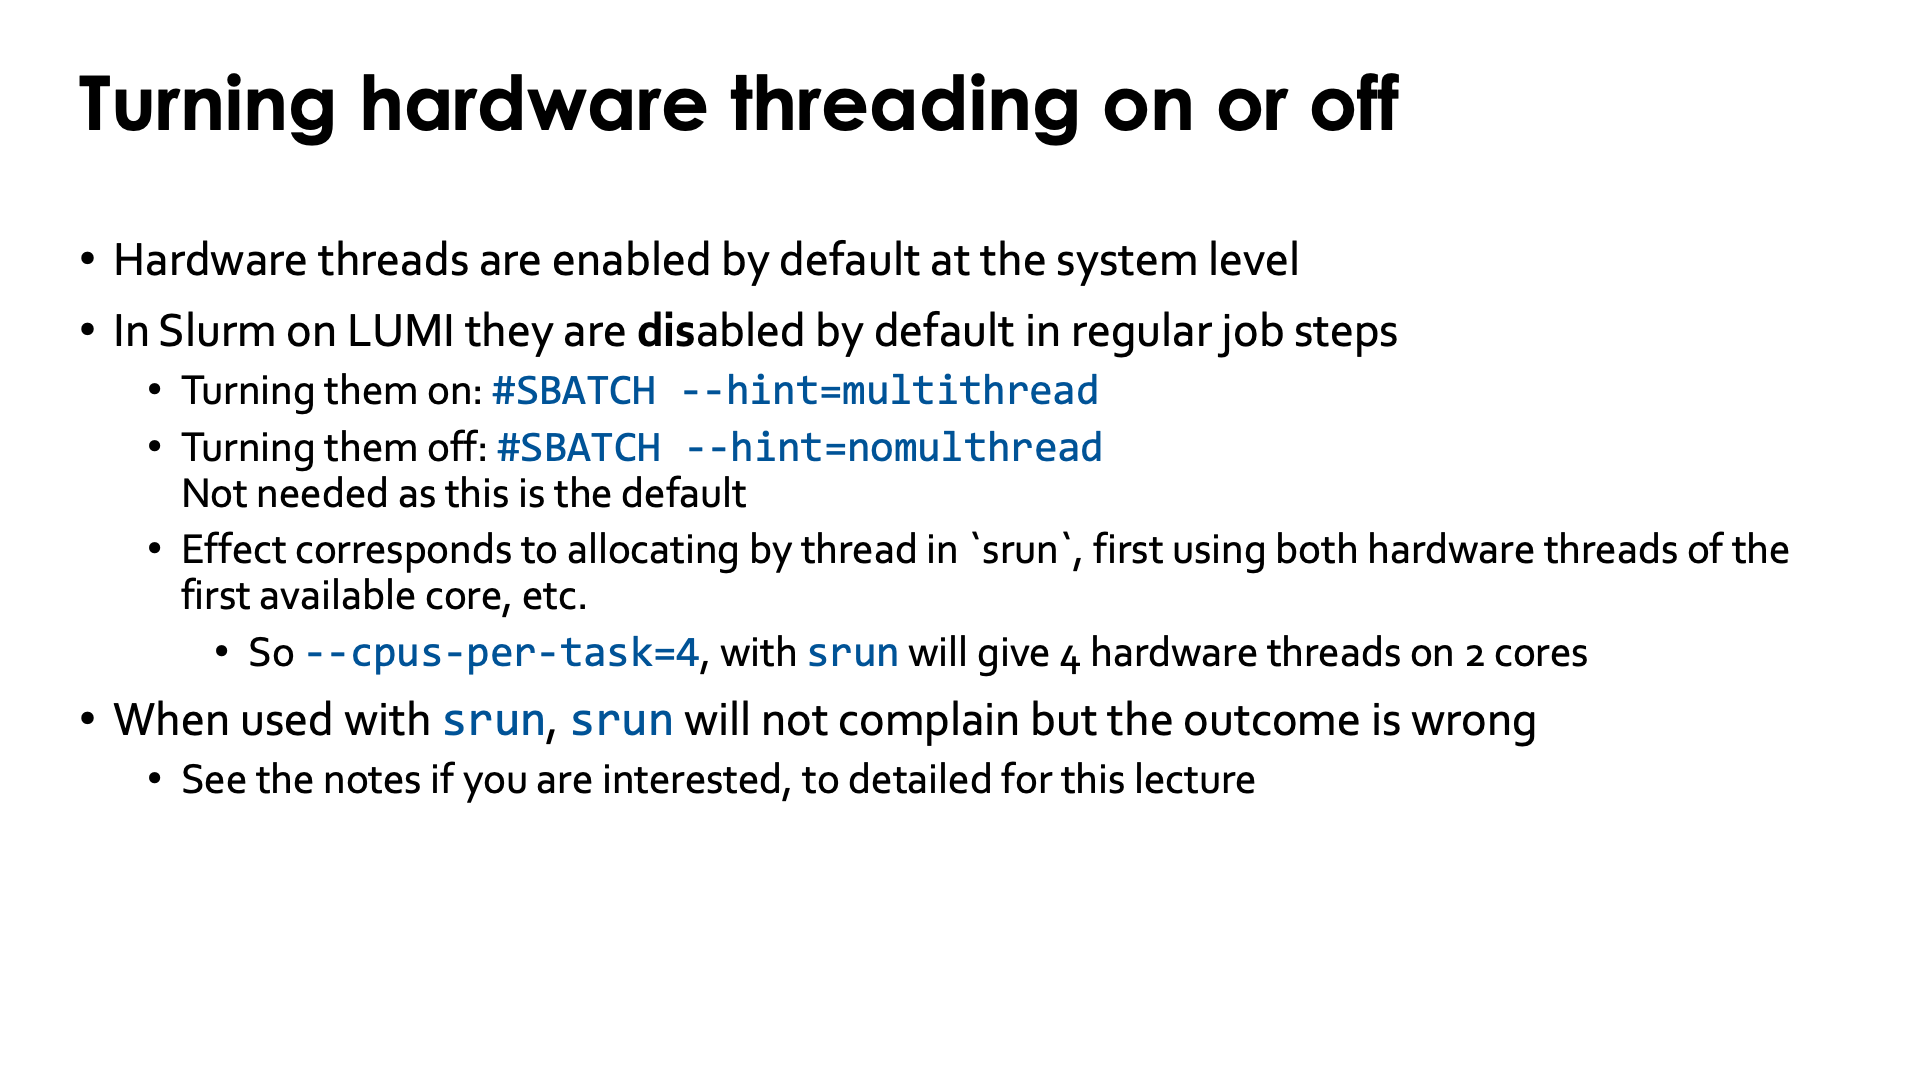
Hardware threads are enabled by default at the operating system level. In Slurm however, regular job steps start by default with hardware threads disabled. This is not true though for the batch job step as the example below will show.
Hardware threading for a regular job step can be turned on explicitly with
--hint=multhithread and turned off explicitly with --hint=nomultithread,
with the latter the default on LUMI. The hint should be given as an option to
sbatch(e.g., as a line #SBATCH --hint=multithread) and not as an option of
srun.
The way it works is a bit confusing though.
We've always told, and that is also what the Slurm manual tells, that a CPU is the
smallest allocatable unit and that on LUMI, Slurm is set to use the core as the smallest
allocatable unit. So you would expect that srun --cpus-per-task=4 combined with #SBATCH --hint=multithread
would give you 4 cores with in total 8 threads, but instead you will get 2 cores with 4 hardware
threads. In other words, it looks like (at least with the settings on LUMI) #SBATCH --hint=multithread
changes the meaning of CPU in the context of an srun command to a hardware thread instead of a
core. This is illustrated with the example below.
Use of --hint=(no)multithread (click to expand)
We consider the job script
#! /usr/bin/bash
#SBATCH --job-name=slurm-HWT-standard-multithread
#SBATCH --partition=standard
#SBATCH --nodes=1
#SBATCH --hint=multithread
#SBATCH --time=2:00
#SBATCH --output=%x-%j.txt
#SBATCH --account=project_46YXXXXXX

module load LUMI/23.09 partition/C lumi-CPEtools/1.1-cpeGNU-23.09

echo -e "Job script:\n$(cat $0)\n"

set -x
srun -n 1 -c 4 omp_check -r
set +x
echo -e "\nsacct for the job:\n$(sacct -j $SLURM_JOB_ID)\n"
We consider three variants of this script:
-
Without the
#SBATCH --hint=multithreadline to see the default behaviour of Slurm on LUMI. The relevant lines of the output are:+ srun -n 1 -c 4 omp_check -r Running 4 threads in a single process ++ omp_check: OpenMP thread 0/4 on cpu 0/256 of nid001847 mask 0-3 ++ omp_check: OpenMP thread 1/4 on cpu 1/256 of nid001847 mask 0-3 ++ omp_check: OpenMP thread 2/4 on cpu 2/256 of nid001847 mask 0-3 ++ omp_check: OpenMP thread 3/4 on cpu 3/256 of nid001847 mask 0-3 + set +x sacct for the job: JobID JobName Partition Account AllocCPUS State ExitCode ------------ ---------- ---------- ---------- ---------- ---------- -------- 4238727 slurm-HWT+ standard project_4+ 256 RUNNING 0:0 4238727.bat+ batch project_4+ 256 RUNNING 0:0 4238727.0 omp_check project_4+ 8 RUNNING 0:0The
omp_checkprogram detects that it should run 4 threads (we didn't even need to help by settingOMP_NUM_THREADS) and uses cores 0 till 3 which are the first 4 physical cores on the processor.The output of the
sacctcommand claims that the job (which is the first line of the table) got allocated 256 CPUs. This is a confusing feature ofsacct: it shows the number of hardware threads even though the Slurm CPU on LUMI is defined as a core. The next line shows the batch job step which actually does see all hardware threads of all cores (and in general, all hardware threads of all allocated cores of the first node of the job). The final line, with the '.0' job step, shows that that core was using 8 hardware threads, even thoughomp_checkonly saw 4. This is because the default behaviour (as the next test will confirm) is--hint=nomultithread.Note that
sacctshows the last job step as running even though it has finished. This is becausesacctgets the information not from the compute node but from a database, and it looks like the full information has not yet derived in the database. A short sleep before thesacctcall would cure this problem. -
Now replace the
#SBATCH --hint=multithreadwith#SBATCH --hint=nomultithread. The relevant lines of the output are now+ srun -n 1 -c 4 omp_check -r Running 4 threads in a single process ++ omp_check: OpenMP thread 0/4 on cpu 0/256 of nid001847 mask 0-3 ++ omp_check: OpenMP thread 1/4 on cpu 1/256 of nid001847 mask 0-3 ++ omp_check: OpenMP thread 2/4 on cpu 2/256 of nid001847 mask 0-3 ++ omp_check: OpenMP thread 3/4 on cpu 3/256 of nid001847 mask 0-3 + set +x sacct for the job: JobID JobName Partition Account AllocCPUS State ExitCode ------------ ---------- ---------- ---------- ---------- ---------- -------- 4238730 slurm-HWT+ standard project_4+ 256 RUNNING 0:0 4238730.bat+ batch project_4+ 256 RUNNING 0:0 4238730.0 omp_check project_4+ 8 RUNNING 0:0The output is no different from the previous case which confirms that this is the default behaviour.
-
Lastly, we run the above script unmodified, i.e., with
#SBATCH --hint=multithreadNow the relevant lines of the output are:+ srun -n 1 -c 4 omp_check -r Running 4 threads in a single process ++ omp_check: OpenMP thread 0/4 on cpu 0/256 of nid001847 mask 0-1, 128-129 ++ omp_check: OpenMP thread 1/4 on cpu 1/256 of nid001847 mask 0-1, 128-129 ++ omp_check: OpenMP thread 2/4 on cpu 128/256 of nid001847 mask 0-1, 128-129 ++ omp_check: OpenMP thread 3/4 on cpu 129/256 of nid001847 mask 0-1, 128-129 + set +x sacct for the job: JobID JobName Partition Account AllocCPUS State ExitCode ------------ ---------- ---------- ---------- ---------- ---------- -------- 4238728 slurm-HWT+ standard project_4+ 256 RUNNING 0:0 4238728.bat+ batch project_4+ 256 RUNNING 0:0 4238728.0 omp_check project_4+ 4 COMPLETED 0:0The
omp_checkprogram again detects only 4 threads but now runs them on the first two physical cores and the corresponding second hardware thread for these cores. The output ofsacctnow shows 4 in the "AllocCPUS" command for the.0job step, which confirms that indeed only 2 cores with both hardware threads were allocated instead of 4 cores.
Buggy behaviour when used with srun
Consider the following job script:
#! /usr/bin/bash
#SBATCH --job-name=slurm-HWT-standard-bug2
#SBATCH --partition=standard
#SBATCH --nodes=1
#SBATCH --time=2:00
#SBATCH --output=%x-%j.txt
#SBATCH --hint=multithread
#SBATCH --account=project_46YXXXXXX

module load LUMI/22.12 partition/C lumi-CPEtools/1.1-cpeGNU-22.12

set -x
srun -n 1 -c 4 --hint=nomultithread omp_check -r

srun -n 1 -c 4 --hint=multithread omp_check -r

OMP_NUM_THREADS=8 srun -n 1 -c 4 --hint=multithread omp_check -r

srun -n 1 -c 4 omp_check -r
set +x
echo -e "\nsacct for the job:\n$(sacct -j $SLURM_JOB_ID)\n"

set -x
srun -n 1 -c 256 --hint=multithread omp_check -r
The relevant lines of the output are:
+ srun -n 1 -c 4 --hint=nomultithread omp_check -r

Running 4 threads in a single process

++ omp_check: OpenMP thread   0/4   on cpu   0/256 of nid001246 mask 0-3
++ omp_check: OpenMP thread   1/4   on cpu   1/256 of nid001246 mask 0-3
++ omp_check: OpenMP thread   2/4   on cpu   2/256 of nid001246 mask 0-3
++ omp_check: OpenMP thread   3/4   on cpu   3/256 of nid001246 mask 0-3

+ srun -n 1 -c 4 --hint=multithread omp_check -r

Running 4 threads in a single process

++ omp_check: OpenMP thread   0/4   on cpu   0/256 of nid001246 mask 0-1, 128-129
++ omp_check: OpenMP thread   1/4   on cpu 129/256 of nid001246 mask 0-1, 128-129
++ omp_check: OpenMP thread   2/4   on cpu 128/256 of nid001246 mask 0-1, 128-129
++ omp_check: OpenMP thread   3/4   on cpu   1/256 of nid001246 mask 0-1, 128-129

+ OMP_NUM_THREADS=8
+ srun -n 1 -c 4 --hint=multithread omp_check -r

Running 8 threads in a single process

++ omp_check: OpenMP thread   0/8   on cpu   0/256 of nid001246 mask 0-1, 128-129
++ omp_check: OpenMP thread   1/8   on cpu 128/256 of nid001246 mask 0-1, 128-129
++ omp_check: OpenMP thread   2/8   on cpu   0/256 of nid001246 mask 0-1, 128-129
++ omp_check: OpenMP thread   3/8   on cpu   1/256 of nid001246 mask 0-1, 128-129
++ omp_check: OpenMP thread   4/8   on cpu 129/256 of nid001246 mask 0-1, 128-129
++ omp_check: OpenMP thread   5/8   on cpu 128/256 of nid001246 mask 0-1, 128-129
++ omp_check: OpenMP thread   6/8   on cpu 129/256 of nid001246 mask 0-1, 128-129
++ omp_check: OpenMP thread   7/8   on cpu   1/256 of nid001246 mask 0-1, 128-129

+ srun -n 1 -c 4 omp_check -r

Running 4 threads in a single process

++ omp_check: OpenMP thread   0/4   on cpu   0/256 of nid001246 mask 0-3
++ omp_check: OpenMP thread   1/4   on cpu   1/256 of nid001246 mask 0-3
++ omp_check: OpenMP thread   2/4   on cpu   2/256 of nid001246 mask 0-3
++ omp_check: OpenMP thread   3/4   on cpu   3/256 of nid001246 mask 0-3

+ set +x

sacct for the job:
JobID           JobName  Partition    Account  AllocCPUS      State ExitCode
------------ ---------- ---------- ---------- ---------- ---------- --------
4238801      slurm-HWT+   standard project_4+        256    RUNNING      0:0
4238801.bat+      batch            project_4+        256    RUNNING      0:0
4238801.0     omp_check            project_4+          8  COMPLETED      0:0
4238801.1     omp_check            project_4+          8  COMPLETED      0:0
4238801.2     omp_check            project_4+          8  COMPLETED      0:0
4238801.3     omp_check            project_4+          8  COMPLETED      0:0

+ srun -n 1 -c 256 --hint=multithread omp_check -r
srun: error: Unable to create step for job 4238919: More processors requested than permitted
The first omp_check runs as expected. The seocnd one uses only 2 cores but all
4 hyperthreads on those cores. This is also not unexpected. In the third case
we force the use of 8 threads, and they all land on the 4 hardware threads of
2 cores. Again, this is not unexpected. And neither is the output of the last
run of omp_cehck which is again with multithreading disabled as requested in
the #SBATCH lines. What is surprising though is the output of sacct:
It claims there were 8 hardware threads, so 4 cores, allocated to the second
(the .1) and third (the .2) job step while whatever we tried, omp_check
could only see 2 cores and 4 hardware threads. Indeed, if we would try to run
with -c 256 then srun will fail.
But now try the reverse: we turn multithreading on in the #SBATCH lines
and try to turn it off again with srun:
#! /usr/bin/bash
#SBATCH --job-name=slurm-HWT-standard-bug2
#SBATCH --partition=standard
#SBATCH --nodes=1
#SBATCH --time=2:00
#SBATCH --output=%x-%j.txt
#SBATCH --hint=multithread
#SBATCH --account=project_46YXXXXXX

module load LUMI/22.12 partition/C lumi-CPEtools/1.1-cpeGNU-22.12

set -x
srun -n 1 -c 4 --hint=nomultithread omp_check -r

srun -n 1 -c 4 --hint=multithread omp_check -r

srun -n 1 -c 4 omp_check -r
set +x
echo -e "\nsacct for the job:\n$(sacct -j $SLURM_JOB_ID)\n"
The relevant part of the output is now
+ srun -n 1 -c 4 --hint=nomultithread omp_check -r

Running 4 threads in a single process

++ omp_check: OpenMP thread   0/4   on cpu   1/256 of nid001460 mask 0-3
++ omp_check: OpenMP thread   1/4   on cpu   2/256 of nid001460 mask 0-3
++ omp_check: OpenMP thread   2/4   on cpu   3/256 of nid001460 mask 0-3
++ omp_check: OpenMP thread   3/4   on cpu   0/256 of nid001460 mask 0-3

+ srun -n 1 -c 4 --hint=multithread omp_check -r

Running 4 threads in a single process

++ omp_check: OpenMP thread   0/4   on cpu   0/256 of nid001460 mask 0-1, 128-129
++ omp_check: OpenMP thread   1/4   on cpu 129/256 of nid001460 mask 0-1, 128-129
++ omp_check: OpenMP thread   2/4   on cpu 128/256 of nid001460 mask 0-1, 128-129
++ omp_check: OpenMP thread   3/4   on cpu   1/256 of nid001460 mask 0-1, 128-129

++ srun -n 1 -c 4 omp_check -r

Running 4 threads in a single process

++ omp_check: OpenMP thread   0/4   on cpu   0/256 of nid001460 mask 0-1, 128-129
++ omp_check: OpenMP thread   1/4   on cpu 129/256 of nid001460 mask 0-1, 128-129
++ omp_check: OpenMP thread   2/4   on cpu 128/256 of nid001460 mask 0-1, 128-129
++ omp_check: OpenMP thread   3/4   on cpu   1/256 of nid001460 mask 0-1, 128-129

+ set +x

sacct for the job:
JobID           JobName  Partition    Account  AllocCPUS      State ExitCode
------------ ---------- ---------- ---------- ---------- ---------- --------
4238802      slurm-HWT+   standard project_4+        256    RUNNING      0:0
4238802.bat+      batch            project_4+        256    RUNNING      0:0
4238802.0     omp_check            project_4+          8  COMPLETED      0:0
4238802.1     omp_check            project_4+          4  COMPLETED      0:0
4238802.2     omp_check            project_4+          4  COMPLETED      0:0
And this is fully as expected. The first srun does not use hardware threads
as requested by srun, the second run does use hardware threads and only 2 cores
which is also what we requested with the srun command, and the last one also uses
hardware threads. The output of sacct (and in particular the AllocCPUS comumn)
not fully confirms that indeed there were only 2 cores allocated to the second and
third run.
So turning hardware threads on in the #SBATCH lines and then off again with srun
works as expected, but the opposite, explicitly turning it off in the #SBATCH lines
(or relying on the default which is off) and then trying to turn it on again, does not
work.
Per-core allocations
When to use?

Not all jobs can use entire nodes efficiently, and therefore the LUMI setup does provide some partitions that enable users to define jobs that use only a part of a node. This scheme enables the user to only request the resources that are really needed for the job (and only get billed for those at least if they are proportional to the resources that a node provides), but also comes with the disadvantage that it is not possible to control how cores and GPUs are allocated within a node. Codes that depend on proper mapping of threads and processes on L3 cache regions, NUMA nodes or sockets, or on shortest paths between cores in a task and the associated GPU(s) may see an unpredictable performance loss as the mapping (a) will rarely be optimal unless you are very lucky (and always be suboptimal for GPUs in the current LUMI setup) and (b) will also depend on other jobs already running on the set of nodes assigned to your job.
Unfortunately,
-
Slurm does not seem to fully understand the GPU topology on LUMI and cannot take that properly into account when assigning resources to a job or task in a job, and
-
Slurm does not support the hierarchy in the compute nodes of LUMI. There is no way to specifically request all cores in a socket, NUMA node or L3 cache region. It is only possible on a per-node level which is the case that we already discussed.
Instead, you have to specify the task structure in the #SBATCH lines of a job script or as the command line
arguments of sbatch and salloc that you will need to run the job.
Resource request
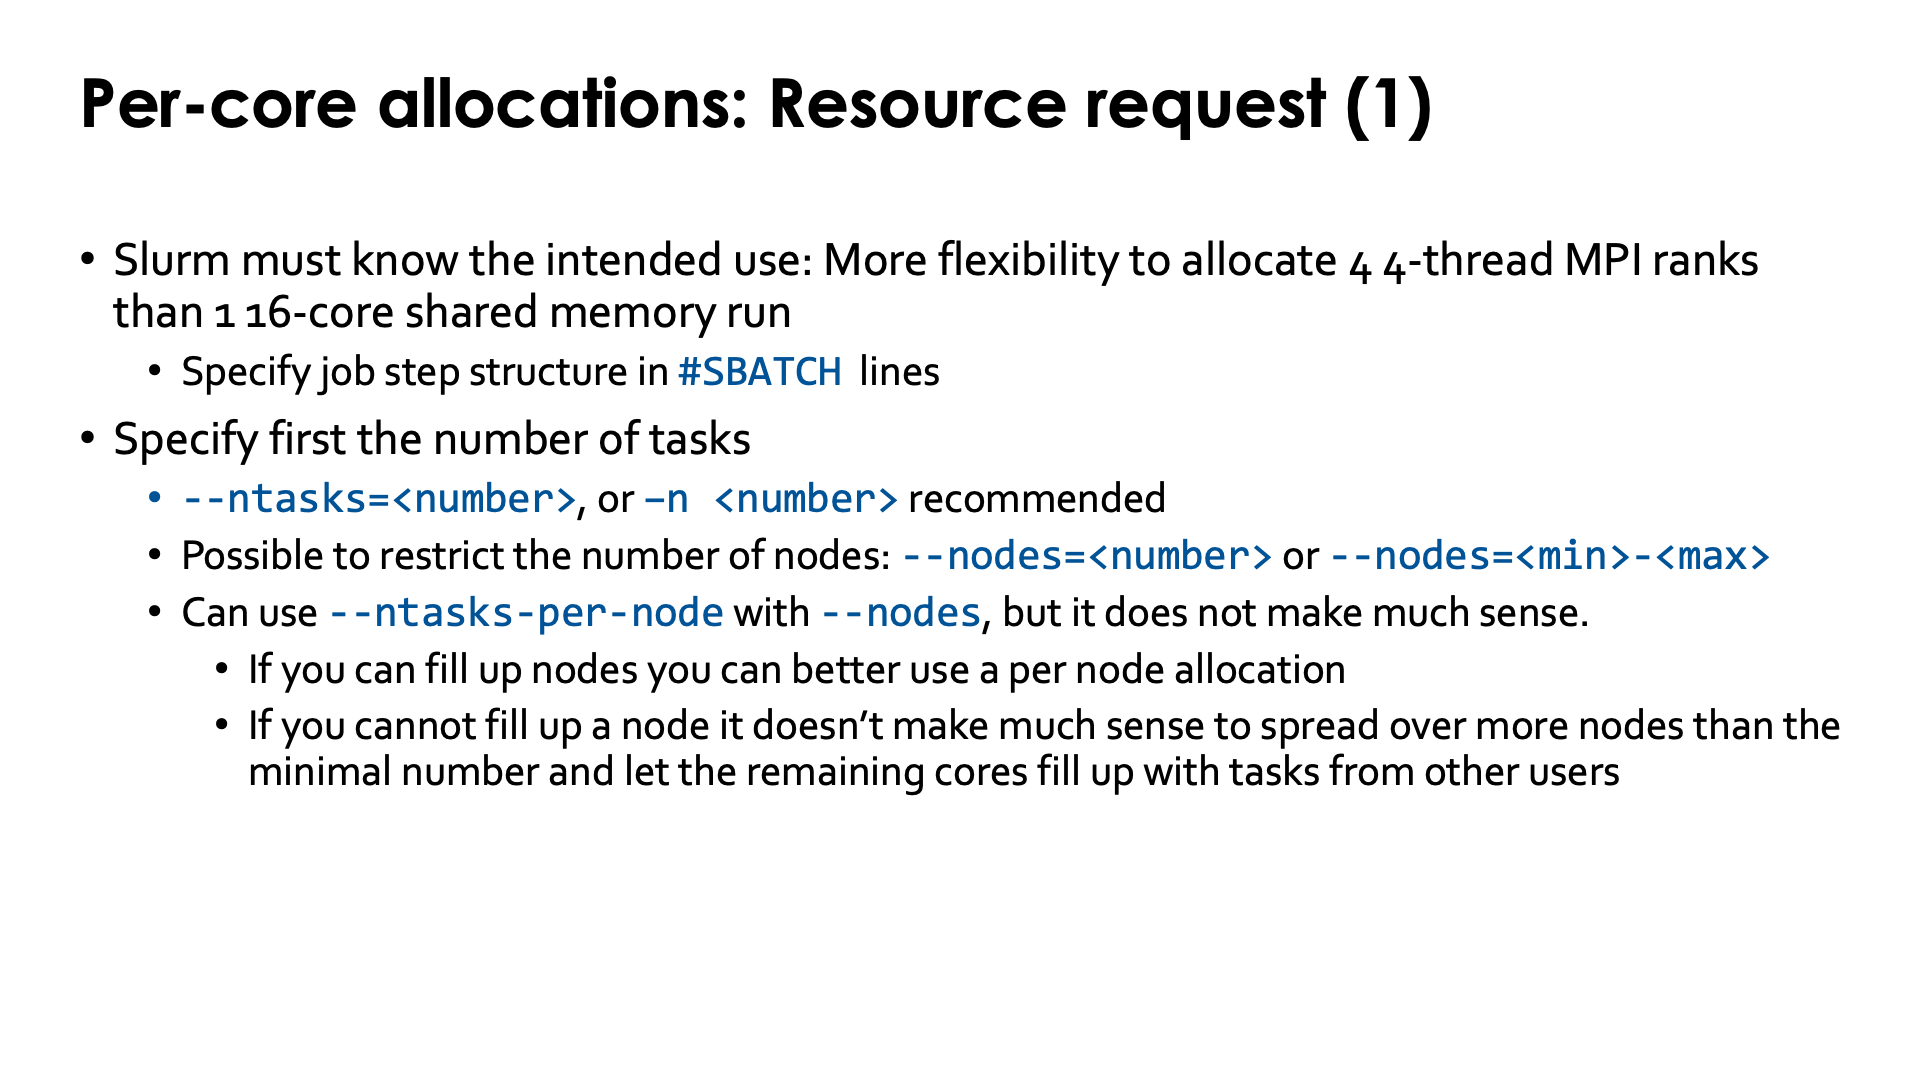
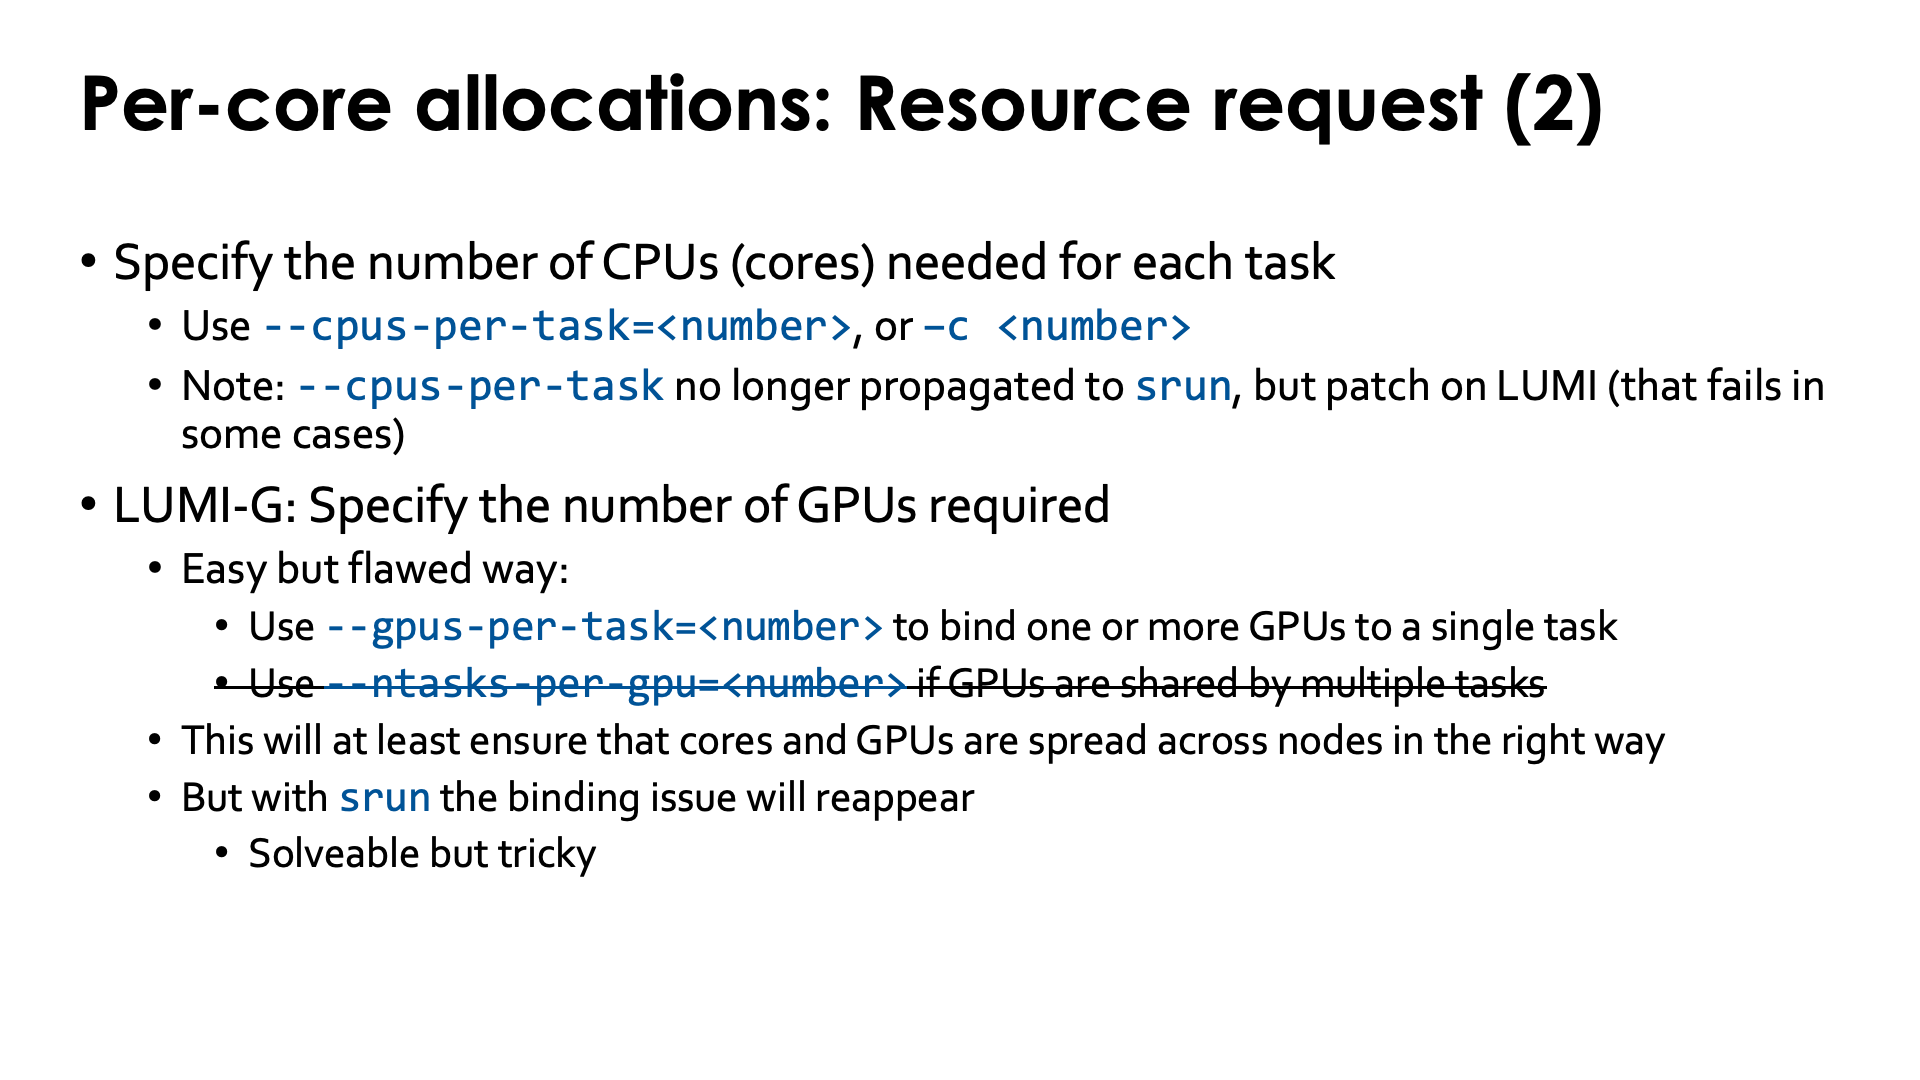
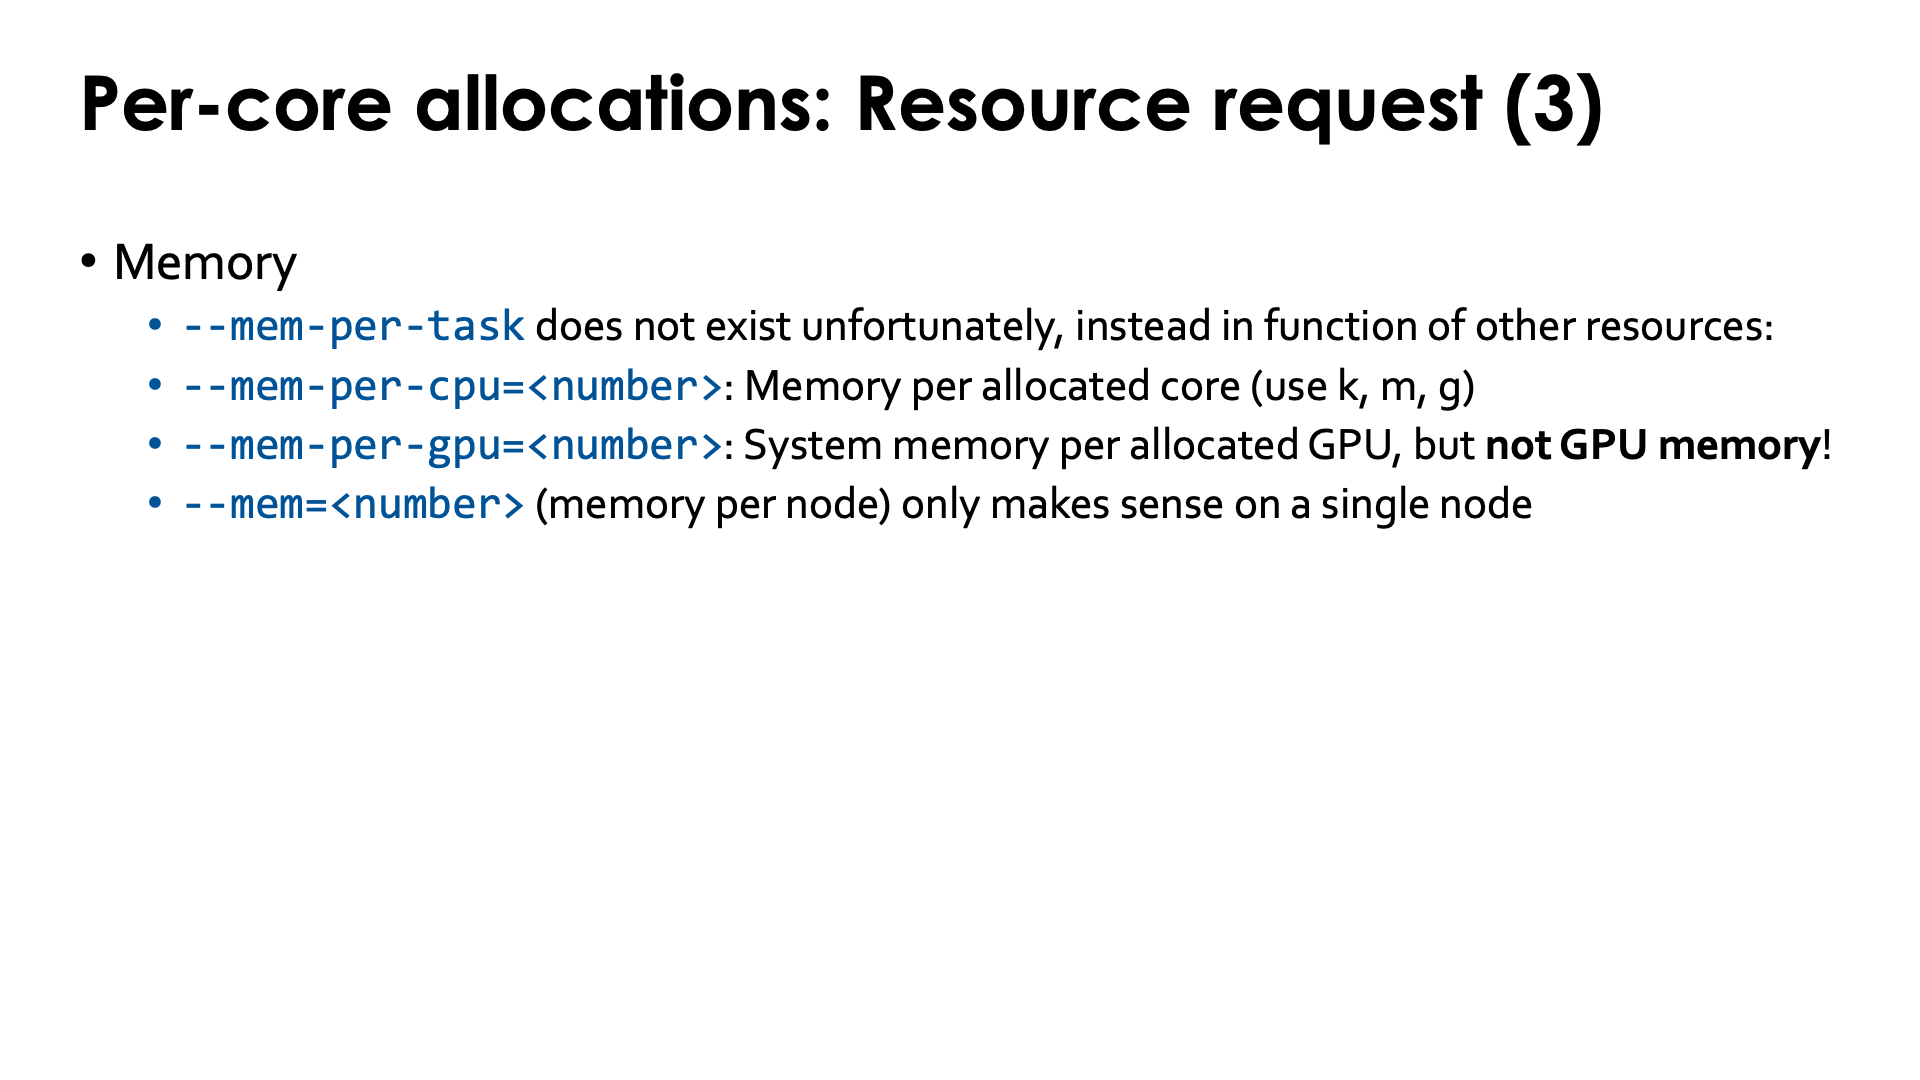
To request an allocation, you have to specify the task structure of the job step you want to run using mostly the same options that we have discussed on the slides "Per-node allocations: Starting a job step":
-
Now you should specify just the total amount of tasks needed using
--ntasks=<number>or-n <number>. As the number of nodes is not fixed in this allocation type,--ntasks-per-node=<ntasks>does not make much sense.It is possible to request a number of nodes using
--nodes, and it can even take two arguments:--nodes=<min>-<max>to specify the minimum and maximum number of nodes that Slurm should use rather than the exact number (and there are even more options), but really the only case where it makes sense to use--nodeswith--ntasks-per-nodein this case, is if all tasks would fit on a single node and you also want to force them on a single node so that all MPI communications are done through shared memory rather than via the Slingshot interconnect.Restricting the choice of resources for the scheduler may increase your waiting time in the queue though.
-
Specifying the number of CPUs (cores on LUMI) for each task. The easiest way to do this is by using
--cpus-per-task=<number>or-c <number.Note that as has been discussed before, the standard behaviour of recent versions of Slurm is to no longer forward
--cpus-per-taskfrom thesbatchorsalloclevel to thesrunlevel though CSC has made a configuration change in Slurm that will still try to do this though with some limitations. -
Specifying the number of GPUs per task. The easiest way here is:
-
Use
--gpus-per-task=<number_GPUs>to bind one or more GPUs to each task. This is probably the most used option in this scheme. -
If however you want multiple tasks to share a GPU, then you should use
--ntasks-per-gpu=<number_of_tasks>. There are use cases where this makes sense. However, at the time of writing this does not work properly.
While this does ensure a proper distribution of GPUs across nodes compatible with the distributions of cores to run the requested tasks, we will again run into binding issues when these options are propagated to
srunto create the actual job steps, and hre this is even more tricky to solve.We will again discuss a solution in the Chapter "Process and thread distribution and binding"
-
-
CPU memory. By default you get less than the memory per core on the node type. To change:
-
Against the logic there is no
--mem-per-task=<number>, instead memory needs to be specified in function of the other allocated resources. -
Use
--mem-per-cpu=<number>to request memory per CPU (use k, m, g to specify kilobytes, megabytes or gigabytes) -
Alternatively on a GPU allocation
--mem-per-gpu=<number>. This is still CPU memory and not GPU memory! -
Specifying memory per node with
--memdoesn't make much sense unless the number of nodes is fixed.
-
--ntasks-per-gpu=<number> does not work
At the time of writing there were several problems when using --ntasks-per-gpu=<number> in combination
with --ntasks=<number>. While according to the Slurm documentation this is a valid request and
Slurm should automatically determine the right number of GPUs to allocate, it turns out that instead
you need to specify the number of GPUs with --gpus=<number> together with --ntasks-per-gpu=<number>
and let Slurm compute the number of tasks.
Moreover, we've seen cases where the final allocation was completely wrong, with tasks ending up with the wrong number of GPUs or on the wrong node (like too many tasks on one and too little on another compared to the number of GPUs set aside in each of these nodes).
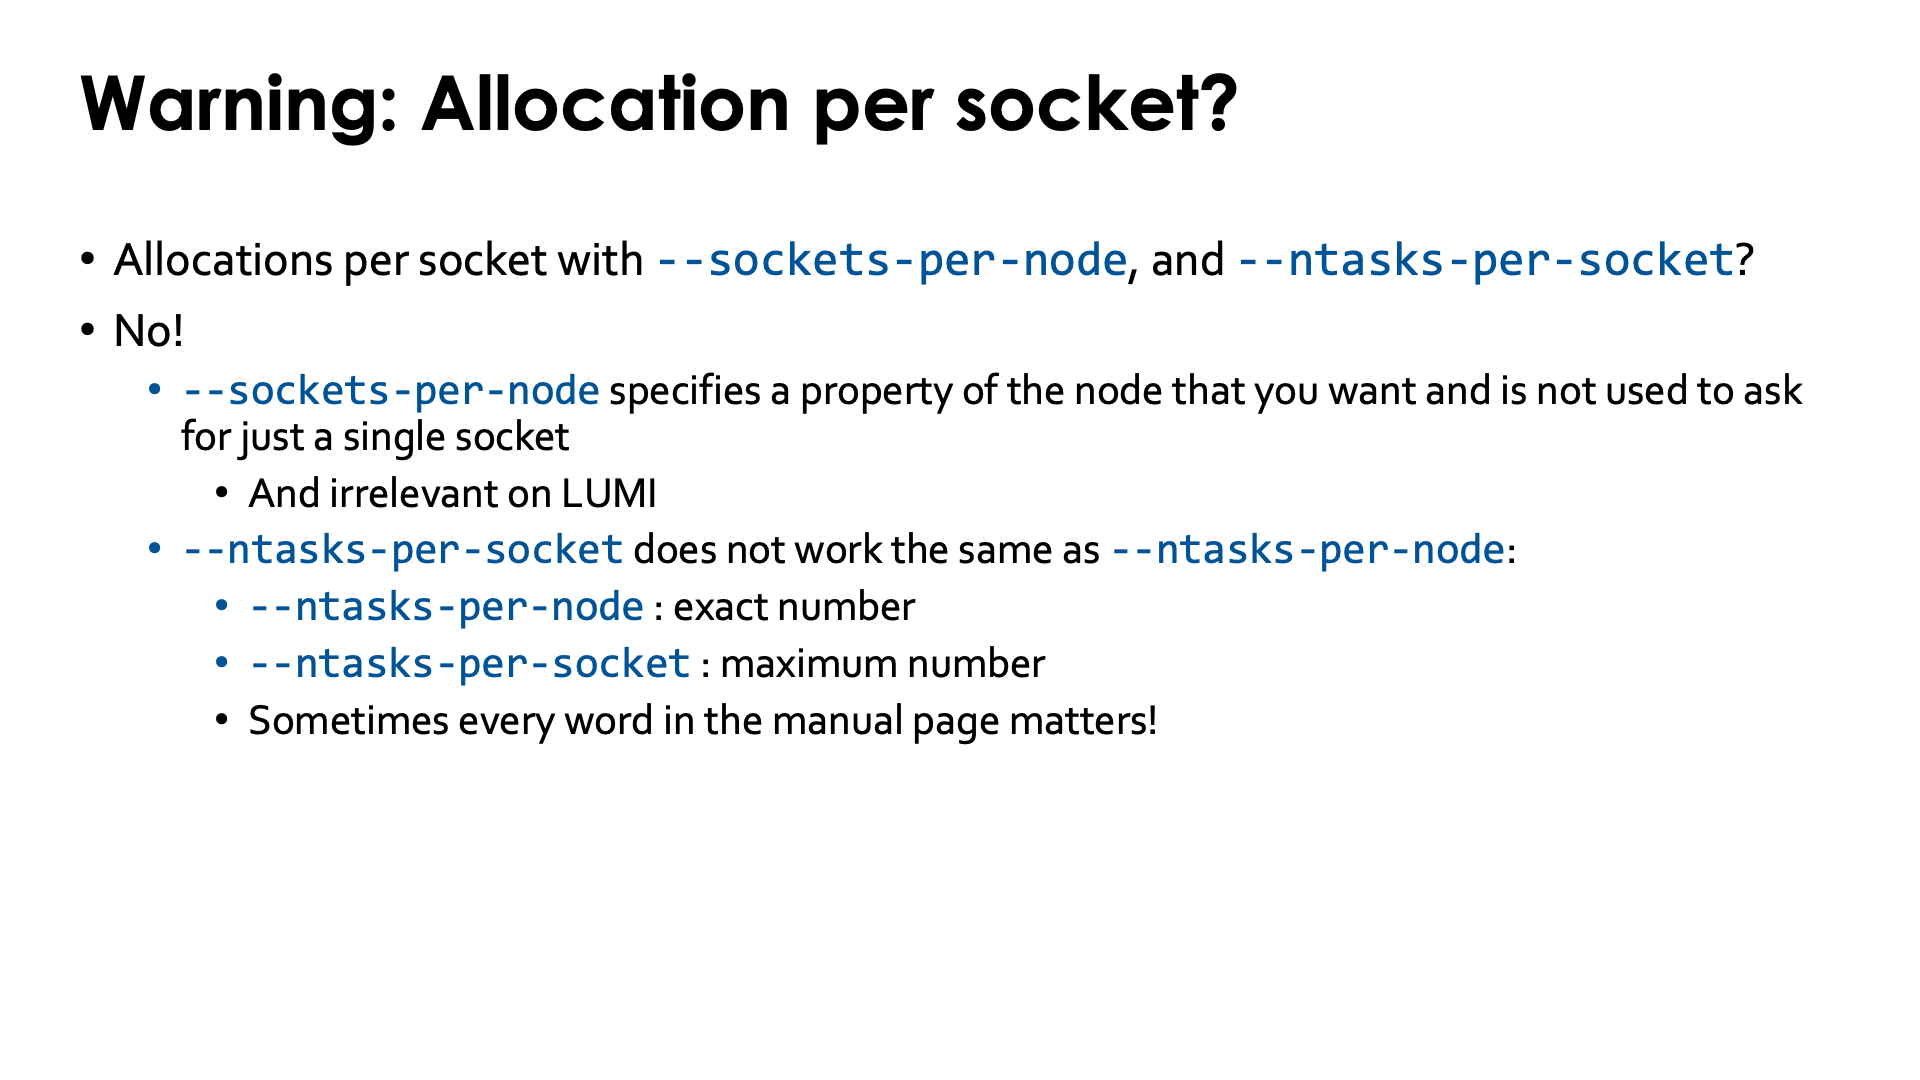
--sockets-per-node and --ntasks-per-socket
If you don't read the manual pages of Slurm carefully enough you may have the impression that
you can use parameters like --sockets-per-node and --ntasks-per-socket to force all tasks
on a single socket (and get a single socket), but these options will not work as you expect.
The --sockets-per-node option is not used to request an exact resource, but to specify a
type of node by specifying the minimal number of sockets a node should have.It is an irrelevant
option on LUMI as each partition does have only a single node type.
If you read the manual carefully, you will also see that there is a subtle difference between
--ntasks-per-node and --ntasks-per-socket: With --ntasks-per-node you specify the
exact number of tasks for each node while with --tasks-per-socket you specify the
maximum number of tasks for each socket. So all hope that something like
--ntasks=8 --ntasks-per-socket=8 --cpus-per-task=8
would always ensure that you get a socket for yourself with each task nicely assigned to a single L3 cache domain, is futile.
Different job steps in a single job
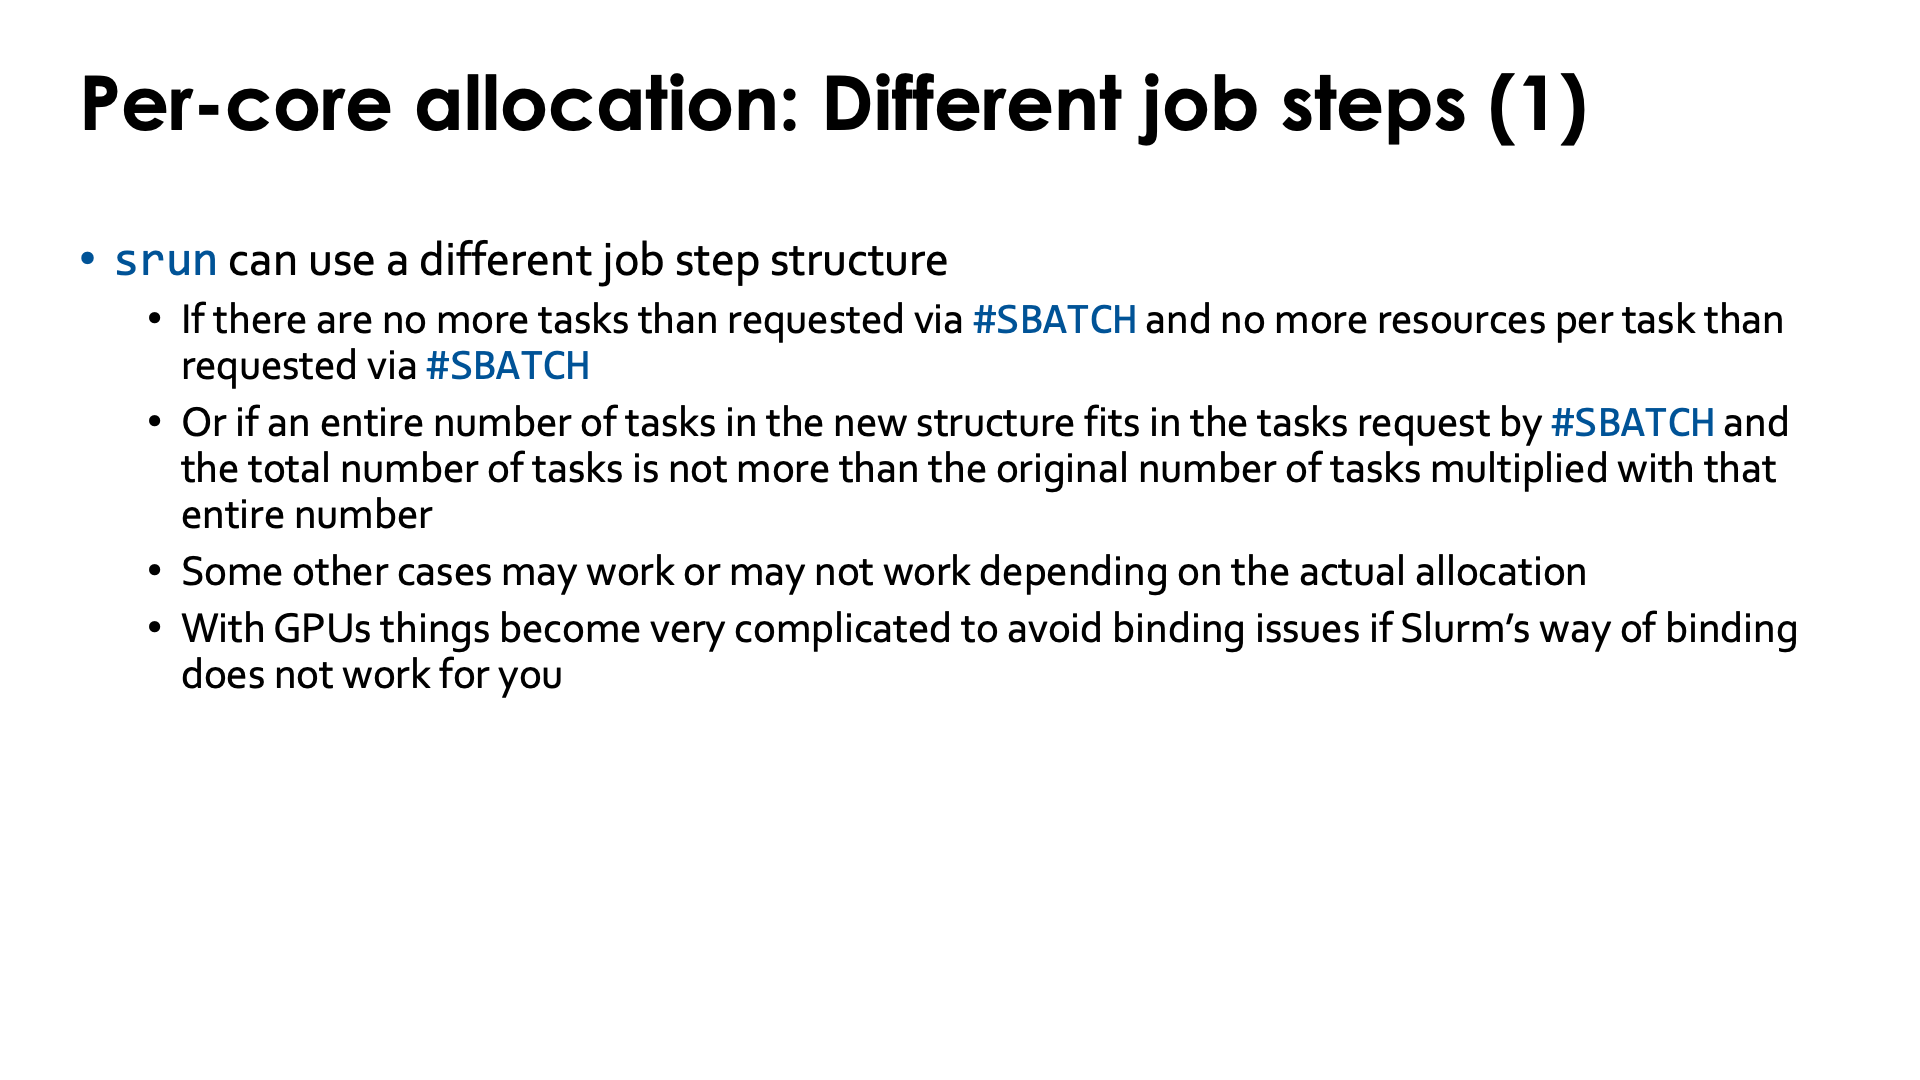

It is possible to have an srun command with a different task structure in your job script.
This will work if no task requires more CPUs or GPUs than in the original request, and if there are
either not more tasks either or if an entire number of tasks in the new structure fits in a task
in the structure from the allocation and the total number of tasks does not exceed the original number
multiplied with that entire number. Other cases may work randomly, depending on how Slurm did the
actual allocation. In fact, this may even be abused to ensure that all tasks are allocated to a single
node, though this is done more elegantly by just specifying --nodes=1.
With GPUs though it can become very complicated to avoid binding problems if the Slurm way of implementing GPU binding does not work for you.
Some examples that work and don't work (click to expand)
Consider the job script:
#! /usr/bin/bash
#SBATCH --job-name=slurm-small-multiple-srun
#SBATCH --partition=small
#SBATCH --ntasks=4
#SBATCH --cpus-per-task=4
#SBATCH --hint=nomultithread
#SBATCH --time=5:00
#SBATCH --output %x-%j.txt
#SBATCH --acount=project_46YXXXXXX

module load LUMI/22.12 partition/C lumi-CPEtools/1.1-cpeCray-22.12

echo "Running on $SLURM_JOB_NODELIST"

set -x

omp_check

srun --ntasks=1 --cpus-per-task=3 omp_check

srun --ntasks=2 --cpus-per-task=4 hybrid_check

srun --ntasks=4 --cpus-per-task=1 mpi_check

srun --ntasks=16 --cpus-per-task=1 mpi_check

srun --ntasks=1 --cpus-per-task=16 omp_check

set +x
echo -e "\nsacct for the job:\n$(sacct -j $SLURM_JOB_ID)\n"
In the first output example (with lots of output deleted) we got the full allocation of 16 cores on a single node, and in fact, even 16 consecutive cores though spread across 3 L3 cache domains. We'll go over the output in steps:
Running on nid002154

+ omp_check

Running 32 threads in a single process

++ omp_check: OpenMP thread   0/32  on cpu  20/256 of nid002154
++ omp_check: OpenMP thread   1/32  on cpu 148/256 of nid002154
...
The first omp_check command was started without using srun and hence ran on all
hardware cores allocated to the job. This is why hardware threading is enabled and why
the executable sees 32 cores.
+ srun --ntasks=1 --cpus-per-task=3 omp_check

Running 3 threads in a single process

++ omp_check: OpenMP thread   0/3   on cpu  20/256 of nid002154
++ omp_check: OpenMP thread   1/3   on cpu  21/256 of nid002154
++ omp_check: OpenMP thread   2/3   on cpu  22/256 of nid002154
Next omp_check was started via srun --ntasks=1 --cpus-per-task=3. One task instead of 4,
and the task is also smaller in terms of number of nodes as the tasks requested in SBATCH
lines, and Slurm starts the executable without problems. It runs on three cores, correctly
detects that number, and also correctly does not use hardware threading.
+ srun --ntasks=2 --cpus-per-task=4 hybrid_check

Running 2 MPI ranks with 4 threads each (total number of threads: 8).

++ hybrid_check: MPI rank   0/2   OpenMP thread   0/4   on cpu  23/256 of nid002154
++ hybrid_check: MPI rank   0/2   OpenMP thread   1/4   on cpu  24/256 of nid002154
++ hybrid_check: MPI rank   0/2   OpenMP thread   2/4   on cpu  25/256 of nid002154
++ hybrid_check: MPI rank   0/2   OpenMP thread   3/4   on cpu  26/256 of nid002154
++ hybrid_check: MPI rank   1/2   OpenMP thread   0/4   on cpu  27/256 of nid002154
++ hybrid_check: MPI rank   1/2   OpenMP thread   1/4   on cpu  28/256 of nid002154
++ hybrid_check: MPI rank   1/2   OpenMP thread   2/4   on cpu  29/256 of nid002154
++ hybrid_check: MPI rank   1/2   OpenMP thread   3/4   on cpu  30/256 of nid002154
Next we tried to start 2 instead of 4 MPI processes with 4 cores each which also works without
problems. The allocation now starts on core 23 but that is because Slurm was still finishing
the job step on cores 20 till 22 from the previous srun command. This may or may not happen
and is also related to a remark we made before about using sacct at the end of the job where
the last job step may still be shown as running instead of completed.
+ srun --ntasks=4 --cpus-per-task=1 mpi_check

Running 4 single-threaded MPI ranks.

++ mpi_check: MPI rank   0/4   on cpu  20/256 of nid002154
++ mpi_check: MPI rank   1/4   on cpu  21/256 of nid002154
++ mpi_check: MPI rank   2/4   on cpu  22/256 of nid002154
++ mpi_check: MPI rank   3/4   on cpu  23/256 of nid002154
Now we tried to start 4 tasks with 1 core each. This time we were lucky and the system
considered the previous srun completely finished and gave us the first 4 cores of the
allocation.
+ srun --ntasks=16 --cpus-per-task=1 mpi_check
srun: Job 4268529 step creation temporarily disabled, retrying (Requested nodes are busy)
srun: Step created for job 4268529

Running 16 single-threaded MPI ranks.

++ mpi_check: MPI rank   0/16  on cpu  20/256 of nid002154
++ mpi_check: MPI rank   1/16  on cpu  21/256 of nid002154
++ mpi_check: MPI rank   2/16  on cpu  22/256 of nid002154
++ mpi_check: MPI rank   3/16  on cpu  23/256 of nid002154
++ mpi_check: MPI rank   4/16  on cpu  24/256 of nid002154
++ mpi_check: MPI rank   5/16  on cpu  25/256 of nid002154
...
With the above srun command we try to start 16 single-threaded MPI processes. This fits
perfectly in the allocation as it simply needs to put 4 of these tasks in the space reserved
for one task in the #SBATCH request. The warning at the start may or may not happen. Basically
Slurm was still freeing up the cores from the previous run and therefore the new srun dind't
have enough resources the first time it tried to, but it automatically tried a second time.
+ srun --ntasks=1 --cpus-per-task=16 omp_check
srun: Job step's --cpus-per-task value exceeds that of job (16 > 4). Job step may never run.
srun: Job 4268529 step creation temporarily disabled, retrying (Requested nodes are busy)
srun: Step created for job 4268529

Running 16 threads in a single process

++ omp_check: OpenMP thread   0/16  on cpu  20/256 of nid002154
++ omp_check: OpenMP thread   1/16  on cpu  21/256 of nid002154
++ omp_check: OpenMP thread   2/16  on cpu  22/256 of nid002154
...
In the final srun command we try to run a single 16-core OpenMP run. This time Slurm produces
a warning as it would be impossible to fit a 16-cpre shared memory run in the space of 4 4-core
tasks if the resources for those tasks would have been spread across multiple nodes. The next
warning is again for the same reason as in the previous case, but ultimately the command does run
on all 16 cores allocated and without using hardware threading.
+ set +x

sacct for the job:
JobID           JobName  Partition    Account  AllocCPUS      State ExitCode
------------ ---------- ---------- ---------- ---------- ---------- --------
4268529      slurm-sma+      small project_4+         32    RUNNING      0:0
4268529.bat+      batch            project_4+         32    RUNNING      0:0
4268529.0     omp_check            project_4+          6  COMPLETED      0:0
4268529.1    hybrid_ch+            project_4+         16  COMPLETED      0:0
4268529.2     mpi_check            project_4+          8  COMPLETED      0:0
4268529.3     mpi_check            project_4+         32  COMPLETED      0:0
4268529.4     omp_check            project_4+         32    RUNNING      0:0
The output of sacct confirms what we have been seeing. The first omp_check
was run without srun and ran in the original batch step which had all hardware threads
of all 16 allocated cores available. The next omp_check ran on 3 cores but 6 is
shwon in this scheme which is normal as the "other" hardware thread on each core is
implicitly also reserved. And the same holds for all other numbers in that column.
At another time I was less lucky and got the tasks spread out across 4 nodes, each running a single 4-core task. Let's go through the output again:
Running on nid[002154,002195,002206,002476]

+ omp_check

Running 8 threads in a single process

++ omp_check: OpenMP thread   0/8   on cpu  36/256 of nid002154
++ omp_check: OpenMP thread   1/8   on cpu 164/256 of nid002154
++ omp_check: OpenMP thread   2/8   on cpu  37/256 of nid002154
++ omp_check: OpenMP thread   3/8   on cpu 165/256 of nid002154
++ omp_check: OpenMP thread   4/8   on cpu  38/256 of nid002154
++ omp_check: OpenMP thread   5/8   on cpu 166/256 of nid002154
++ omp_check: OpenMP thread   6/8   on cpu  39/256 of nid002154
++ omp_check: OpenMP thread   7/8   on cpu 167/256 of nid002154
The first omp_check now uses all hardware threads of the 4 cores allocated
in the first node of the job (while using 16 cores/32 threads in the configuration
where all cores were allocated on a single node).
+ srun --ntasks=1 --cpus-per-task=3 omp_check

Running 3 threads in a single process

++ omp_check: OpenMP thread   0/3   on cpu  36/256 of nid002154
++ omp_check: OpenMP thread   1/3   on cpu  37/256 of nid002154
++ omp_check: OpenMP thread   2/3   on cpu  38/256 of nid002154
Running a three core OpenMP job goes without problems as it nicely fits within the
space of a single task of the #SBATCH allocation.
+ srun --ntasks=2 --cpus-per-task=4 hybrid_check

Running 2 MPI ranks with 4 threads each (total number of threads: 8).

++ hybrid_check: MPI rank   0/2   OpenMP thread   0/4   on cpu  36/256 of nid002195
++ hybrid_check: MPI rank   0/2   OpenMP thread   1/4   on cpu  37/256 of nid002195
++ hybrid_check: MPI rank   0/2   OpenMP thread   2/4   on cpu  38/256 of nid002195
++ hybrid_check: MPI rank   0/2   OpenMP thread   3/4   on cpu  39/256 of nid002195
++ hybrid_check: MPI rank   1/2   OpenMP thread   0/4   on cpu  46/256 of nid002206
++ hybrid_check: MPI rank   1/2   OpenMP thread   1/4   on cpu  47/256 of nid002206
++ hybrid_check: MPI rank   1/2   OpenMP thread   2/4   on cpu  48/256 of nid002206
++ hybrid_check: MPI rank   1/2   OpenMP thread   3/4   on cpu  49/256 of nid002206
Running 2 4-thread MPI processes also goes without problems. In this case we got the second and third
task from the original allocation, likely because Slurm was still freeing up the first node
after the previous srun command.
+ srun --ntasks=4 --cpus-per-task=1 mpi_check
srun: Job 4268614 step creation temporarily disabled, retrying (Requested nodes are busy)
srun: Step created for job 4268614

Running 4 single-threaded MPI ranks.

++ mpi_check: MPI rank   0/4   on cpu  36/256 of nid002154
++ mpi_check: MPI rank   1/4   on cpu  36/256 of nid002195
++ mpi_check: MPI rank   2/4   on cpu  46/256 of nid002206
++ mpi_check: MPI rank   3/4   on cpu   0/256 of nid002476
Running 4 single threaded processes also goes without problems (but the fact that they are scheduled on 4 different nodes here is likely an artifact of the way we had to force to get more than one node as the small partition on LUMI was not very busy at that time).
+ srun --ntasks=16 --cpus-per-task=1 mpi_check

Running 16 single-threaded MPI ranks.

++ mpi_check: MPI rank   0/16  on cpu  36/256 of nid002154
++ mpi_check: MPI rank   1/16  on cpu  37/256 of nid002154
++ mpi_check: MPI rank   2/16  on cpu  38/256 of nid002154
++ mpi_check: MPI rank   3/16  on cpu  39/256 of nid002154
++ mpi_check: MPI rank   4/16  on cpu  36/256 of nid002195
++ mpi_check: MPI rank   5/16  on cpu  37/256 of nid002195
++ mpi_check: MPI rank   6/16  on cpu  38/256 of nid002195
++ mpi_check: MPI rank   7/16  on cpu  39/256 of nid002195
++ mpi_check: MPI rank   8/16  on cpu  46/256 of nid002206
++ mpi_check: MPI rank   9/16  on cpu  47/256 of nid002206
++ mpi_check: MPI rank  10/16  on cpu  48/256 of nid002206
++ mpi_check: MPI rank  11/16  on cpu  49/256 of nid002206
++ mpi_check: MPI rank  12/16  on cpu   0/256 of nid002476
++ mpi_check: MPI rank  13/16  on cpu   1/256 of nid002476
++ mpi_check: MPI rank  14/16  on cpu   2/256 of nid002476
++ mpi_check: MPI rank  15/16  on cpu   3/256 of nid002476
16 single threaded MPI processes also works without problems.
+ srun --ntasks=1 --cpus-per-task=16 omp_check
srun: Job step's --cpus-per-task value exceeds that of job (16 > 4). Job step may never run.
srun: Warning: can't run 1 processes on 4 nodes, setting nnodes to 1
srun: error: Unable to create step for job 4268614: More processors requested than permitted
...
However, trying to run a single 16-thread process now fails. Slurm first warns us that it might fail, then tries and lets it fail.
The job environment
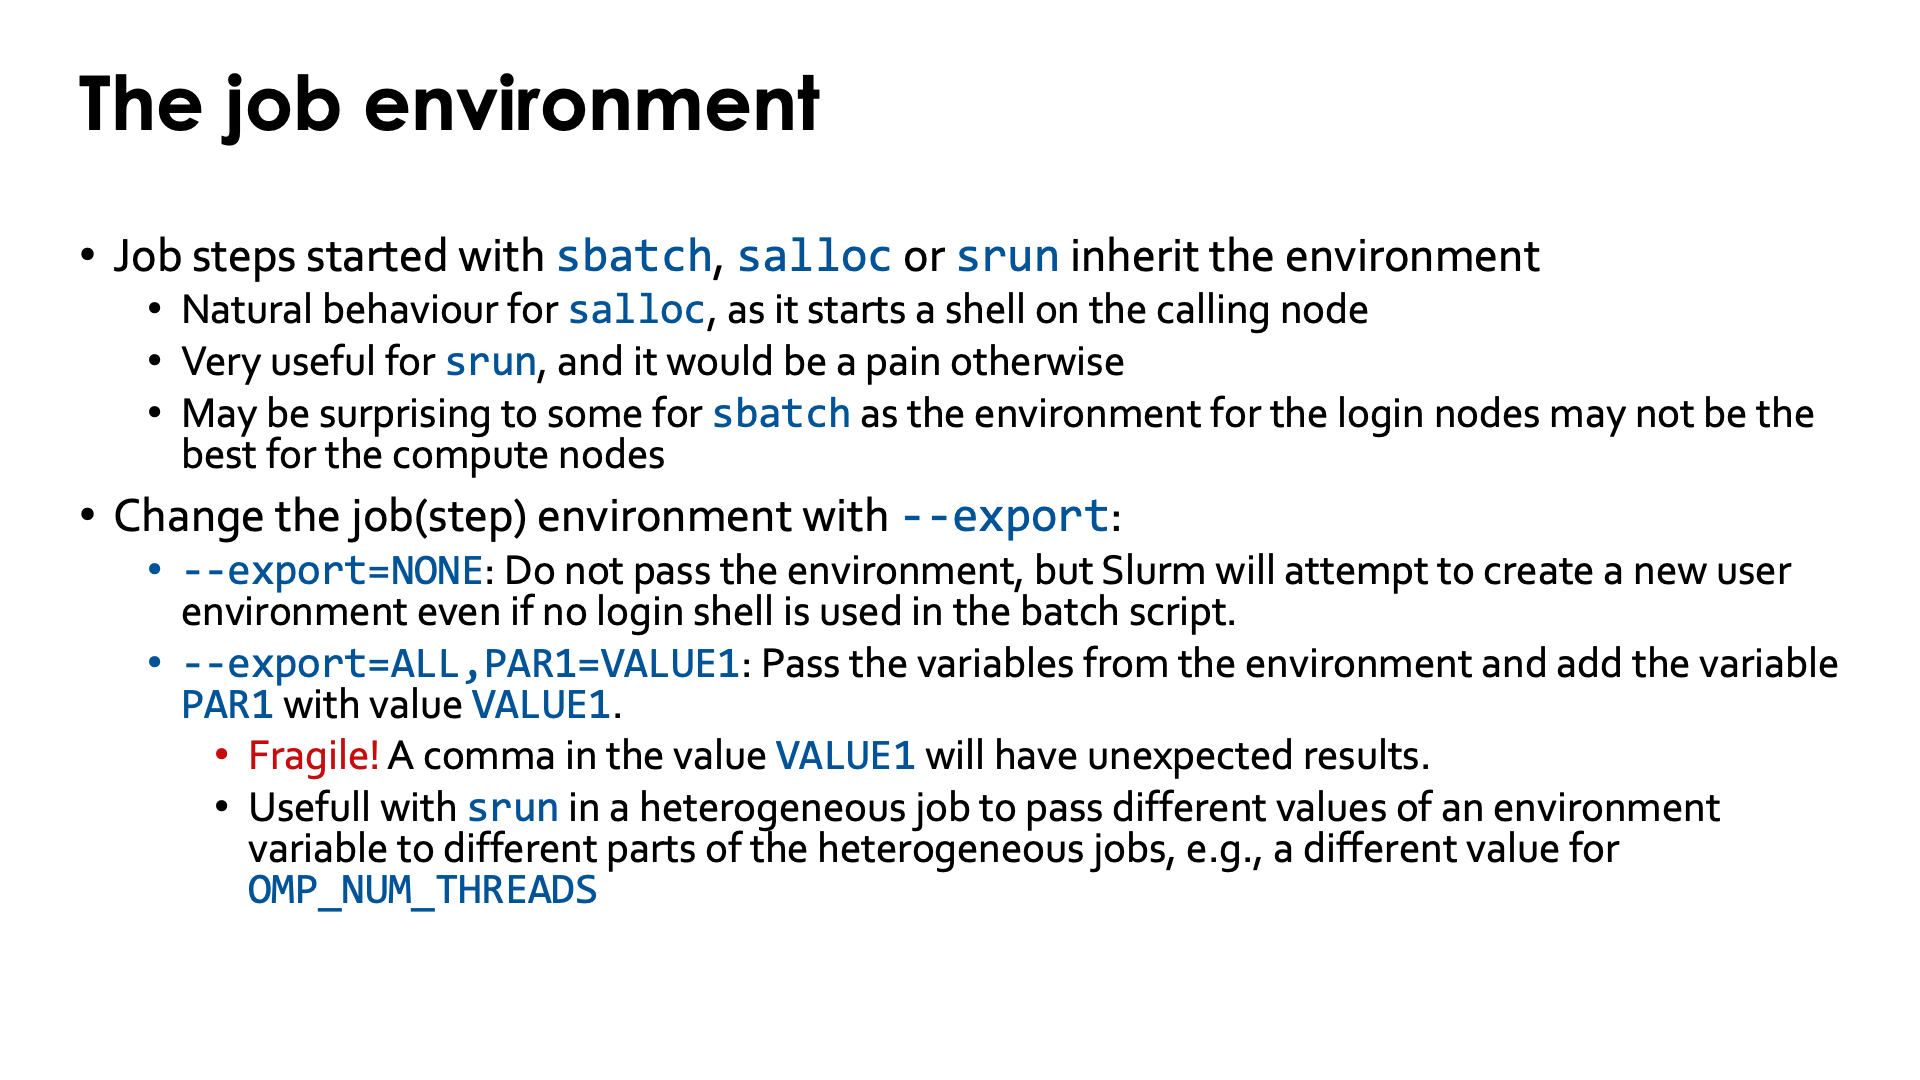
On LUMI, sbatch, salloc and srun will all by default copy the environment in which they run to the
job step they start (the batch job step for sbatch, an interactive job step for salloc and a regular
job step for srun). For salloc this is normal behaviour as it also starts an interactive shell on the
login nodes (and it cannot be changed with a command line parameter). For srun, any other behaviour
would be a pain as each job step would need to set up an environment. But for sbatch this may be
surprising to some as the environment on the login nodes may not be the best environment for the
compute nodes. Indeed, we do recommend to reload, e.g., the LUMI modules to use software optimised
specifically for the compute nodes or to have full support of ROCm.
It is possible to change this behaviour or to define extra environment variables with
sbatch and srun using the command line option --export:
-
--export=NONEwill start the job (step) in a clean environment. The environment will not be inherited, but Slurm will attempt to re-create the user environment even if no login shell is called or used in the batch script. (--export=NILwould give you a truly empty environment.) -
To define extra environment variables, use
--export=ALL,VAR1=VALUE1which would pass all existing environment variables and define a new one,VAR1, with the valueVALUE1. It is of course also possible to define more environment variables using a comma-separated list (without spaces). Withsbatch, specifying--exporton the command line that way is a way to parameterise a batch script. Withsrunit can be very useful with heterogeneous jobs if different parts of the job need a different setting for an environment variable (e.g.,OMP_NUM_THREADS).Note however that
ALLin the above--exportoption is essential as otherwise only the environment variableVAR1would be defined.It is in fact possible to pass only select environment variables by listing them without assigning a new value and omitting the
ALLbut we see no practical use of that on LUMI as the list of environment variables that is needed to have a job script in which you can work more or less normally is rather long.
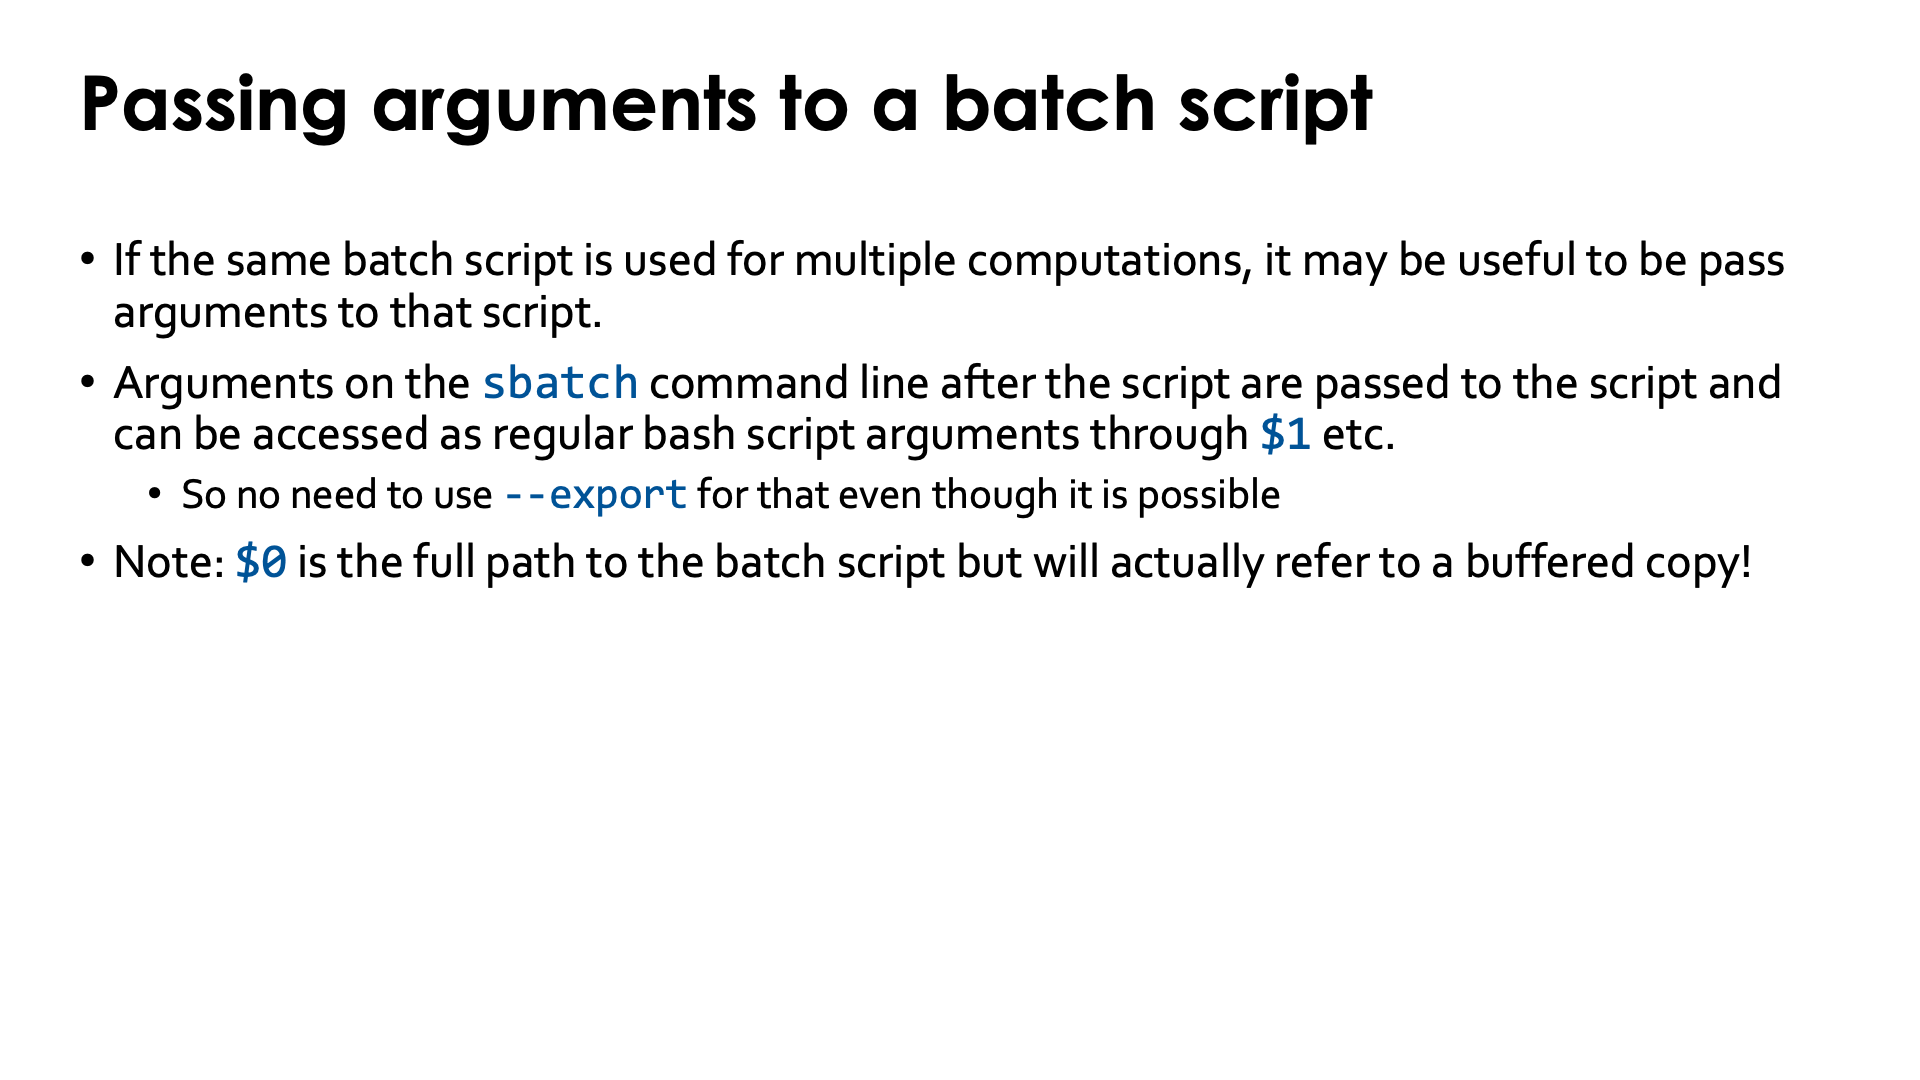
Passing argumetns to a batch script
With the Slurm sbatch command, any argument passed after the name of the job script is passed to the
job script as an argument, so you can use regular bash shell argument processing to pass arguments to
the bash script and do not necessarily need to use --export. Consider the following job script to
demonstrate both options:
! /usr/bin/bash
#SBATCH --job-name=slurm-small-parameters
#SBATCH --partition=small
#SBATCH --ntasks=1
#SBATCH --cpus-per-task=1
#SBATCH --hint=nomultithread
#SBATCH --time=5:00
#SBATCH --output %x-%j.txt
#SBATCH --account=project_46YXXXXXX

echo "Batch script parameter 0: $0"
echo "Batch script parameter 1: $1"
echo "Environment variable PAR1: $PAR1"
Now start this with (assuming the job script is saved as slurm-small-parameters.slurm)
$ sbatch --export=ALL,PAR1="Hello" slurm-small-parameters.slurm 'Wow, this works!'
and check the output file when the job is completed:
Batch script parameter 0: /var/spool/slurmd/job4278998/slurm_script
Batch script parameter 1: Wow, this works!
Environment variable PAR1: Hello
You see that you do not get the path to the job script as it was submitted (which you may expect
to be the value of $0). Instead the job script is buffered when you execute sbatch and started
from a different directory. $1 works as expected, and PAR1 is also defined.
In fact, passing arguments through command line arguments of the bash script is a more robust
mechanism than using --export as can be seen from the bug discussed below...
Fragile behaviour of --export
One of the problems with --export is that you cannot really assign any variable to a new
environment variable the way you would do it on the bash command line. It is not clear what
internal processing is going on, but the value is not always what you would expect.
In particular, problems can be expected when the value of the variable contains a semicolon.
E.g., try the command from the previous example with --export=ALL,PAR1='Hello, world'
and it turns out that only Hello is passed as the value of the variable.
Differences with some VSC systems
The job environment in Slurm is different from that of some other resource managers, and in paritcular Torque which was in use on VSC clusters and whose behaviour is still emulated on some. LUMI uses the default settings of Slurm when it comes to environment management which is to start a job or job step in the environment from which the Slurm command was called.
Automatic requeueing
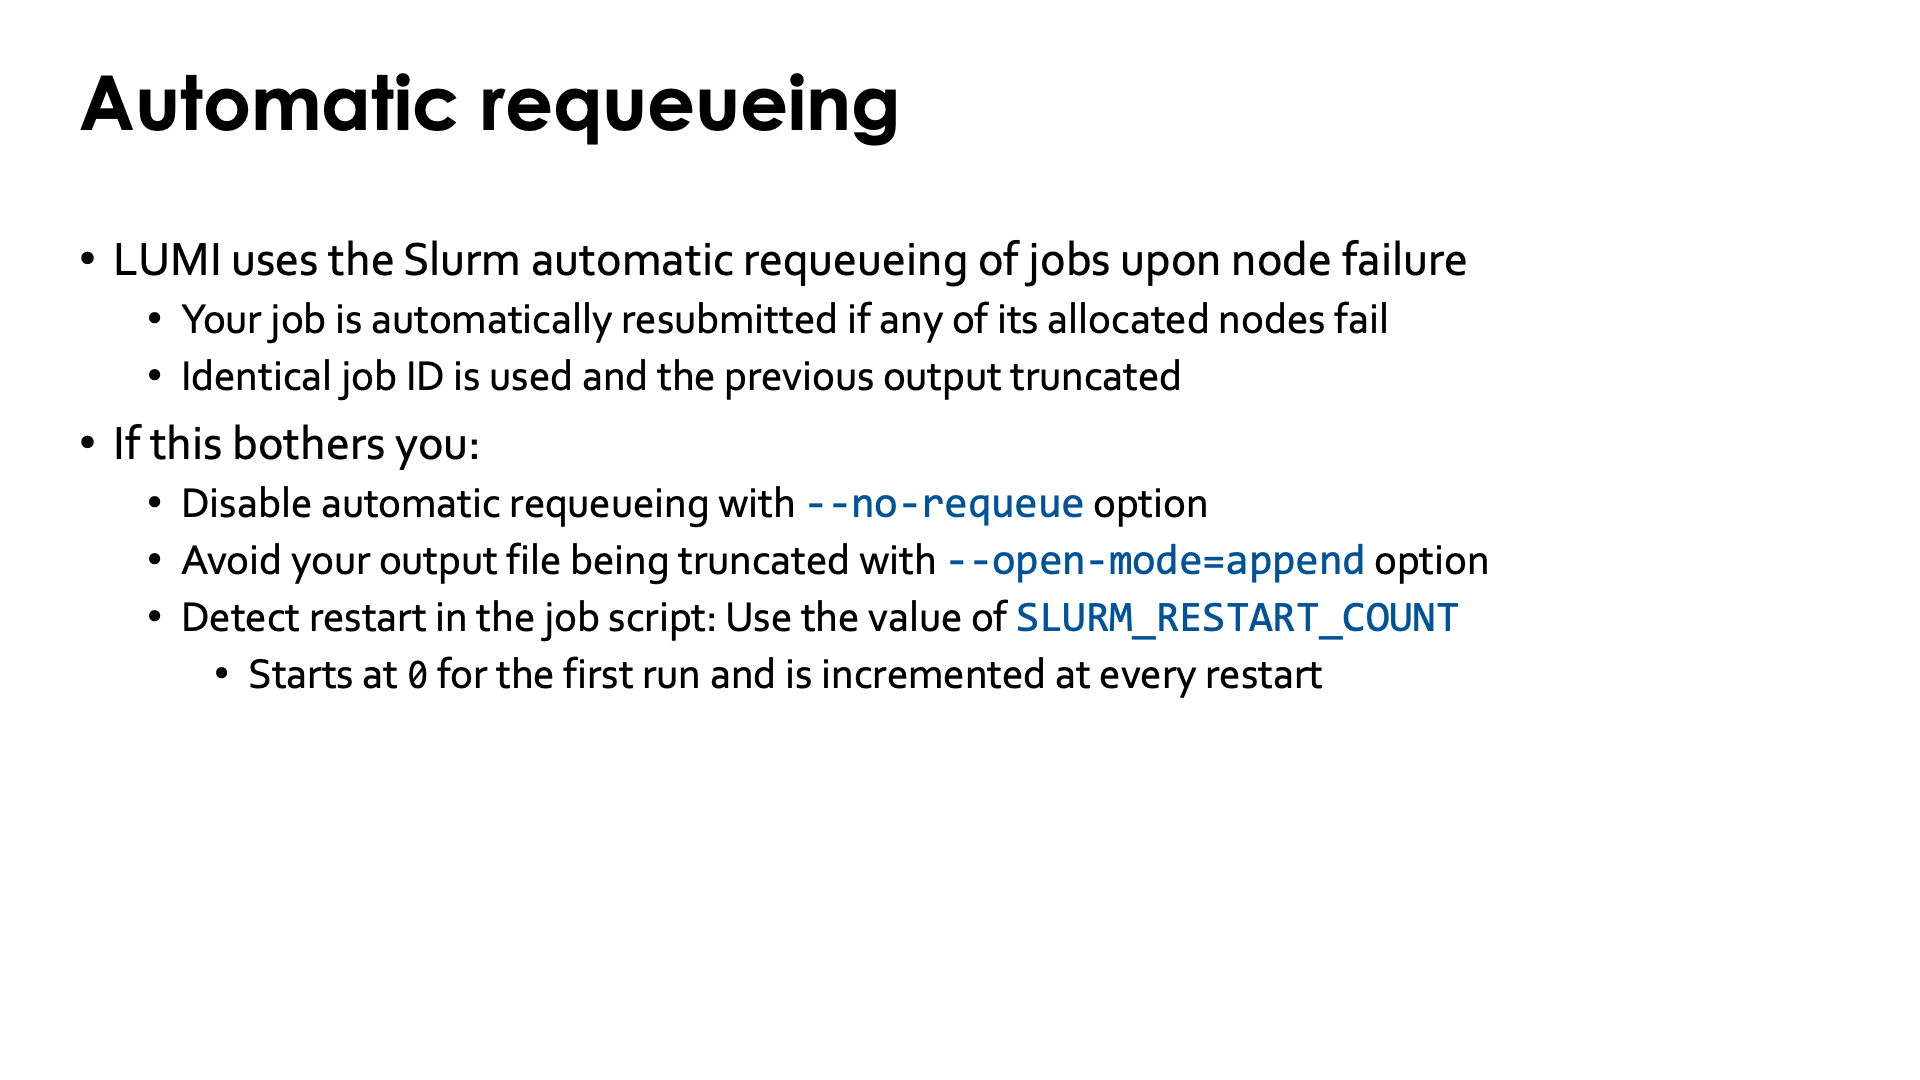
LUMI has the Slurm automatic requeueing of jobs upon node failure enabled. So jobs will be automatically resubmitted when one of the allocated nodes fails. For this an identical job ID is used and by default the prefious output will be truncated when the requeueed job starts.
There are some options to influence this behaviour:
-
Automatic requeueing can be disabled at job submission with the
--no-requeueoption of thesbatchcommand. -
Truncating of the output files can be avoided by specifying
--open-mode=append. -
It is also possible to detect in a job script if a job has been restarted or not. For this Slurm sets the environment variable
SLURM_RESTART_COUNTwhich is 0 the first time a job script runs and augmented by one at every restart.
Job dependencies
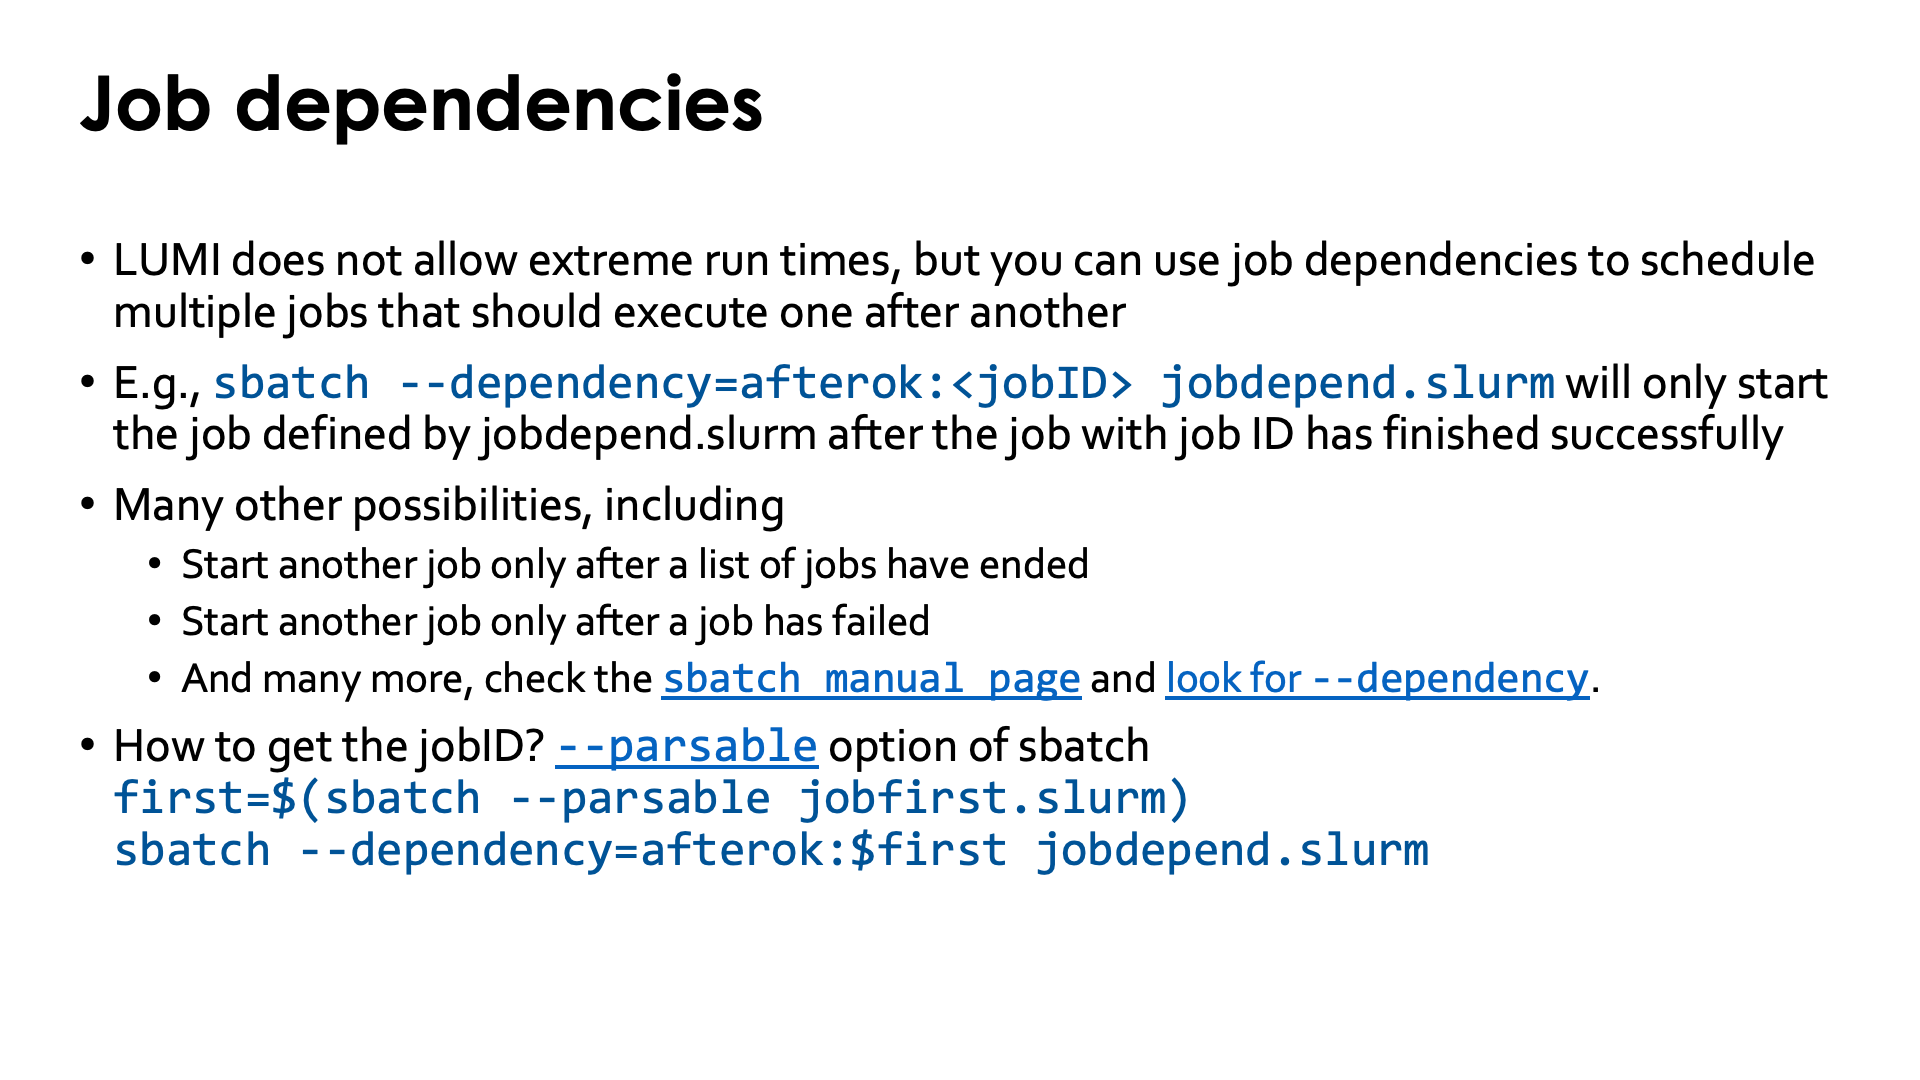
The maximum wall time that a job can run on LUMI is fairly long for a Tier-0 system. Many other big systems in Europe will only allow a maximum wall time of 24 hours. Despite this, this is not yet enough for some users. One way to deal with this is ensure that programs end in time and write the necessary restart information in a file, then start a new job that continues from that file.
You don't have to wait to submit that second job. Instead, it is possible to tell Slurm that the second job should not start before the first one has ended (and ended successfully). This is done through job dependencies. It would take us too far to discuss all possible cases in this tutorial.
One example is
$ sbatch --dependency=afterok:<jobID> jobdepend.slurm
With this statement, the job defined by the job script jobdpend.slurm will not start until the job with the
given jobID has ended successfully (and you may have to clean up the queue if it never ends successfully). But
there are other possibilities also, e.g., start another job after a list of jobs has ended, or after a job has
failed. We refer to the
sbatch manual page where you should
look for --dependency on the page.
It is also possible to automate the process of submitting a chain of dependent jobs. For this the
sbatch flag --parsable
can be used which on LUMI will only print the job number of the job being submitted. So to
let the job defined by jobdepend.slurm run after the job defined by jobfirst.slurm while
submitting both at the same time, you can use something like
first=$(sbatch --parsable jobfirst.slurm)
sbatch --dependency=afterok:$first jobdepend.slurm
Interactive jobs
Interactive jobs can have several goals, e.g.,
-
Simply testing a code or steps to take to get a code to run while developing a job script. In this case you will likely want an allocation in which you can also easily run parallel MPI jobs.
-
Compiling a code usually works better interactively, but here you only need an allocation for a single task supporting multiple cores if your code supports a parallel build process. Building on the compute nodes is needed if architecture-specific optimisations are desired while the code building process does not support cross-compiling (e.g., because the build process adds
-march=nativeor a similar compiler switch even if it is told not to do so) or ie you want to compile software for the GPUs that during the configure or build process needs a GPU to be present in the node to detect its features. -
Attaching to a running job to inspect how it is doing.
Interactive jobs with salloc
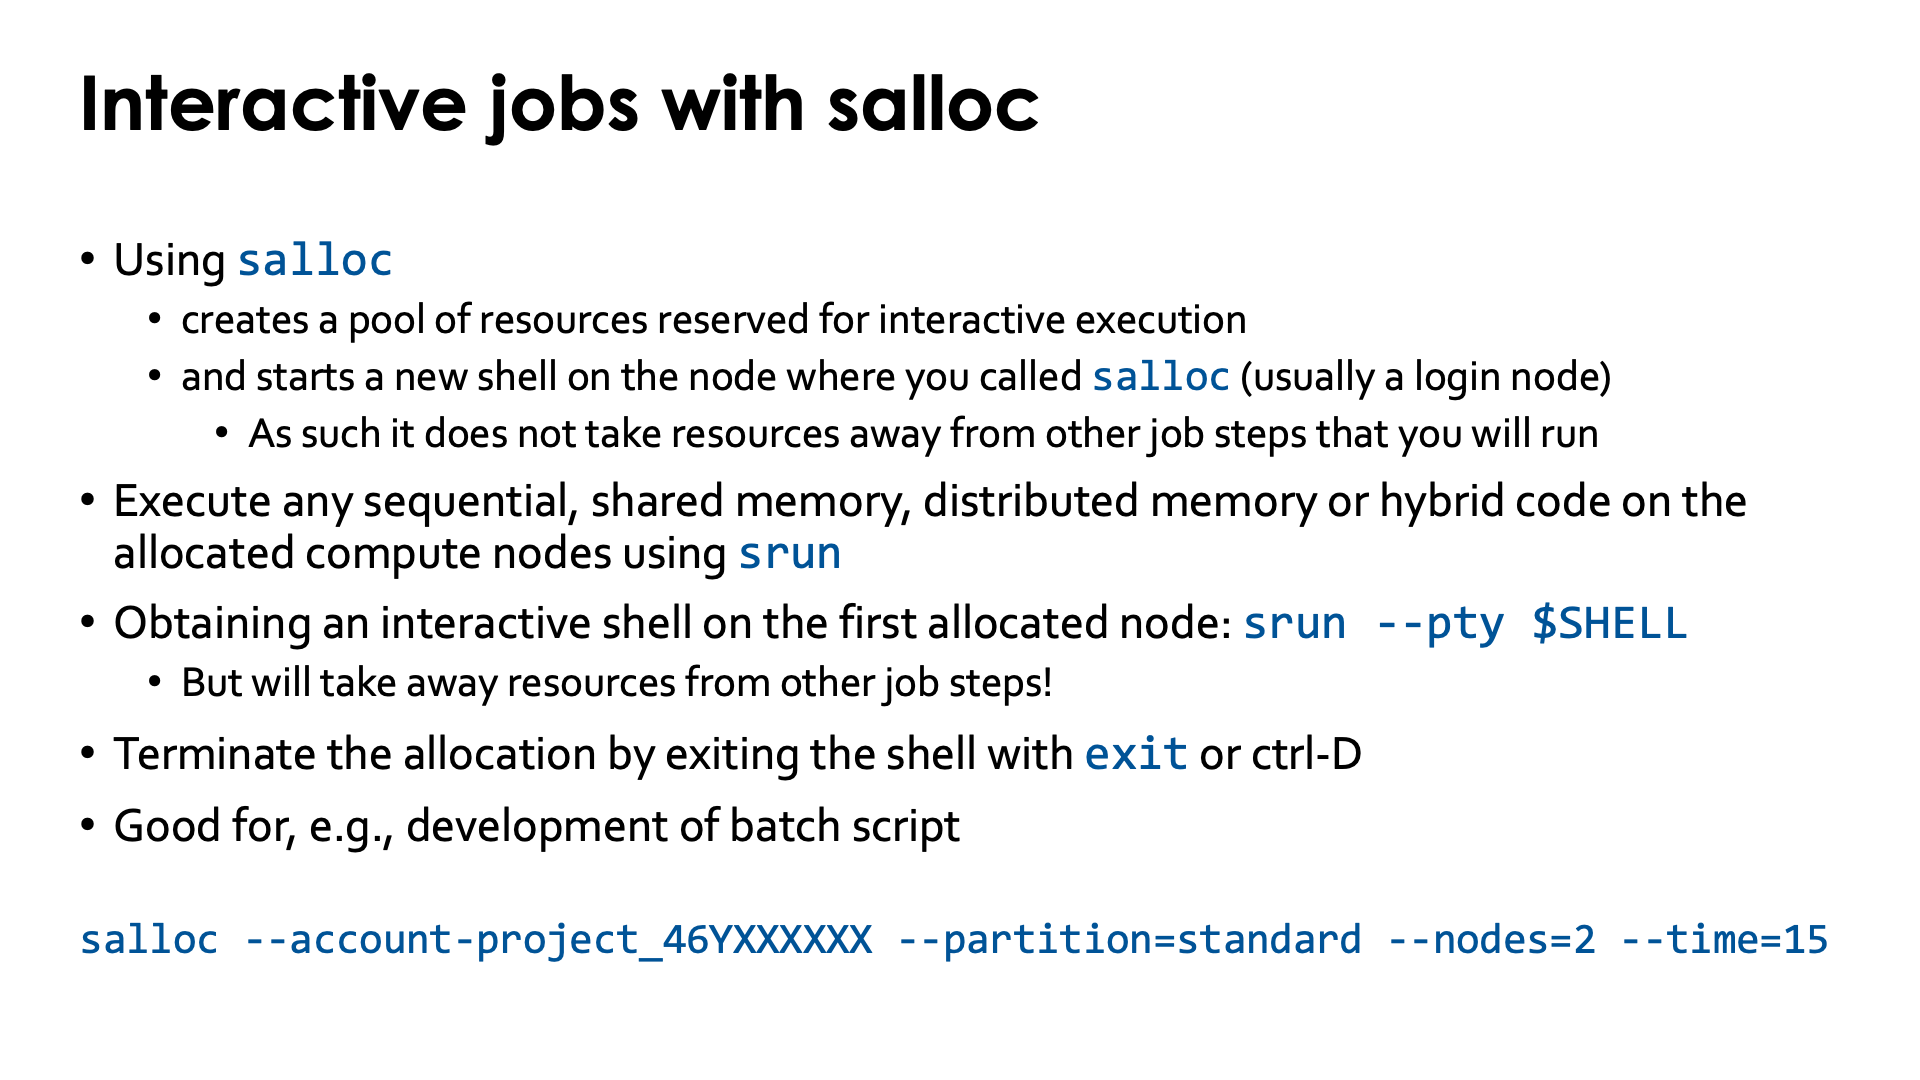
This is a very good way of working for the first scenario described above.
Using salloc will create a pool of resources reserved for interactive execution, and
will start a new shell on the node where you called salloc(usually a login node).
As such it does not take resources away from other job steps that you will create so
the shell is a good environment to test most stuff that you would execute in the
batch job step of a job script.
To execute any code on one of the allocated compute nodes, be it a large sequential program,
a shared memory program, distributed memory program or hybrid code, you can use srun in
the same way as we have discussed for job scripts.
It is possible to obtain an interactive shell on the first allocated compute node with
srun --pty $SHELL
(which if nothing more is specified would give you a single core for the shell),
but keep in mind that this takes away resources from other job steps so if you try to
start further job steps from that interactive shell you will note that you have fewer
resources available, and will have to force overlap (with --overlap),
so it is not very practical to work that way.
To terminate the allocation, simply exit the shell that was created by salloc with exit or
the CTRL-D key combination (and the same holds for the interactive shell in the previous
paragraph).
Example with salloc and a GPU code (click to expand)
$ salloc --account=project_46YXXXXXX --partition=standard-g --nodes=2 --time=15
salloc: Pending job allocation 4292946
salloc: job 4292946 queued and waiting for resources
salloc: job 4292946 has been allocated resources
salloc: Granted job allocation 4292946
$ module load LUMI/22.12 partition/G lumi-CPEtools/1.1-cpeCray-22.12

...

$ srun -n 16 -c 2 --gpus-per-task 1 gpu_check
MPI 000 - OMP 000 - HWT 001 - Node nid005191 - RT_GPU_ID 0 - GPU_ID 0 - Bus_ID c1
MPI 000 - OMP 001 - HWT 002 - Node nid005191 - RT_GPU_ID 0 - GPU_ID 0 - Bus_ID c1
MPI 001 - OMP 000 - HWT 003 - Node nid005191 - RT_GPU_ID 0 - GPU_ID 0 - Bus_ID c6
MPI 001 - OMP 001 - HWT 004 - Node nid005191 - RT_GPU_ID 0 - GPU_ID 0 - Bus_ID c6
MPI 002 - OMP 000 - HWT 005 - Node nid005191 - RT_GPU_ID 0 - GPU_ID 0 - Bus_ID c9
MPI 002 - OMP 001 - HWT 006 - Node nid005191 - RT_GPU_ID 0 - GPU_ID 0 - Bus_ID c9
MPI 003 - OMP 000 - HWT 007 - Node nid005191 - RT_GPU_ID 0 - GPU_ID 0 - Bus_ID ce
MPI 003 - OMP 001 - HWT 008 - Node nid005191 - RT_GPU_ID 0 - GPU_ID 0 - Bus_ID ce
MPI 004 - OMP 000 - HWT 009 - Node nid005191 - RT_GPU_ID 0 - GPU_ID 0 - Bus_ID d1
MPI 004 - OMP 001 - HWT 010 - Node nid005191 - RT_GPU_ID 0 - GPU_ID 0 - Bus_ID d1
MPI 005 - OMP 000 - HWT 011 - Node nid005191 - RT_GPU_ID 0 - GPU_ID 0 - Bus_ID d6
MPI 005 - OMP 001 - HWT 012 - Node nid005191 - RT_GPU_ID 0 - GPU_ID 0 - Bus_ID d6
MPI 006 - OMP 000 - HWT 013 - Node nid005191 - RT_GPU_ID 0 - GPU_ID 0 - Bus_ID d9
MPI 006 - OMP 001 - HWT 014 - Node nid005191 - RT_GPU_ID 0 - GPU_ID 0 - Bus_ID d9
MPI 007 - OMP 000 - HWT 015 - Node nid005191 - RT_GPU_ID 0 - GPU_ID 0 - Bus_ID dc
MPI 007 - OMP 001 - HWT 016 - Node nid005191 - RT_GPU_ID 0 - GPU_ID 0 - Bus_ID dc
MPI 008 - OMP 000 - HWT 001 - Node nid005192 - RT_GPU_ID 0 - GPU_ID 0 - Bus_ID c1
MPI 008 - OMP 001 - HWT 002 - Node nid005192 - RT_GPU_ID 0 - GPU_ID 0 - Bus_ID c1
MPI 009 - OMP 000 - HWT 003 - Node nid005192 - RT_GPU_ID 0 - GPU_ID 0 - Bus_ID c6
MPI 009 - OMP 001 - HWT 004 - Node nid005192 - RT_GPU_ID 0 - GPU_ID 0 - Bus_ID c6
MPI 010 - OMP 000 - HWT 005 - Node nid005192 - RT_GPU_ID 0 - GPU_ID 0 - Bus_ID c9
MPI 010 - OMP 001 - HWT 006 - Node nid005192 - RT_GPU_ID 0 - GPU_ID 0 - Bus_ID c9
MPI 011 - OMP 000 - HWT 007 - Node nid005192 - RT_GPU_ID 0 - GPU_ID 0 - Bus_ID ce
MPI 011 - OMP 001 - HWT 008 - Node nid005192 - RT_GPU_ID 0 - GPU_ID 0 - Bus_ID ce
MPI 012 - OMP 000 - HWT 009 - Node nid005192 - RT_GPU_ID 0 - GPU_ID 0 - Bus_ID d1
MPI 012 - OMP 001 - HWT 010 - Node nid005192 - RT_GPU_ID 0 - GPU_ID 0 - Bus_ID d1
MPI 013 - OMP 000 - HWT 011 - Node nid005192 - RT_GPU_ID 0 - GPU_ID 0 - Bus_ID d6
MPI 013 - OMP 001 - HWT 012 - Node nid005192 - RT_GPU_ID 0 - GPU_ID 0 - Bus_ID d6
MPI 014 - OMP 000 - HWT 013 - Node nid005192 - RT_GPU_ID 0 - GPU_ID 0 - Bus_ID d9
MPI 014 - OMP 001 - HWT 014 - Node nid005192 - RT_GPU_ID 0 - GPU_ID 0 - Bus_ID d9
MPI 015 - OMP 000 - HWT 015 - Node nid005192 - RT_GPU_ID 0 - GPU_ID 0 - Bus_ID dc
MPI 015 - OMP 001 - HWT 016 - Node nid005192 - RT_GPU_ID 0 - GPU_ID 0 - Bus_ID dc
Interactive jobs with srun
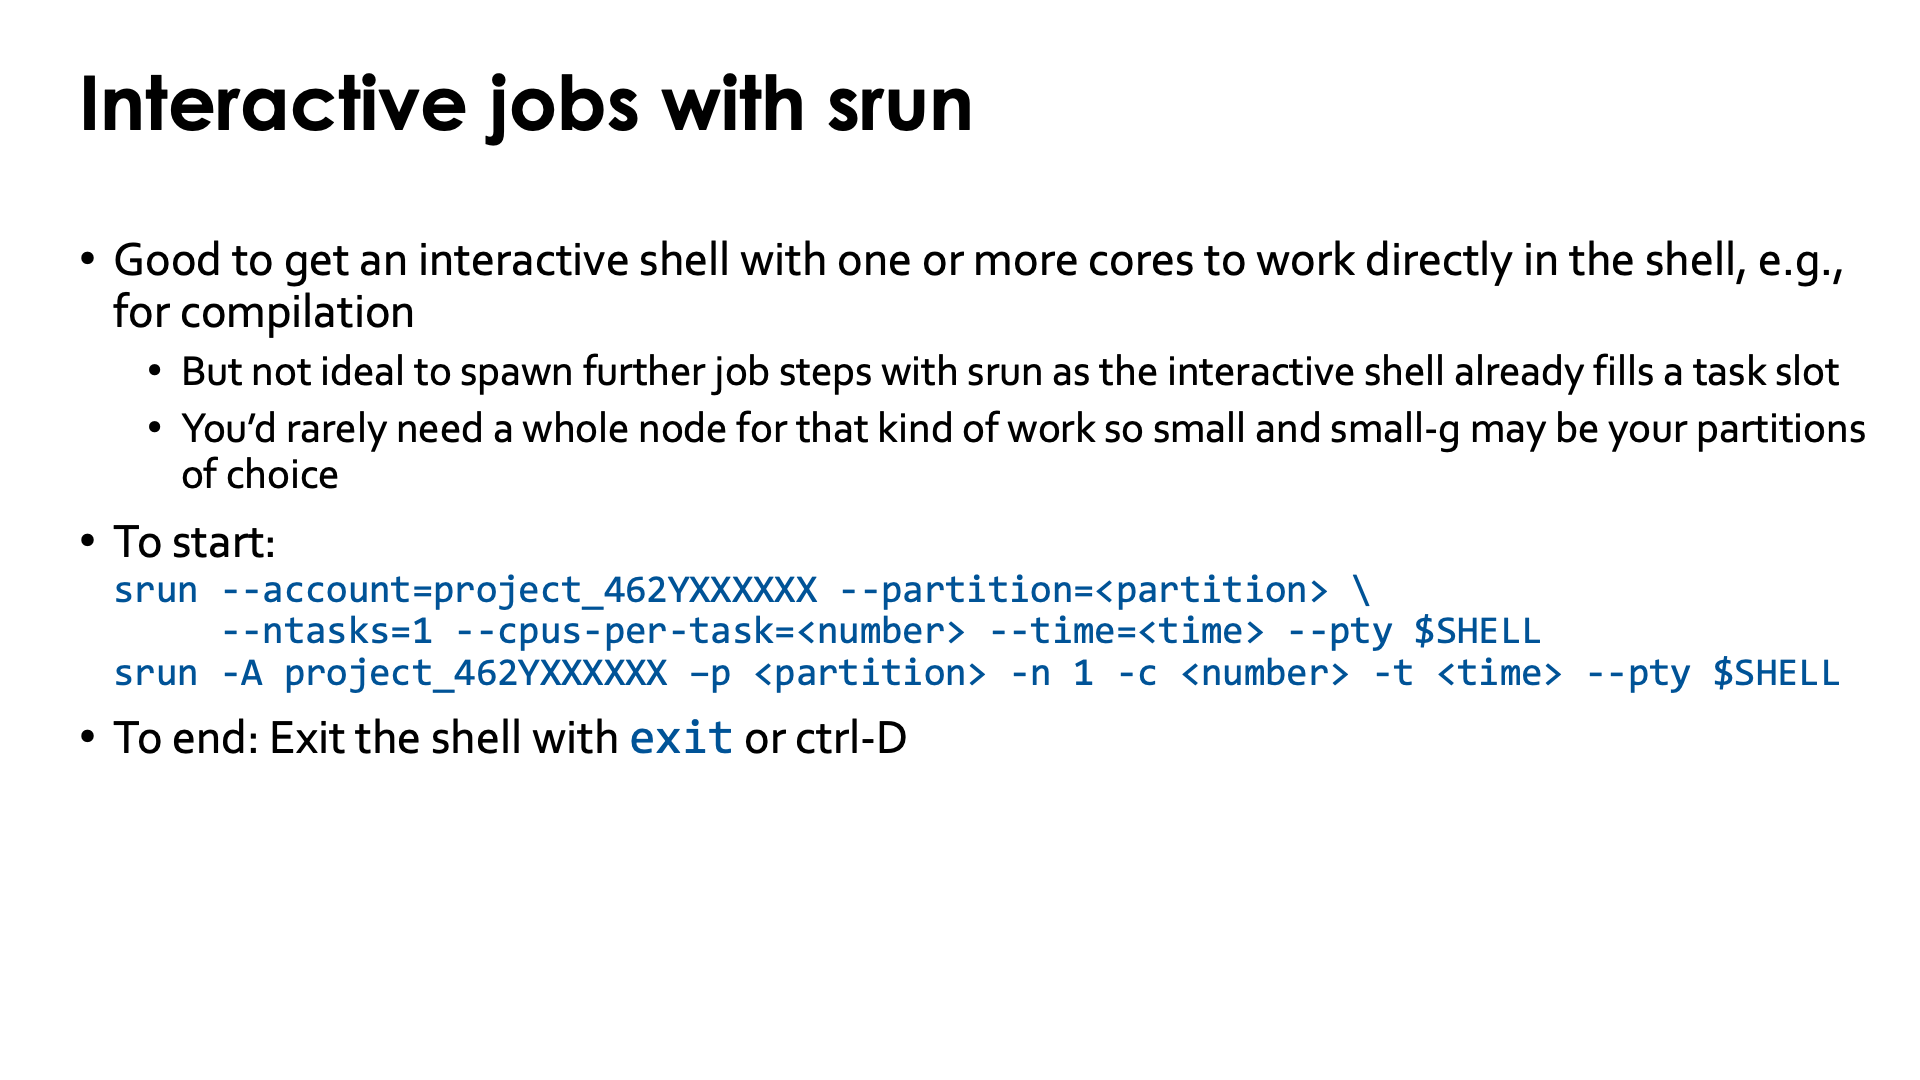
Starting an interactive job with srun is good to get an interactive shell in which you want
to do some work without starting further job steps, e.g., for compilation on the compute nodes
or to run an interactive shared memory program such as R. It is not ideal if you want to spawn
further job steps with srun within the same allocation as the interactive shell already
fills a task slot, so you'd have to overlap if you want to use all resources of the job in the
next job step.
For this kind of work you'll rarely need a whole node so small, small-g, debug or dev-g will likely be your
partitions of choice.
To start such a job, you'd use
srun --account=project_46YXXXXXX --partition=<partition> --ntasks=1 --cpus-per-task=<number> --time=<time> --pty=$SHELL
or with the short options
srun -A project_46YXXXXXX -p <partition> -n 1 -c <number> -t <time> --pty $SHELL
For the GPU nodes you'd also add a --gpus-per-task=<number> to request a number of GPUs.
To end the interactive job, all you need to do is to leave the shell with exit or the
CTRL-D key combination.
Inspecting a running job
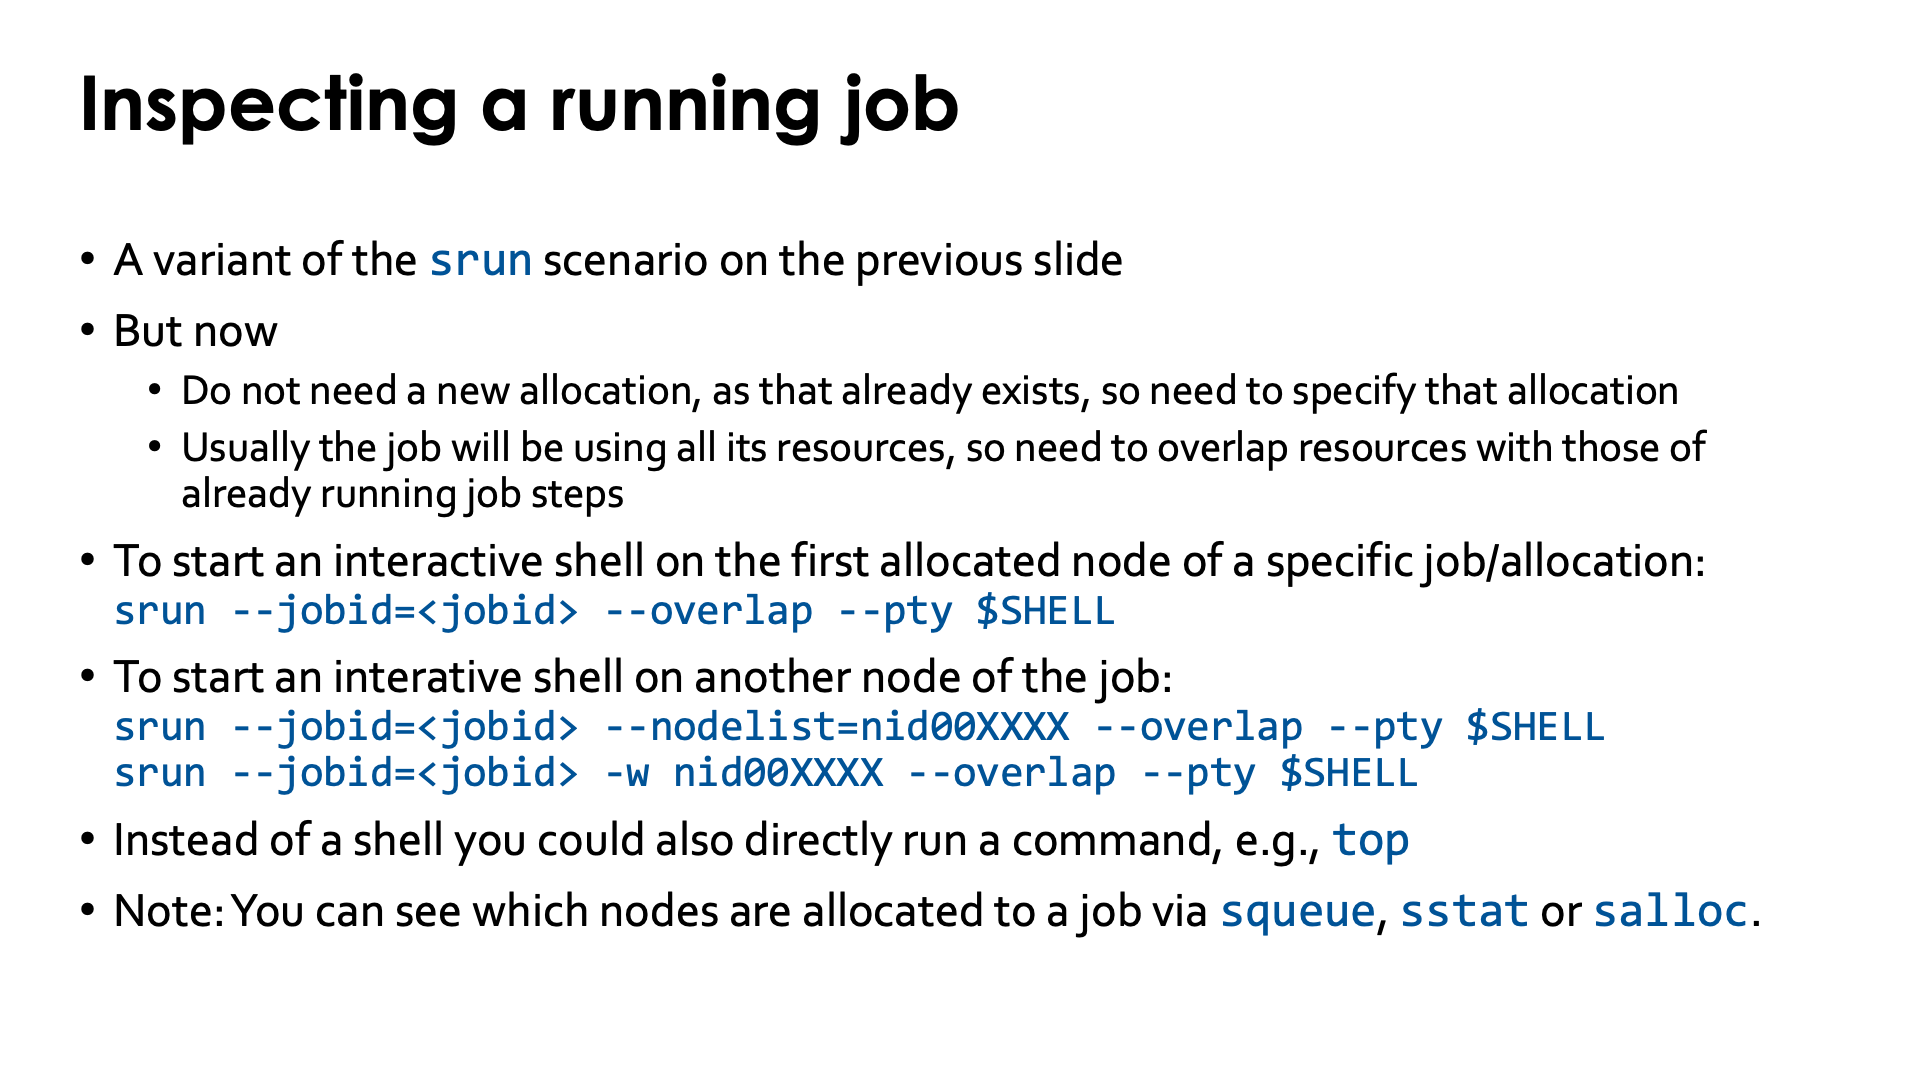
On LUMI it is not possible to use ssh to log on to a compute node in use by one of your jobs.
Instead you need to use Slurm to attach a shell to an already running job. This can be done with
srun, but there are two differences with the previous scenario. First, you do not need a new
allocation but need to tell srun to use an existing allocation. As there is already an allocation,
srun does not need your project account in this case. Second, usually the job will be using all its
resources so there is no room in the allocation to create another job step with the interactive shell.
This is solved by telling srun that the resources should overlap with those already in use.
To start an interactive shell on the first allocated node of a specific job/allocation, use
srun --jobid=<jobID> --overlap --pty $SHELL
and to start an interactive shell on another node of the jobm simply add a -w or --nodelist argument:
srun --jobid=<jobID> --nodelist=nid00XXXX --overlap --pty $SHELL
srun --jobid=<jobID> -w nid00XXXX --overlap --pty $SHELL
Instead of starting a shell, you could also just run a command, e.g., top, to inspect what the nodes are doing.
Note that you can find out the nodes allocated to your job using squeue (probably the easiest as the nodes are
shown by default), sstat or salloc.
Job arrays
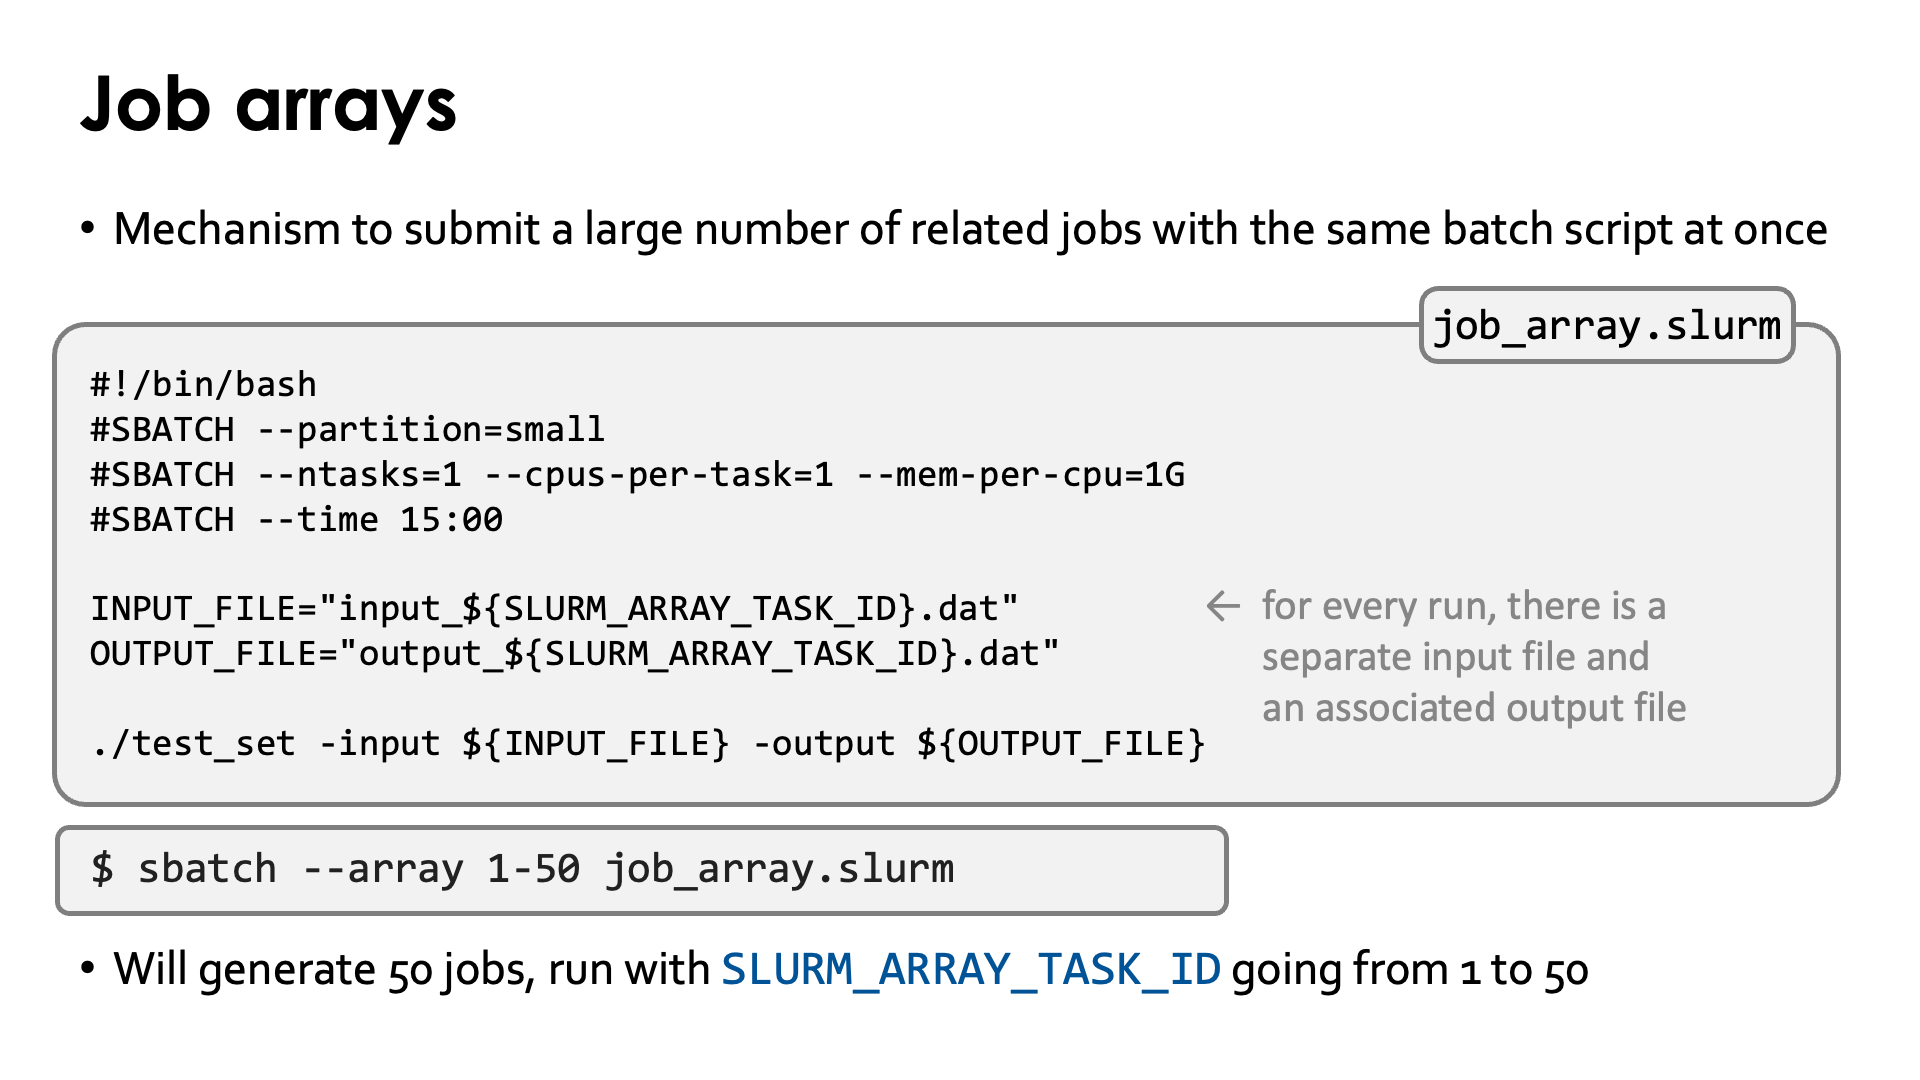
Job arrays is a mechanism to submit a large number of related jobs with the same batch script in a
single sbatch operation.
As an example, consider the job script job_array.slurm
#!/bin/bash
#SBATCH --account=project_46YXXXXXX
#SBATCH --partition=small
#SBATCH --ntasks=1
#SBATCH --cpus-per-task=1
#SBATCH --mem-per-cpu=1G
#SBATCH --time=15:00

INPUT_FILE="input_${SLURM_ARRAY_TASK_ID}.dat"
OUTPUT_FILE="output_${SLURM_ARRAY_TASK_ID}.dat"

./test_set -input ${INPUT_FILE} -output ${OUTPUT_FILE}
Note that Slurm defines the environment variable SLURM_ARRAY_TASK_ID which will have a unique
value for each job of the job array, varying in the range given at job submission.
This enables to distinguish between the different runs and can be used to generate names of
input and output files.
Submitting this job script and running it for values of SLURM_ARRAY_TASK_ID going from 1 to 50
could be done with
$ sbatch --array 1-50 job_array.slurm
Note that this will count for 50 Slurm jobs so the size of your array jobs on LUMI is limited by the rather strict limit on job size. LUMI is made as a system for big jobs, and is a system with a lot of users, and there are only that many simultaneous jobs that a scheduler can deal with. Users doing throughput computing should do some kind of hierarchical scheduling, running a subscheduler in the job that then further start subjobs.
Heterogeneous jobs
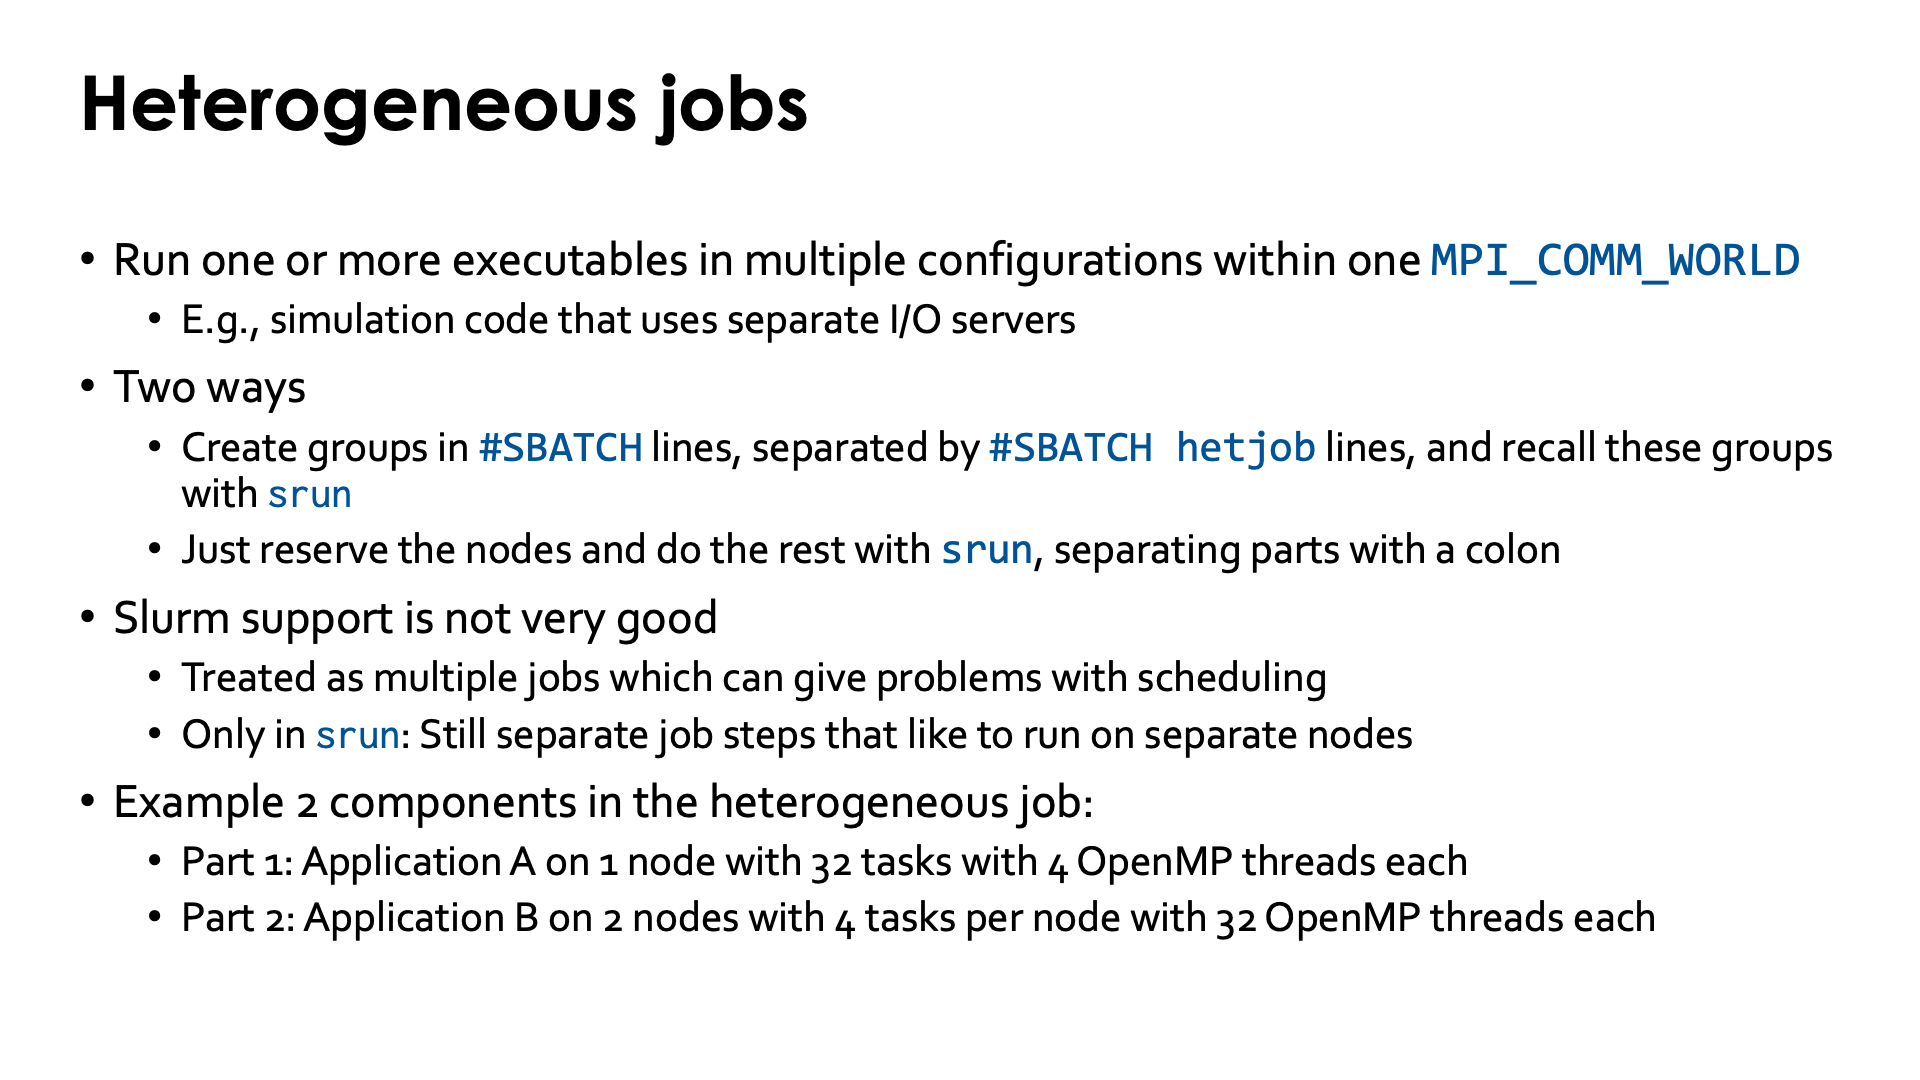
A heterogeneous job is one in which multiple executables run in a single MPI_COMM_WORLD, or a single
executable runs in different combinations (e.g., some multithreaded and some single-threaded MPI ranks where
the latter take a different code path from the former and do a different task). One example is large
simulation codes that use separate I/O servers to take care of the parallel I/O ot the file system.
There are two ways to start such a job:
-
Create groups in the
SBATCHlines, separated by#SBATCH hetjoblines, and then recall these groups withsrun. This is the most powerful mechanism as in principle one could use nodes in different partitions for different parts of the heterogeneous job. -
Request the total number of nodes needed with the
#SBATCHlines and then do the rest entirely withsrun, when starting the heterogeneous job step. The different blocks insrunare separated by a colon. In this case we can only use a single partition.
The Slurm support for heterogeneous jobs is not very good and problems to often occur, or new bugs are being introduced.
-
The different parts of heterogeneous jobs in the first way of specifying them, are treated as different jobs which may give problems with the scheduling.
-
When using the
srunmethod, these are still separate job steps and it looks like a second job is created internally to run these, and on a separate set of nodes.
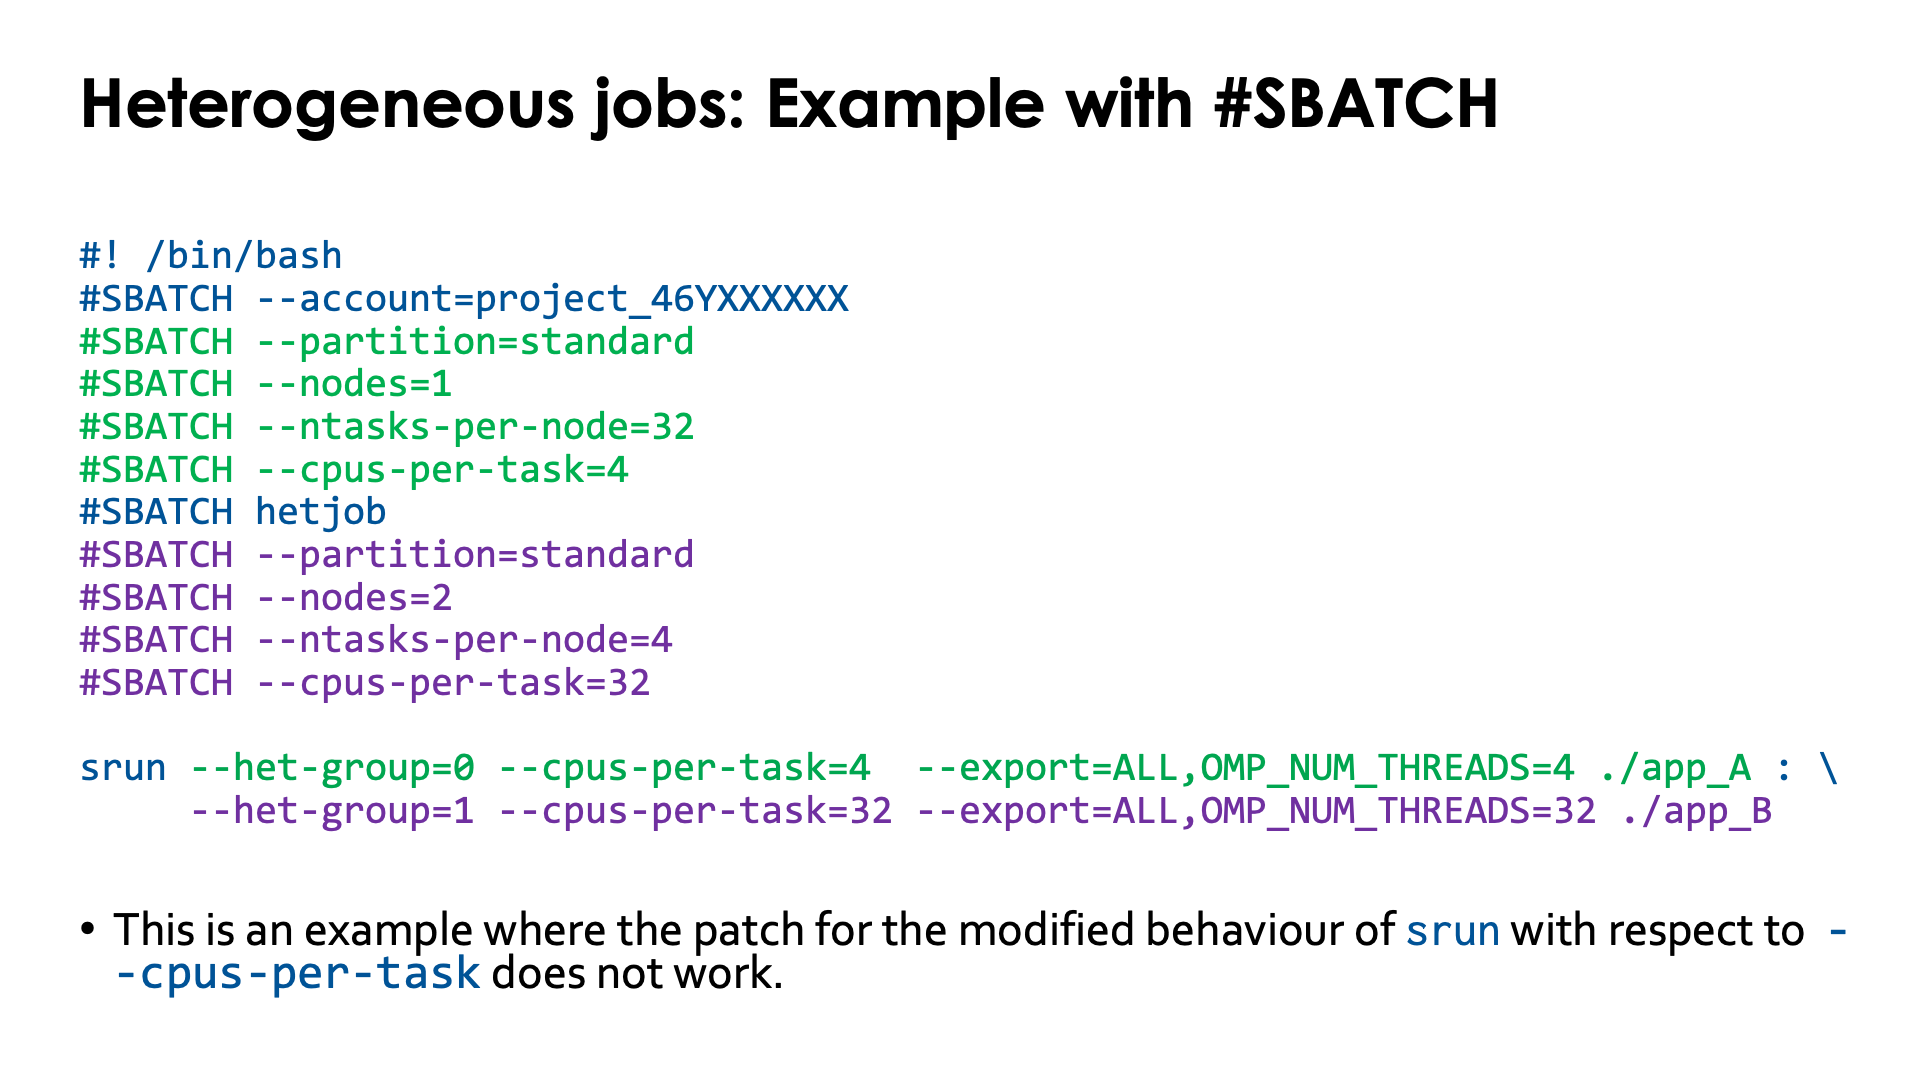
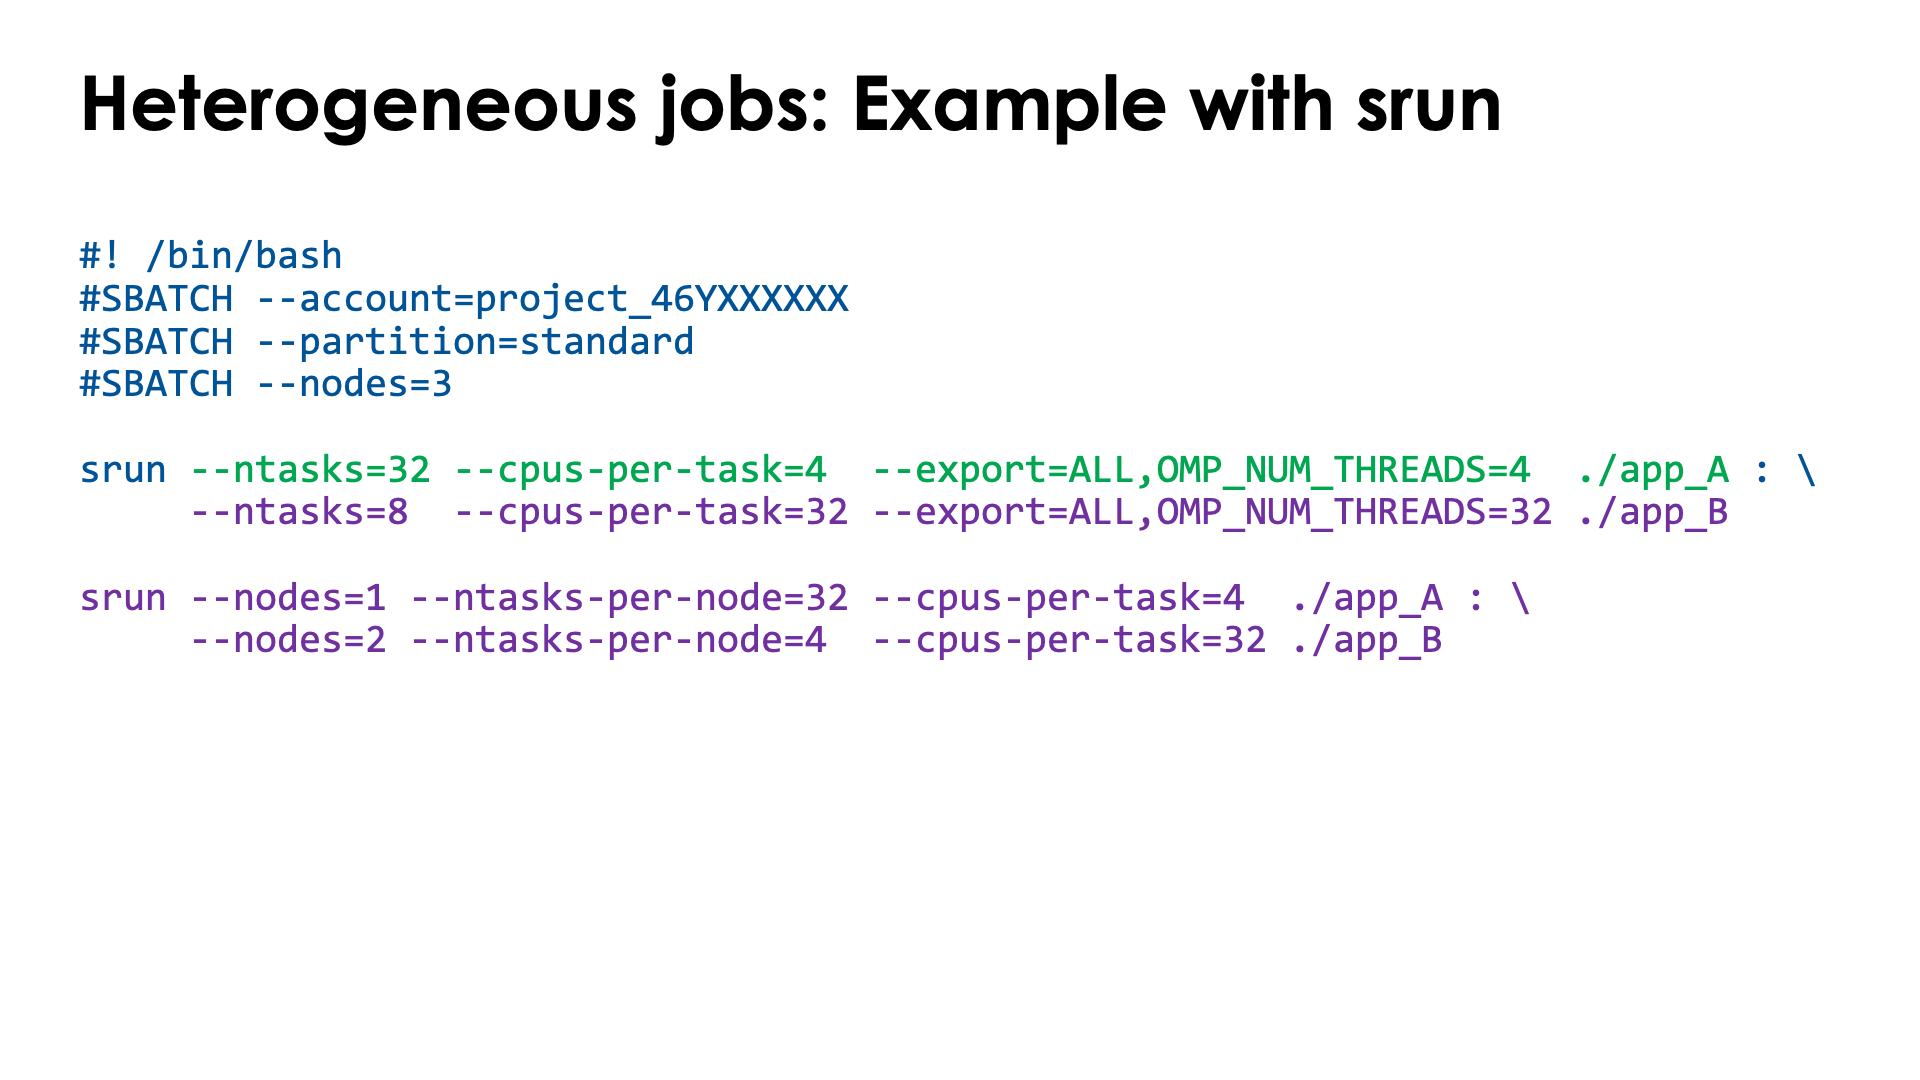
Let's show with an example (worked out more in the text than in the slides)
Consider the following case of a 2-component job:
-
Part 1: Application A on 1 node with 32 tasks with 4 OpenMP threads each
-
Part 2: Application B on 2 nodes with 4 tasks per node with 32 OpenMP threads each
We will simulate this case with the hybrid_check program from the lumi-CPEtools module
that we have used in earlier examples also.
The job script for the first method would look like:
#! /usr/bin/bash
#SBATCH --job-name=slurm-herterogeneous-sbatch
#SBATCH --time=5:00
#SBATCH --output %x-%j.txt
#SBATCH --partition=standard
#SBATCH --nodes=1
#SBATCH --ntasks-per-node=32
#SBATCH --cpus-per-task=4
#SBATCH hetjob
#SBATCH --partition=standard
#SBATCH --nodes=2
#SBATCH --ntasks-per-node=4
#SBATCH --cpus-per-task=32

module load LUMI/22.12 partition/C lumi-CPEtools/1.1-cpeCray-22.12

srun --het-group=0 --cpus-per-task=$SLURM_CPUS_PER_TASK_HET_GROUP_0 --export=ALL,OMP_NUM_THREADS=4  hybrid_check -l app_A : \
     --het-group=1 --cpus-per-task=$SLURM_CPUS_PER_TASK_HET_GROUP_1 --export=ALL,OMP_NUM_THREADS=32 hybrid_check -l app_B

srun --het-group=0 --cpus-per-task=$SLURM_CPUS_PER_TASK_HET_GROUP_0 hybrid_check -l hybrid_check -l app_A : \
     --het-group=1 --cpus-per-task=$SLURM_CPUS_PER_TASK_HET_GROUP_1 hybrid_check -l hybrid_check -l app_B

echo -e "\nsacct for the job:\n$(sacct -j $SLURM_JOB_ID)\n"
There is a single srun command. --het-group=0 tells srun to pick up the settings for the first
heterogeneous group (before the #SBATCH hetjob line), and use that to start the hybrid_check program
with the command line arguments -l app_A. Next we have the column to tell srun that we start with the
second group, which is done in the same way. Note that since recent versions of Slurm do no longer
propagate the value for --cpus-per-task, we need to specify the value here explicitly which we can do
via an environment variable. This is one of the cases where the patch to work around this new behaviour on
LUMI does not work.
This job script shows also demonstrates how a different value of a variable can be passed to each
component using --export, even though this was not needed as the second case would show.
The output of this job script would look lik (with a lot omitted):
srun: Job step's --cpus-per-task value exceeds that of job (32 > 4). Job step may never run.

Running 40 MPI ranks with between 4 and 32 threads each (total number of threads: 384).

++ app_A: MPI rank   0/40  OpenMP thread   0/4   on cpu   0/256 of nid001083
++ app_A: MPI rank   0/40  OpenMP thread   1/4   on cpu   1/256 of nid001083
...
++ app_A: MPI rank  31/40  OpenMP thread   2/4   on cpu 126/256 of nid001083
++ app_A: MPI rank  31/40  OpenMP thread   3/4   on cpu 127/256 of nid001083
++ app_B: MPI rank  32/40  OpenMP thread   0/32  on cpu   0/256 of nid001544
++ app_B: MPI rank  32/40  OpenMP thread   1/32  on cpu   1/256 of nid001544
...
++ app_B: MPI rank  35/40  OpenMP thread  30/32  on cpu 126/256 of nid001544
++ app_B: MPI rank  35/40  OpenMP thread  31/32  on cpu 127/256 of nid001544
++ app_B: MPI rank  36/40  OpenMP thread   0/32  on cpu   0/256 of nid001545
++ app_B: MPI rank  36/40  OpenMP thread   1/32  on cpu   1/256 of nid001545
...
++ app_B: MPI rank  39/40  OpenMP thread  30/32  on cpu 126/256 of nid001545
++ app_B: MPI rank  39/40  OpenMP thread  31/32  on cpu 127/256 of nid001545
... (second run produces identical output)

sacct for the job:
JobID           JobName  Partition    Account  AllocCPUS      State ExitCode
------------ ---------- ---------- ---------- ---------- ---------- --------
4285795+0    slurm-her+   standard project_4+        256    RUNNING      0:0
4285795+0.b+      batch            project_4+        256    RUNNING      0:0
4285795+0.0  hybrid_ch+            project_4+        256  COMPLETED      0:0
4285795+0.1  hybrid_ch+            project_4+        256  COMPLETED      0:0
4285795+1    slurm-her+   standard project_4+        512    RUNNING      0:0
4285795+1.0  hybrid_ch+            project_4+        512  COMPLETED      0:0
4285795+1.1  hybrid_ch+            project_4+        512  COMPLETED      0:0
The warning at the start can be safely ignored. It just shows how heterogeneous job were an afterthought in Slurm and likely implemented in a very dirty way. We see that we get what we expected: 32 MPI ranks on the first node of the allocation, then 4 on each of the other two nodes.
The output of sacct is somewhat surprising. Slurm has essnetially started two jobs,
with jobIDs that end with +0 and +1, and it first shows all job steps for the first
job, which is the batch job step and the first group of both srun commands, and then
shows the second job and its job steps, again indicating that heterogeneous jobs are
not really treated as a single job.
The same example can also be done by just allocating 3 nodes and then using more arguments
with srun to start the application:
#! /usr/bin/bash
#SBATCH --job-name=slurm-herterogeneous-srun
#SBATCH --time=5:00
#SBATCH --output %x-%j.txt
#SBATCH --partition=standard
#SBATCH --nodes=3

module load LUMI/22.12 partition/C lumi-CPEtools/1.1-cpeCray-22.12

srun --ntasks=32 --cpus-per-task=4  --export=ALL,OMP_NUM_THREADS=4  hybrid_check -l app_A : \
     --ntasks=8  --cpus-per-task=32 --export=ALL,OMP_NUM_THREADS=32 hybrid_check -l app_B

srun --ntasks=32 --cpus-per-task=4  hybrid_check -l app_A : \
     --ntasks=8  --cpus-per-task=32 hybrid_check -l app_B

echo -e "\nsacct for the job:\n$(sacct -j $SLURM_JOB_ID)\n"
The output of the two srun commands is essentially the same as before, but the output
of sacct is different:
sacct for the job:
JobID           JobName  Partition    Account  AllocCPUS      State ExitCode
------------ ---------- ---------- ---------- ---------- ---------- --------
4284021      slurm-her+   standard project_4+        768    RUNNING      0:0
4284021.bat+      batch            project_4+        256    RUNNING      0:0
4284021.0+0  hybrid_ch+            project_4+        256  COMPLETED      0:0
4284021.0+1  hybrid_ch+            project_4+        512  COMPLETED      0:0
4284021.1+0  hybrid_ch+            project_4+        256  COMPLETED      0:0
4284021.1+1  hybrid_ch+            project_4+        512  COMPLETED      0:0
We now get a single job ID but the job step for each of the srun commands is split
in two separate job steps, a +0 and a +1.
Erratic behaviour of --nnodes=<X> --ntasks-per-node=<Y>
One can wonder if in the second case we could still specify resources on a per-node
basis in the srun command:
#! /usr/bin/bash
#SBATCH --job-name=slurm-herterogeneous-srun
#SBATCH --time=5:00
#SBATCH --output %x-%j.txt
#SBATCH --partition=standard
#SBATCH --nodes=3

module load LUMI/22.12 partition/C lumi-CPEtools/1.1-cpeCray-22.12

srun --nodes=1 --ntasks-per-node=32 --cpus-per-task=4  hybrid_check -l hybrid_check -l app_A : \
     --nodes=2 --ntasks-per-node=4  --cpus-per-task=32 hybrid_check -l hybrid_check -l app_B
It turns out that this does not work at all. Both components get the wrong number of tasks. For some reason only 3 copies were started of the first application on the first node of the allocation, the 2 32-thread processes on the second node and one 32-thread process on the third node, also with an unexpected thread distribution.
This shows that before starting a big application it may make sense to check with the
tools from the lumi-CPEtools module if the allocation would be what you expect as Slurm
is definitely not free of problems when it comes to hetereogeneous jobs.
Simultaneous job steps
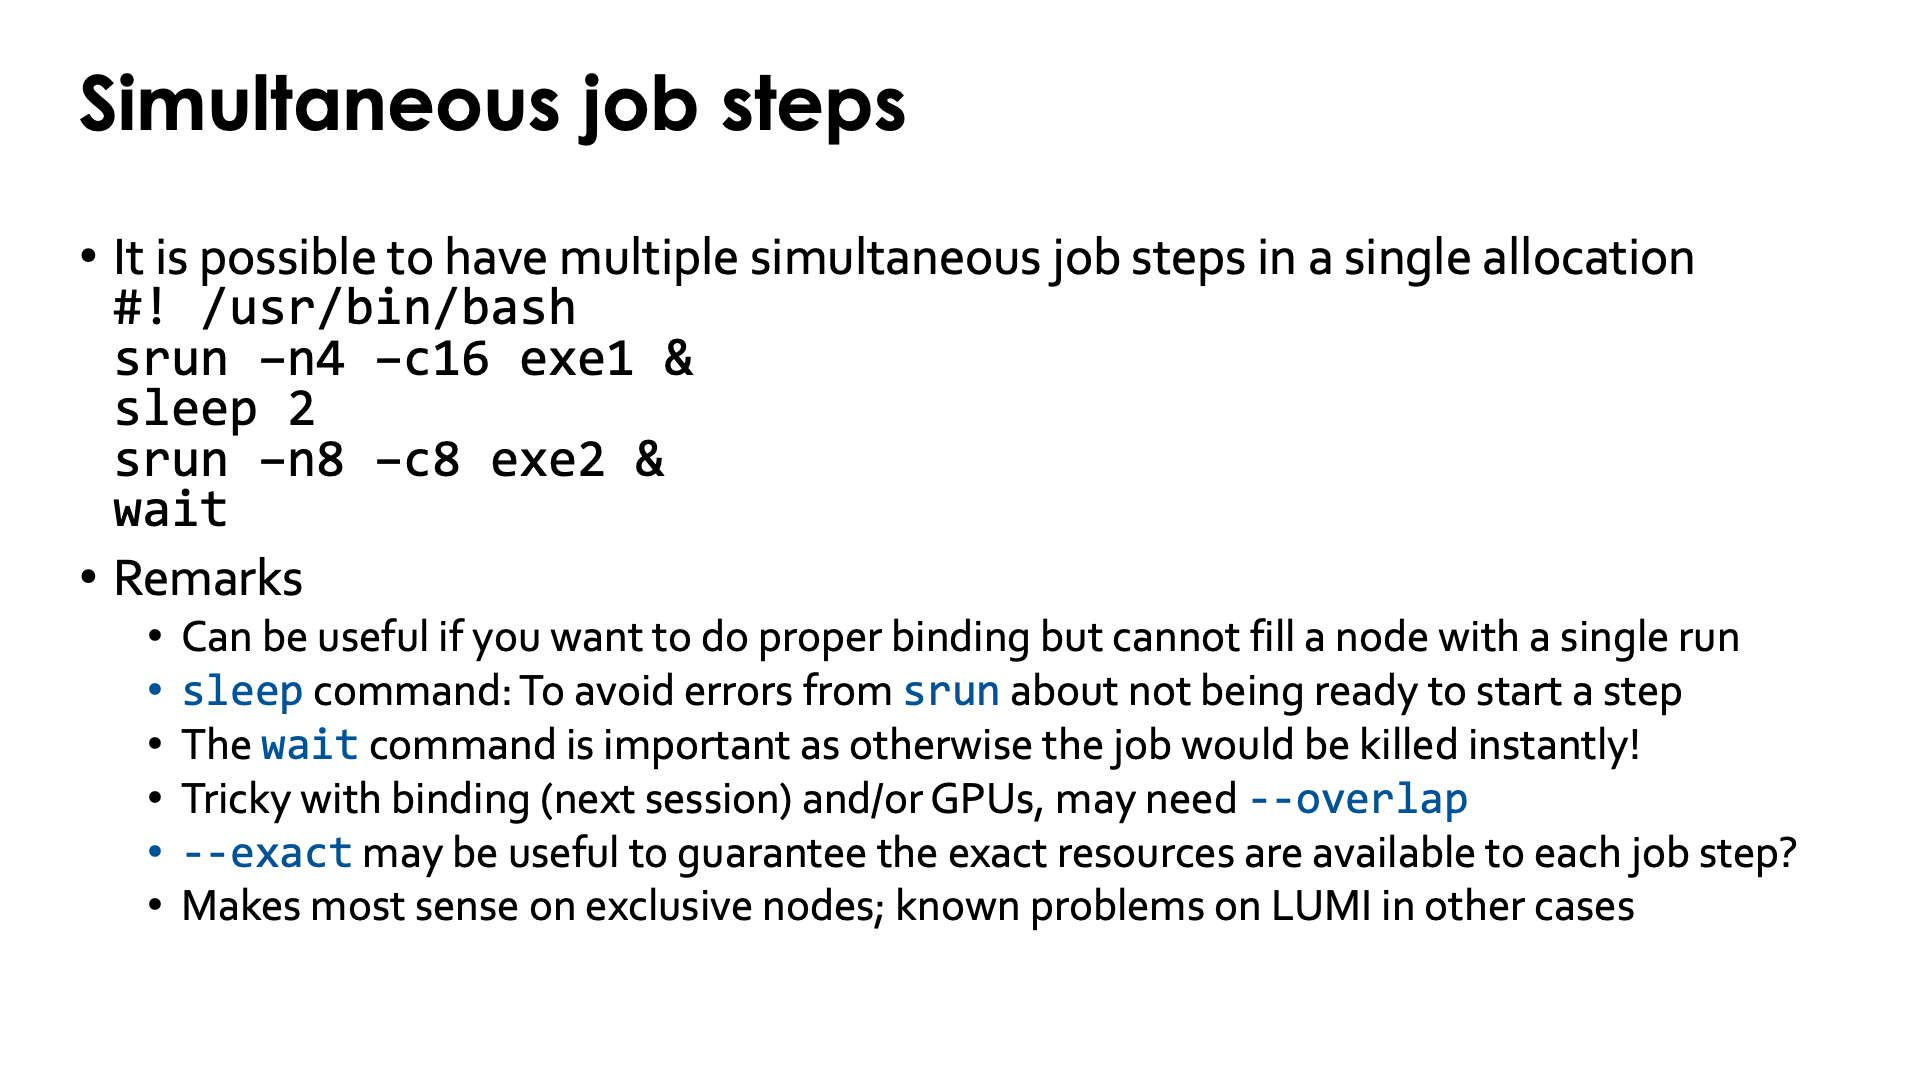
It is possible to run multiple job steps in parallel on LUMI. The core of your job script would look something like:
#! /usr/bin/bash
...
#SBATCH partition=standard
...
srun -n4 -c16 exe1 &
sleep 2
srun -n8 -c8 exe2 &
wait
The first srun statement will start a hybrid job of 4 tasks with 16 cores each on the first 64 cores
of the node, the second srun statement would start a hybrid job of 8 tasks with 8 cores each on
the remaining 64 cores. The sleep 2 statement is used because we have experienced that from time
to time even though the second srun statement cannot be executed immediately as the resource manager
is busy with the first one. The wait command at the end is essential, as otherwise the batch job step
would end without waiting for the two srun commands to finish the work they started, and the whole
job would be killed.
Running multiple job steps in parallel in a single job can be useful if you want to ensure a proper
binding and hence do not want to use the "allocate by resources" partition, while a single job step
is not enough to fill an exclusive node. It does turn out to be tricky though, especially when GPU nodes
are being used, and with proper binding of the resources. In some cases the --overlap parameter of
srun may help a bit. (And some have reported that in some cases --exact is needed instead, but this
parameter is already implied if --cpus-per-task can be used.)
Note that we have observed unexpected behaviour when using this on nodes that were not job-exclusive, likely caused by Slurm bugs. It also doesn't make much sense to use this feature in that case. The main reason to use it, is to be able to do proper mapping/binding of resources even when a single job step cannot fill a whole node. In other cases it may simply be easier to have multiple jobs, one for each job step that you would run simultaneously.
A longer example
Consider the bash job script for an exclusive CPU node:
#! /usr/bin/bash
#SBATCH --job-name=slurm-simultaneous-CPU-1
#SBATCH --partition=standard
#SBATCH --nodes=1
#SBATCH --hint=nomultithread
#SBATCH --time=2:00
#SBATCH --output %x-%j.txt

module load LUMI/23.09 partition/C lumi-CPEtools/1.1-cpeCray-23.09

echo "Submitted from $SLURM_SUBMIT_HOST"
echo "Running on $SLURM_JOB_NODELIST"
echo
echo -e "Job script:\n$(cat $0)\n"
echo "SLURM_* environment variables:"
env | egrep ^SLURM

for i in $(seq 0 7)
do
    srun --ntasks=1 --cpus-per-task=16 --output="slurm-simultaneous-CPU-1-$SLURM_JOB_ID-$i.txt" \
        bash -c "export ROCR_VISIBLE_DEVICES=${GPU_BIND[$i]} && omp_check -w 30" &

    sleep 2
done

wait

sleep 2
echo -e "\nsacct for the job:\n$(sacct -j $SLURM_JOB_ID --format JobID%-13,Start,End,AllocCPUS,NCPUS,TotalCPU,MaxRSS --units=M )\n"
It will start 8 parallel job steps and in total create 9 files: One file with the output of the job script itself,
and then one file for each job step with the output specific to that job step.
the sacct command at the end shows that the 8 job parallel job steps indeed overlap, as can be seen from the
start and end time of each, with the TotalCPU column confirming that they are also consuming CPU time during that
time. The last bit of the output of the main batch file looks like:
sacct for the job:
JobID                       Start                 End  AllocCPUS      NCPUS   TotalCPU     MaxRSS
------------- ------------------- ------------------- ---------- ---------- ---------- ----------
6849913       2024-04-09T16:15:45             Unknown        256        256   01:04:07
6849913.batch 2024-04-09T16:15:45             Unknown        256        256   00:00:00
6849913.0     2024-04-09T16:15:54 2024-04-09T16:16:25         32         32  08:00.834      6.92M
6849913.1     2024-04-09T16:15:56 2024-04-09T16:16:26         32         32  08:00.854      6.98M
6849913.2     2024-04-09T16:15:58 2024-04-09T16:16:29         32         32  08:00.859      6.76M
6849913.3     2024-04-09T16:16:00 2024-04-09T16:16:30         32         32  08:00.793      6.76M
6849913.4     2024-04-09T16:16:02 2024-04-09T16:16:33         32         32  08:00.870      6.59M
6849913.5     2024-04-09T16:16:04 2024-04-09T16:16:34         32         32  08:01.046      8.57M
6849913.6     2024-04-09T16:16:06 2024-04-09T16:16:36         32         32  08:01.133      6.76M
6849913.7     2024-04-09T16:16:08 2024-04-09T16:16:39         32         32  08:00.793      6.57M
Obviously as we execute the sacct command in the job the end time of the batch job step and hence
the job as a whole are still unknown. We ask omp_check to do some computations during 30 seconds on
each thread, and so we see that the CPU time consumed by each 16-core job is indeed around 8 minutes,
while start and end time of each job step showed that they executed for roughly 30s each and nicely
overlapped.
Slurm job monitoring commands
Slurm has two useful commands to monitor jobs that we want to discuss a bit further:
-
sstatis a command to monitor jobs that are currently running. It gets its information directly from the resource manager component of Slurm. -
sacctis a command to get information about terminated jobs. It gets its information from the Slurm accounting database. As that database is not continuously updated, information about running jobs may already be present but is far from real-time.
Some users may also be familiar with the sreport command, but it is of limited use on LUMI.
The sstat command
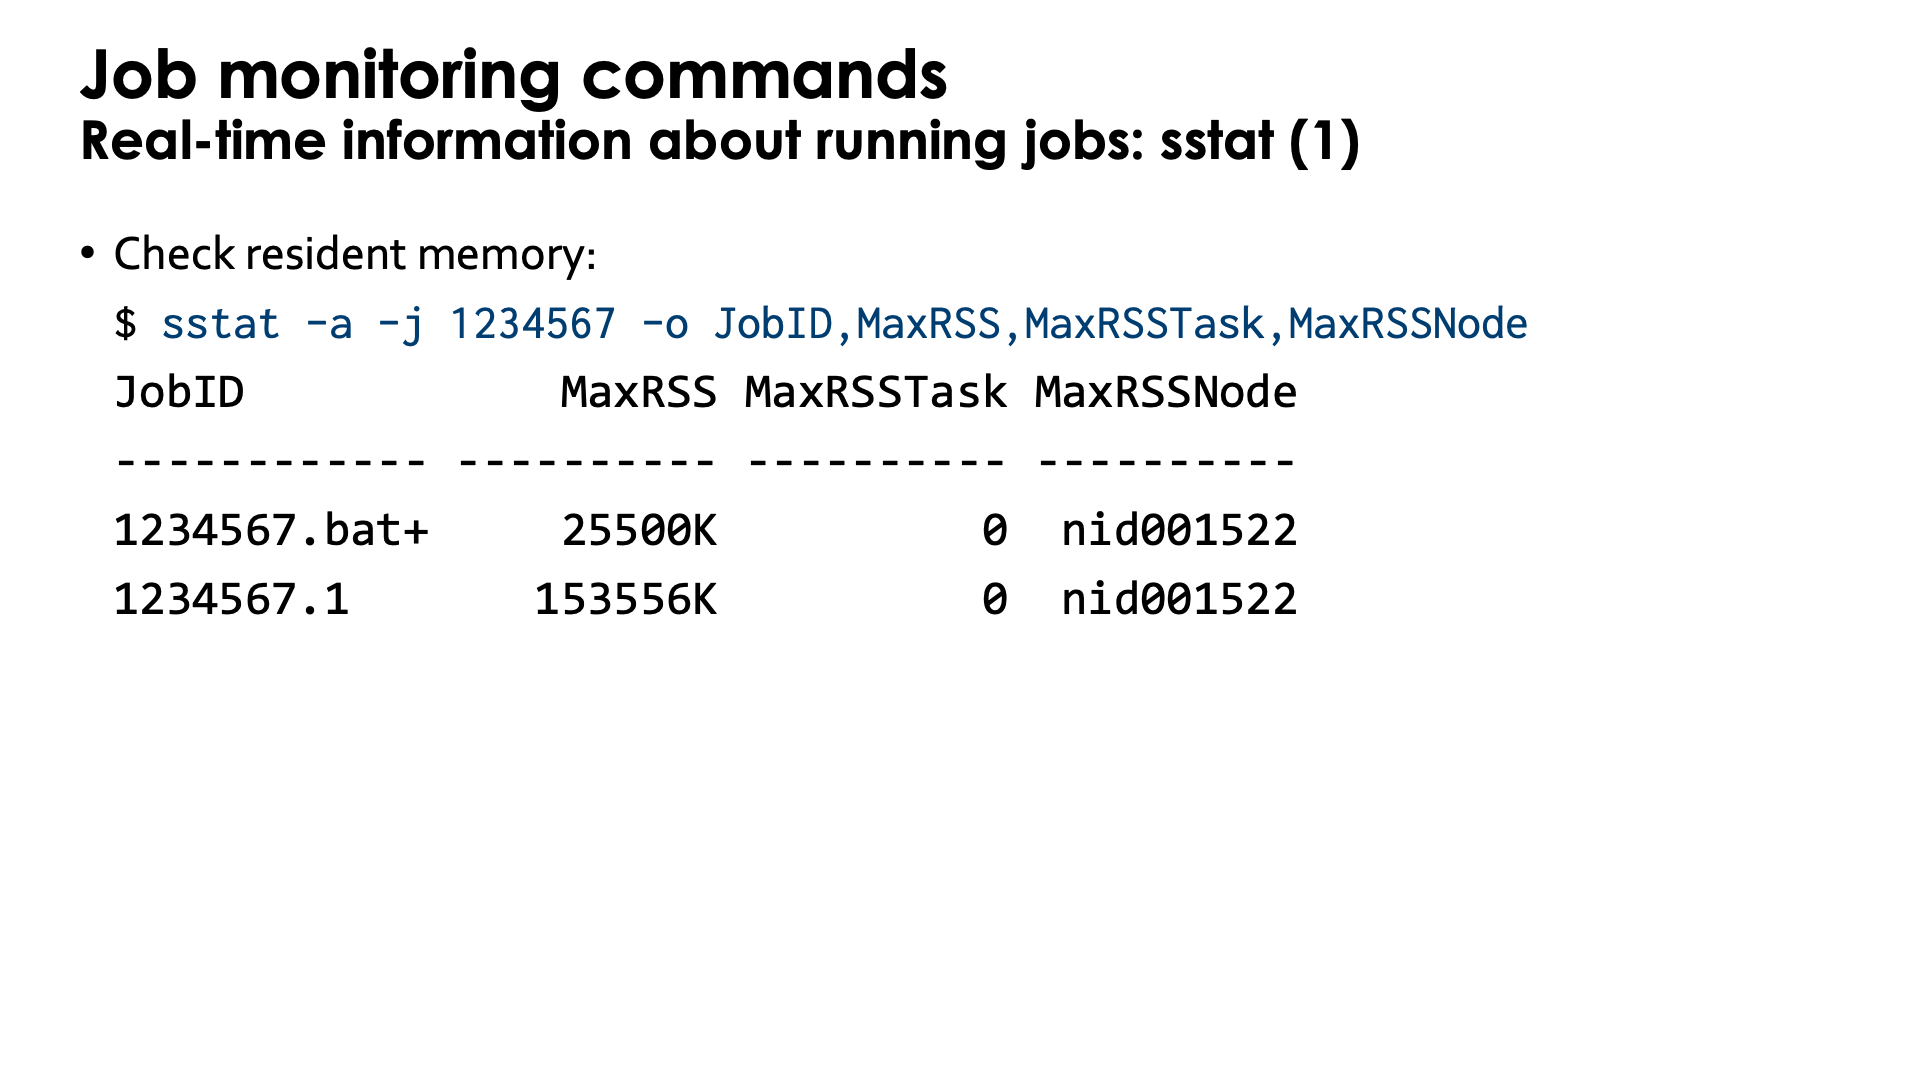
The sstat command is a command to get real-time information about a running job.
That information is obtained from the resource manager components in Slurm and not from the
accounting database. The command can only produce information about job steps that are currently
being executed and cannot be used to get information about jobs tha thave already been terminated,
or job steps that have terminated from jobs that are still running.
In its most simple form, you'd likely use the -j (or --jobs) flag to specify the job for which you want information:
sstat -j 1234567
and you may like to add the -a flag to get information about all job steps for which information is available.
You can also restrict to a single job step, e.g.,
sstat -j 1234567.0
The command produces a lot of output though and it is nearly impossible to interpret the output, even on a very wide monitor.
To restrict that output to something that can actually be handled, you can use the -o or --format flag
to specify the columns that you want to see.
E.g., the following variant would show for each job step the minimum amount of CPU time that a task has consumed, and the average across all tasks. These numbers should be fairly close if the job has a good load balance.
$ sstat -a -j 1234567 -o JobID,MinCPU,AveCPU
JobID            MinCPU     AveCPU
------------ ---------- ----------
1234567.bat+   00:00:00   00:00:00
1234567.1      00:23:44   00:26:02
The above output is from an MPI job that has two job steps in it. The first step was a quick initialisation
step and that one has terminated already, so we get no information about that step. The 1234567.1 step
is the currently executing one, and we do note a slight load inbalance in this case. No measurable amount
of time has been consumed running the batch script itself outside the srun commands in this case.
It can also be used to monitor memory use of the application. E.g.,
$ sstat -a -j 1234567 -o JobID,MaxRSS,MaxRSSTask,MaxRSSNode
JobID            MaxRSS MaxRSSTask MaxRSSNode
------------ ---------- ---------- ----------
1234567.bat+     25500K          0  nid001522
1234567.1       153556K          0  nid001522
will show the maximum amount of resident memory used by any of the tasks, and also tell you which task that is and on which node it is running.
You can get a list of output fields using sstat -e or sstat --helpformat.
Or check the
"Job Status Fields" section in the sstat manual page. That page also contains further examples.
The sacct command
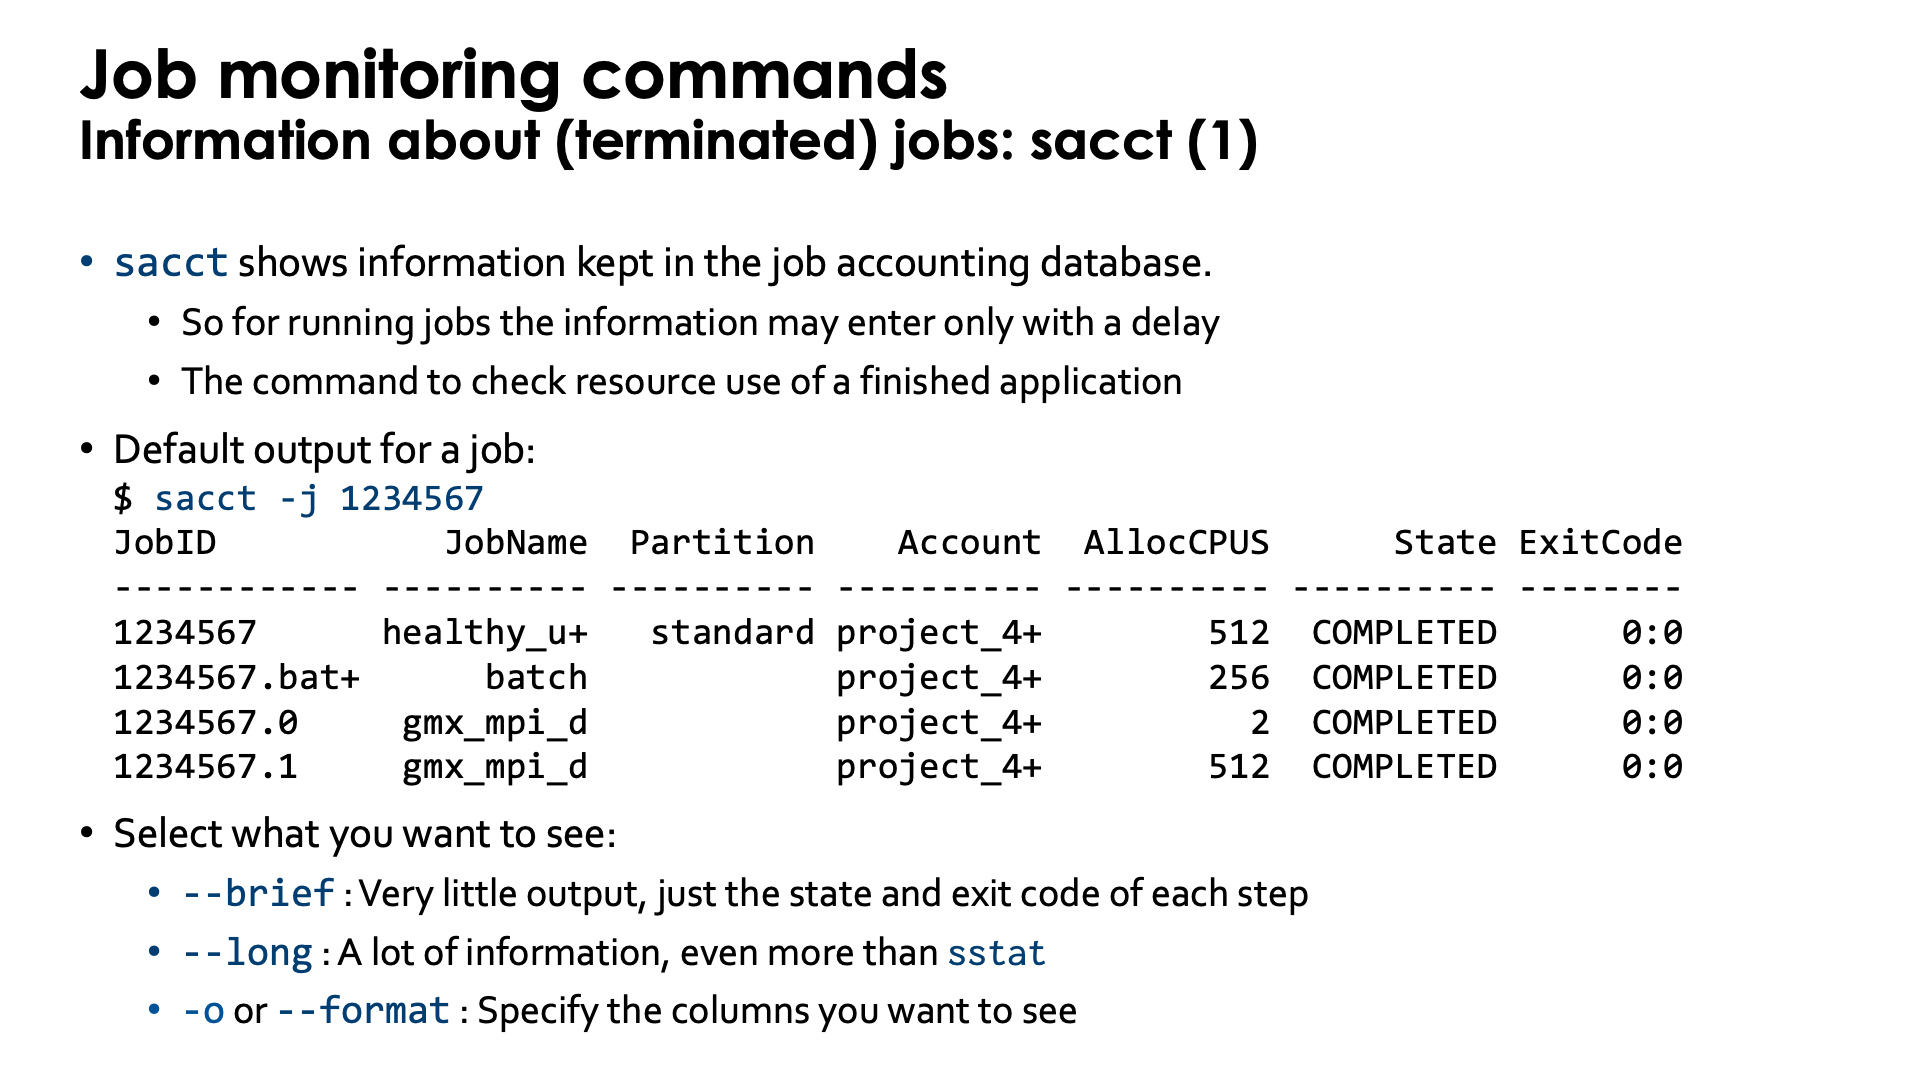
The sacct command shows information kept in the Slurm job accounting database.
Its main use is to extract information about jobs or job steps that have already
terminated. It will however also provide information about running jobs and job steps,
but that information if not real-time and only pushed periodically to the accounting
database.
If you know the job ID of the job you want to investigate, you can specify it
directly using the -j or --jobs flag. E.g.,
$ sacct -j 1234567
JobID           JobName  Partition    Account  AllocCPUS      State ExitCode
------------ ---------- ---------- ---------- ---------- ---------- --------
1234567      healthy_u+   standard project_4+        512  COMPLETED      0:0
1234567.bat+      batch            project_4+        256  COMPLETED      0:0
1234567.0     gmx_mpi_d            project_4+          2  COMPLETED      0:0
1234567.1     gmx_mpi_d            project_4+        512  COMPLETED      0:0
This report is for a GROMACS job that ran on two nodes. The first line gives the data
for the overall job. The second line is for the batch job step that ran the batch script.
That job got access to all resources on the first node of the job which is why 256 is
shown in the AllocCPUS column (as that data is reported using the number of virtual cores).
Job step .0 was really an initialisation step that ran as a single task on a single physical
core of the node, while the .1 step was running on both nodes (as 256 tasks each on a
physical core but that again cannot be directly derived from the output shown here).
You can also change the amount of output that is shown using either --brief (which will show a lot less)
or --long (which shows an unwieldly amount of information similar to sstat),
and just as with sstat, the information can be fully customised using -o or --format,
but as there is a lot more information in the accounting database, the format options are different.
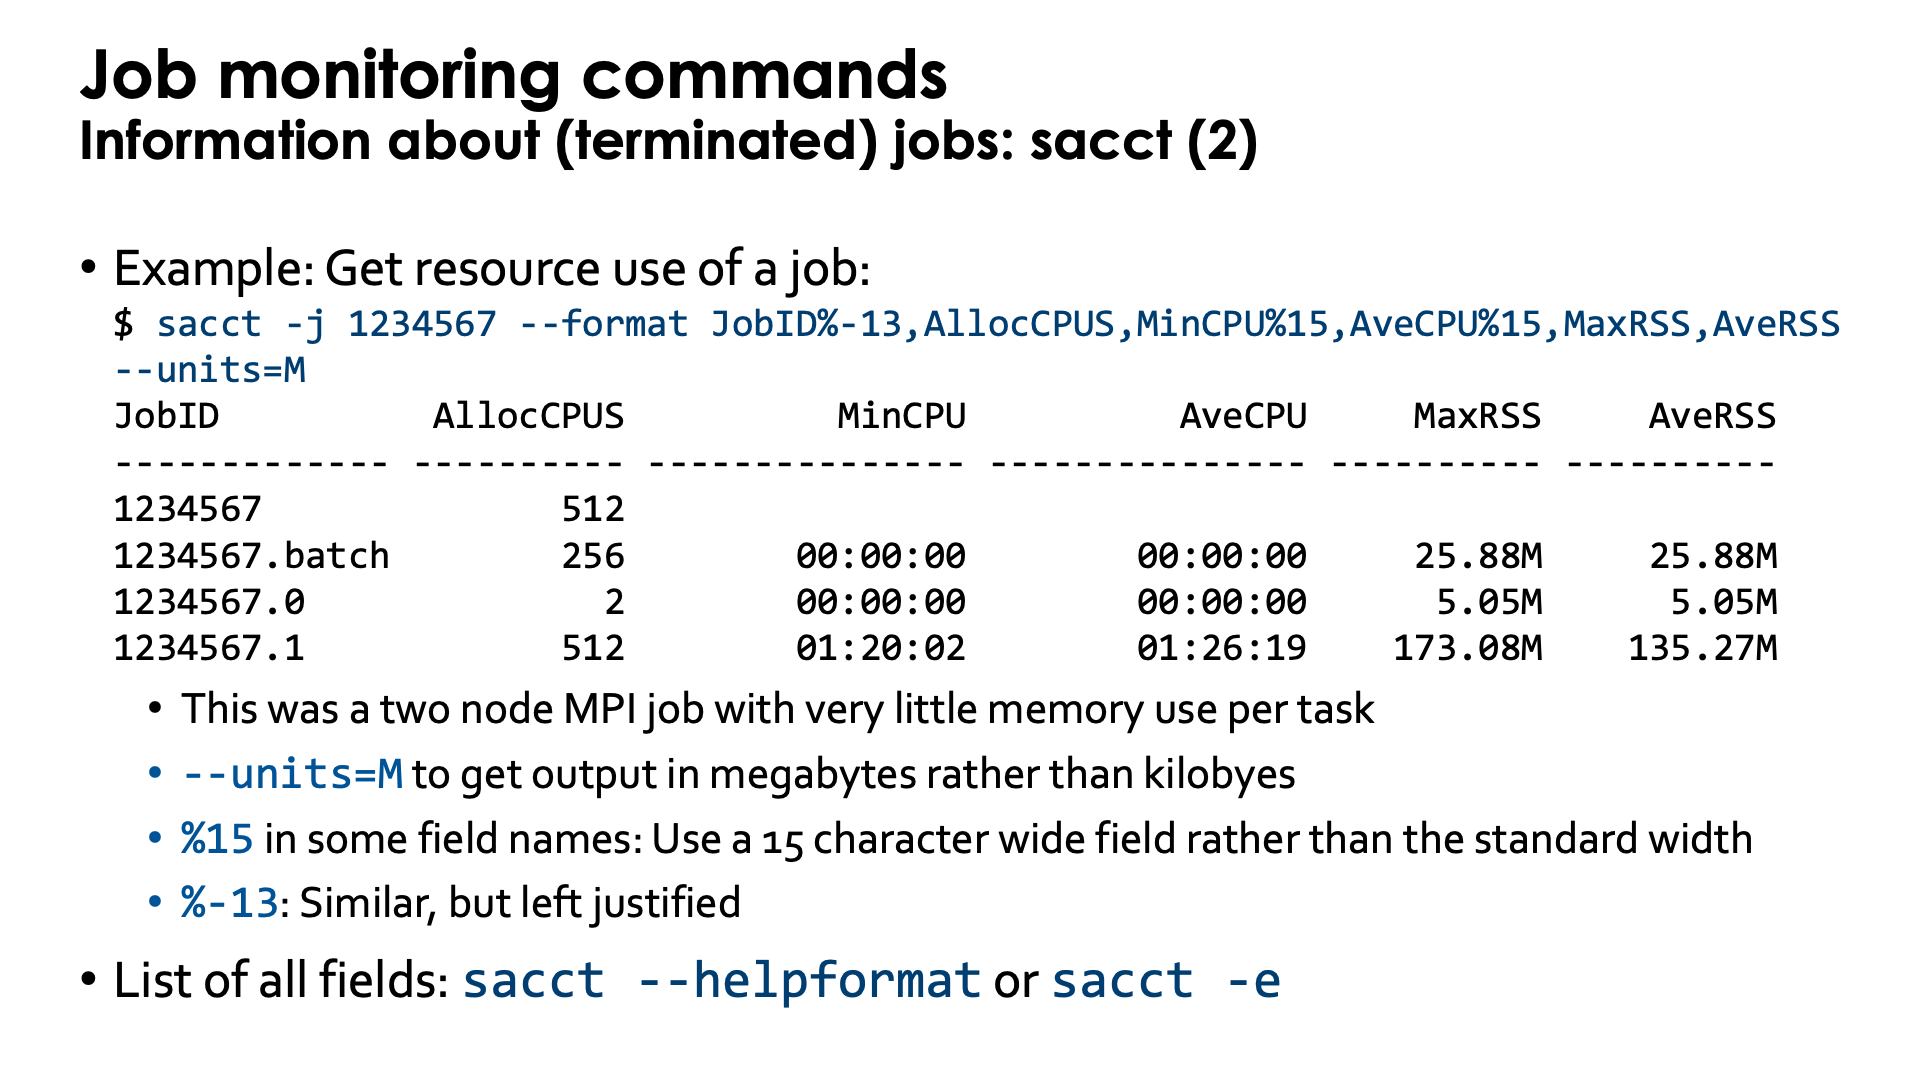
As an example, let's check the CPU time and memory used by a job:
$ sacct -j 1234567 --format JobID%-13,AllocCPUS,MinCPU%15,AveCPU%15,MaxRSS,AveRSS --units=M
JobID          AllocCPUS          MinCPU          AveCPU     MaxRSS     AveRSS
------------- ---------- --------------- --------------- ---------- ----------
1234567              512
1234567.batch        256        00:00:00        00:00:00     25.88M     25.88M
1234567.0              2        00:00:00        00:00:00      5.05M      5.05M
1234567.1            512        01:20:02        01:26:19    173.08M    135.27M
This is again the two node MPI job that we've used in the previous example. We used
--units=M to get the memory use per task in megabytes, which is the proper option
here as tasks are relatively small (but not uncommonly small for an HPC system when a
properly scaling code is used). The %15 is used to specify the width of the field
as otherwise some of that information could be truncated (and the width of 15 would have
been needed if this were a shared memory program or a program that ran for longer than
a day). By default, specifying the field width will right justify the information in
the columns. The %-13 tells to use a field width of 13 and to left-justify the data
in that column.
You can get a list of output fields using sacct -e or sacct --helpformat.
Or check the
"Job Accounting Fields" section in the sacct manual page. That page also contains further examples.
Using sacct is a bit harder if you don't have the job ID of the job for which you want information.
You can run sacct without any arguments, and in that case it will produce output for your jobs that
have run since midnight. It is also possible to define the start time (with -S or --starttime)
and the end time (with -E or --endtime) of the time window for which job data should be shown,
and there are even more features to filter jobs, though some of them are really more useful for
administrators.
This is only a very brief introduction to sacct, basically so that you know that it exists and what
its main purpose is. But you can find more information in the
sacct manual page
The sreport command
The sreport command is a command to create summary reports from data in the Slurm accounting database.
Its main use is to track consumed resources in a project.
On LUMI it is of little use as as the billing is not done by Slurm but by a script that runs outside
of Slurm that uses data from the Slurm accounting database. That data is gathered in a different
database though with no direct user access, and only some summary reports are brought back to the
system (and used by the lumi-workspaces command and some other tools for user and project monitoring).
So the correct billing information is not available in the Slurm accounting database, nor can it be easily
derived from data in the summary reports as the billing is more complicated than some billing for individual
elements such as core use, memory use and accelerator use. E.g., one can get summary reports mentioning the
amount of core hours used per user for a project, but that is reported for all partitions together and hence
irrelevant to get an idea of how the CPU billing units were consumed.
This section is mostly to discourage you to use sreport as its information is often misleading and certainly
it it is used to follow up your use of billing units on LUMI, but should you insist, there is more information
in the sreport manual page.
Local trainings and materials
-
Docs VSC: Slurm material for the general docs is still under development and will be published later in 2023.
-
Docs CÉCI: Extensive documentation on the use of Slurm
-
VSC training materials
-
VSC@KULeuven HPC-intro training covers Slurm in the "Starting to Compute" section.
-
VSC@UAntwerpen covers Slurm in the "HPC@UAntwerp introduction" training
-
CÉCI training materials: Slurm is covered in the "Learning how to use HPC infrastructure" training.