Last update of this page: March 23, 2026
Containers on LUMI-C and LUMI-G
What are we talking about in this chapter?
Let's now switch to using containers on LUMI. This section is about using HPC containers on the login nodes and compute nodes and not about building containers for and using containers on LUMI-K, the small OpenShift Kubernetes cloud partition, which delivers less than 0.8% of LUMI's CPU compute power and has no GPUs.
In this section, we will
-
discuss what to expect from containers on LUMI: what can they do and what can't they do,
-
discuss how to get a container on LUMI,
-
discuss how to run a container on LUMI,
-
discuss some enhancements we made to the LUMI environment that are based on containers or help you use containers and some containers we offer pre-built,
-
and discuss some strategies to extend containers.
If you are interested in doing AI on LUMI, we highly recommend that you have a look at the LUMI AI guide and the AI course materials. The former is updated regularly and may be the most up-to-date document, while the latter is updated whenever the course is given.
Remember though that the compute nodes of LUMI are an HPC infrastructure and not a container cloud! HPC has its own container runtimes specifically for an HPC environment and the typical security constraints of such an environment.
What do containers not provide
What is being discussed in this subsection may be a bit surprising. Containers are often marketed as a way to provide reproducible science and as an easy way to transfer software from one machine to another machine. However, containers are neither of those and this becomes very clear when using containers built on your typical Mellanox/NVIDIA InfiniBand based clusters with Intel processors and NVIDIA GPUs on LUMI. This is only true if you transport software between sufficiently similar machines (which is why they do work very well in, e.g., the management nodes of a cluster, or a server farm).
First, full reproducibility of your science is a myth. All that containers reproduce, is a part of the software stack, and not even the whole software stack as containers still rely on kernels and drivers of the host system and maybe even some injected libraries specific for the host. Computational results are almost never 100% reproducible because of the very nature of how computers work. If you use any floating point computation, you can only expect reproducibility of sequential codes between equal hardware. As soon as you change the CPU type, some floating point computations may produce slightly different results, and as soon as you go parallel this may even be the case between two runs on exactly the same hardware and with exactly the same software. Besides, by the very nature of floating point computations, you know that the results are wrong if you really want to work with real numbers. What matters is understanding how wrong the results are and reproduce results that fall within expected error margins for the computation. This is no different from reproducing a lab experiment where, e.g., each measurement instrument introduces errors. The only thing that containers do reproduce very well, is your software stack. But not without problems:
Containers are certainly not performance portable unless they have been specifically designed to run optimally on a range of hardware and your hardware falls into that range. E.g., without proper support for the interconnect it may still run but in a much slower mode. But one should also realise that speed gains in the x86 family over the years come to a large extent from adding new instructions to the CPU set, and that two processors with the same instructions set extensions may still benefit from different optimisations by the compilers. Not using the proper instruction set extensions can have a lot of influence. At my local site we've seen GROMACS doubling its speed by choosing proper options, and the difference can even be bigger.
Many HPC sites try to build software as much as possible from sources to exploit the available hardware as much as possible. You may not care much about 10% or 20% performance difference on your PC, but 20% on a 160 million EURO investment represents 32 million EURO and a lot of science can be done for that money...
Libraries that talk to the interconnect may also cause issues. If an MPI library or RCCL library
isn't built specifically for the LUMI interconnect, it will fall back to slower communication
protocols (or if you are unlucky, even fail, but that is the next point).
The same is true if an MPI implementation expects a particular kernel extension for improved
performance of shared memory communication and that extension is not present (or the other way
around, the container cannot exploit such an extension on LUMI). This is not so strange:
Many supercomputers use the knem extension while LUMI uses xpmem instead.
Some container promoters say that all you need to do to get good performance is to run a standard container on an optimised OS kernel. This is nonsense. Scientific software typically spends around 99% of its time in user mode. So even if you can optimise that 1% that it spends in the kernel away, you've still shaved only one minute of a 100 minute job.
But even basic portability is a myth, even if you wouldn't care much about performance (which is already a bad idea on an infrastructure as expensive as LUMI). Containers are really only guaranteed to be portable between similar systems. When well built, they are more portable than just a binary as you may be able to deal with missing or different libraries in the container, but that is where it ends. Containers are usually built for a particular CPU architecture and GPU architecture, two elements where everybody can easily see that if you change this, the container will not run. But there is in fact more: containers talk to other hardware too, and on an HPC system the first piece of hardware that comes to mind is the interconnect. This may also cause failures. And they use the kernel of the host and the kernel modules and drivers provided by that kernel. Those can be a problem. This is particularly true for GPU software: If your userland libraries in the container are too new or too old for the GPU driver, they may simply fail to run. And containers may also want to talk to certain services on the supercomputer. One important one is communicating with the resource manager, which some MPI libraries need. Versions that do not sufficiently or features that the host does not offer but the container expects, may also cause crashes.
But what can they then do on LUMI?
Containers are in the first place a software management instrument to create a contained software installation: Files not spread over the system, better control of dependencies, and more:
-
A very important reason to use containers on LUMI is reducing the pressure on the file system by software that accesses many thousands of small files (Python and R users, you know who we are talking about). That software kills the metadata servers of almost any parallel file system when used at scale.
As a container on LUMI is a single file, the metadata servers of the parallel file system have far less work to do, and all the file caching mechanisms can also work much better.
-
Software installations that would otherwise be impossible. E.g., some software may not even be suited for installation in a multi-user HPC system as it uses fixed paths that are not compatible with installation in module-controlled software stacks. HPC systems want a lightweight
/usretc. structure as that part of the system software is often stored in a RAM disk, and to reduce boot times. Moreover, different users may need different versions of a software library so it cannot be installed in its default location in the system software region. However, some software is ill-behaved and cannot be relocated to a different directory, and in these cases containers help you to build a private installation that does not interfere with other software on the system.They are also of interest if compiling the software takes too much work while any processor-specific optimisation that could be obtained by compiling oneself, isn't really important. E.g., if a full stack of GUI libraries is needed, as they are rarely the speed-limiting factor in an application.
-
Isolation is often considered as an advantage of containers also. The isolation helps preventing that software picks up libraries it should not pick up. In a context with multiple services running on a single server, it limits problems when the security of a container is compromised to that container. However, it also comes with a big disadvantage in an HPC context: Debugging and performance profiling also becomes a lot harder.
In fact, with the current state of container technology, it is often a pain also when running MPI applications as it would be much better to have only a single container per node, running MPI inside the container at the node level and then between containers on different nodes.
-
As an example, Conda installations are not appreciated on the main Lustre file system.
On one hand, Conda installations tend to generate lots of small files (and then even more due to a linking strategy that does not work on Lustre). So they need to be containerised just for storage manageability.
They also re-install lots of libraries that may already be on the system in a different version. The isolation offered by a container environment may be a good idea to ensure that all software picks up the right versions.
-
An example of software that is usually very hard to install is a GUI application, as they tend to have tons of dependencies and recompiling can be tricky. Yet rather often the binary packages that you can download cannot be installed wherever you want, so a container can come to the rescue.
-
Another example where containers have proven to be useful on LUMI is to experiment with newer versions of ROCm or the Cray Programming Environment than we can offer on the system.
This often comes with limitations though, as (a) that ROCm version is still limited by the drivers on the system and (b) we've seen incompatibilities between newer ROCm versions and the Cray MPICH libraries.
-
The LUMI AI factory, and before LUST with the help of AMD, have prepared some containers with popular AI applications. These containers mix software from PyPi or Conda (the LUST containers), often a newer ROCm version installed through RPMs, and some performance-critical code that is compiled specifically for LUMI.
Remember though that whenever you use containers, you are the system administrator and not LUST. We can impossibly support all different software that users want to run in containers, and all possible Linux distributions they may want to run in those containers. We provide some advice on how to build a proper container, but if you chose to neglect it, it is up to you to solve the problems that occur.
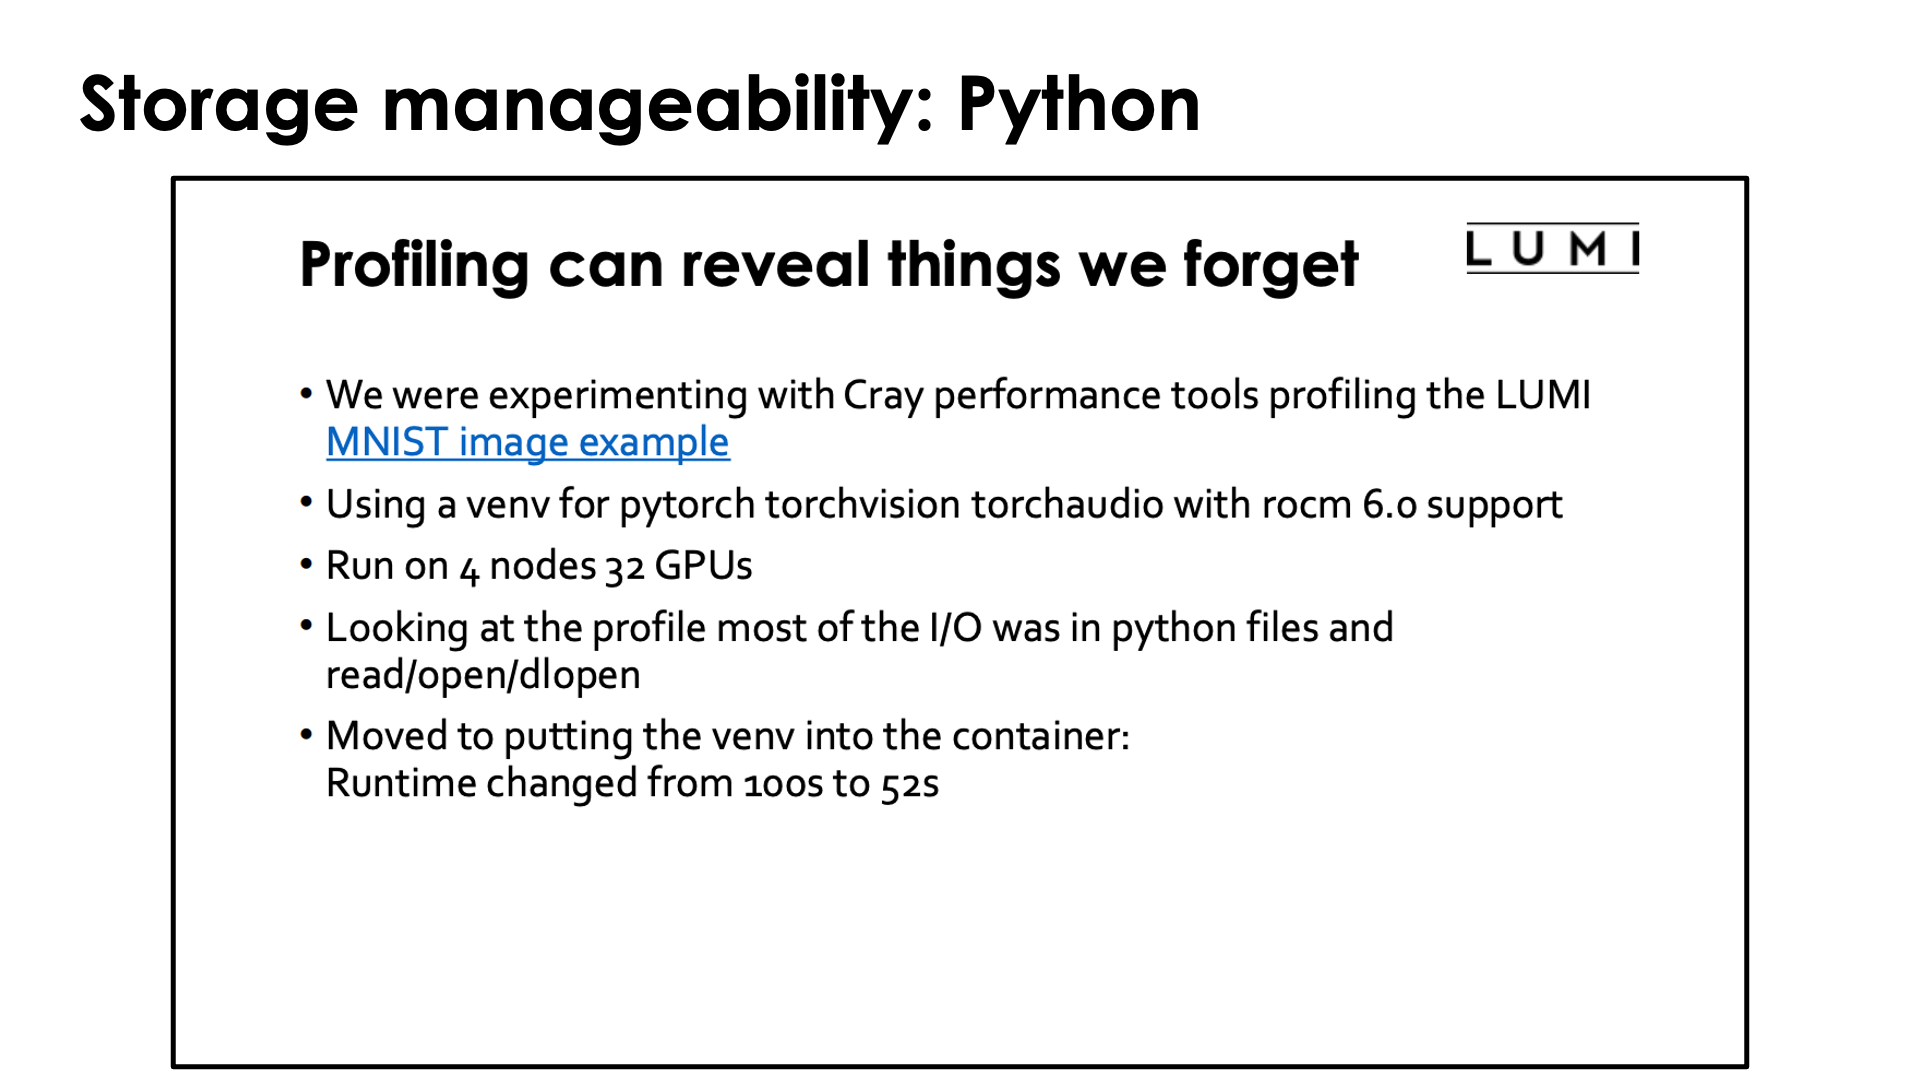
In case you wonder how important it is to containerise Conda and Python installations: Look no further than the slide above which was borrowed from the presentation "Loading training data on LUMI" of the "Moving your AI training jobs to LUMI of October 2025 and was presented by our colleagues from the HPE Center of Excellence supporting LUST. They wanted to see to what extent their profiling tools were useful to understanding the performance of AI jobs and took a simple example from the LUMI documentation. The conclusion of the profiling was a bit surprising, even for them. It turned out that in this rather standard example for machine learning (well, not so standard for what many users try as the MNIST dataset is not stored as many small files, but the tasks are standard) Python was spending as much time reading in Python code from Lustre as it was doing useful work. Containerising the Python installation sped up the benchmark from 100s to 52s.
Managing containers
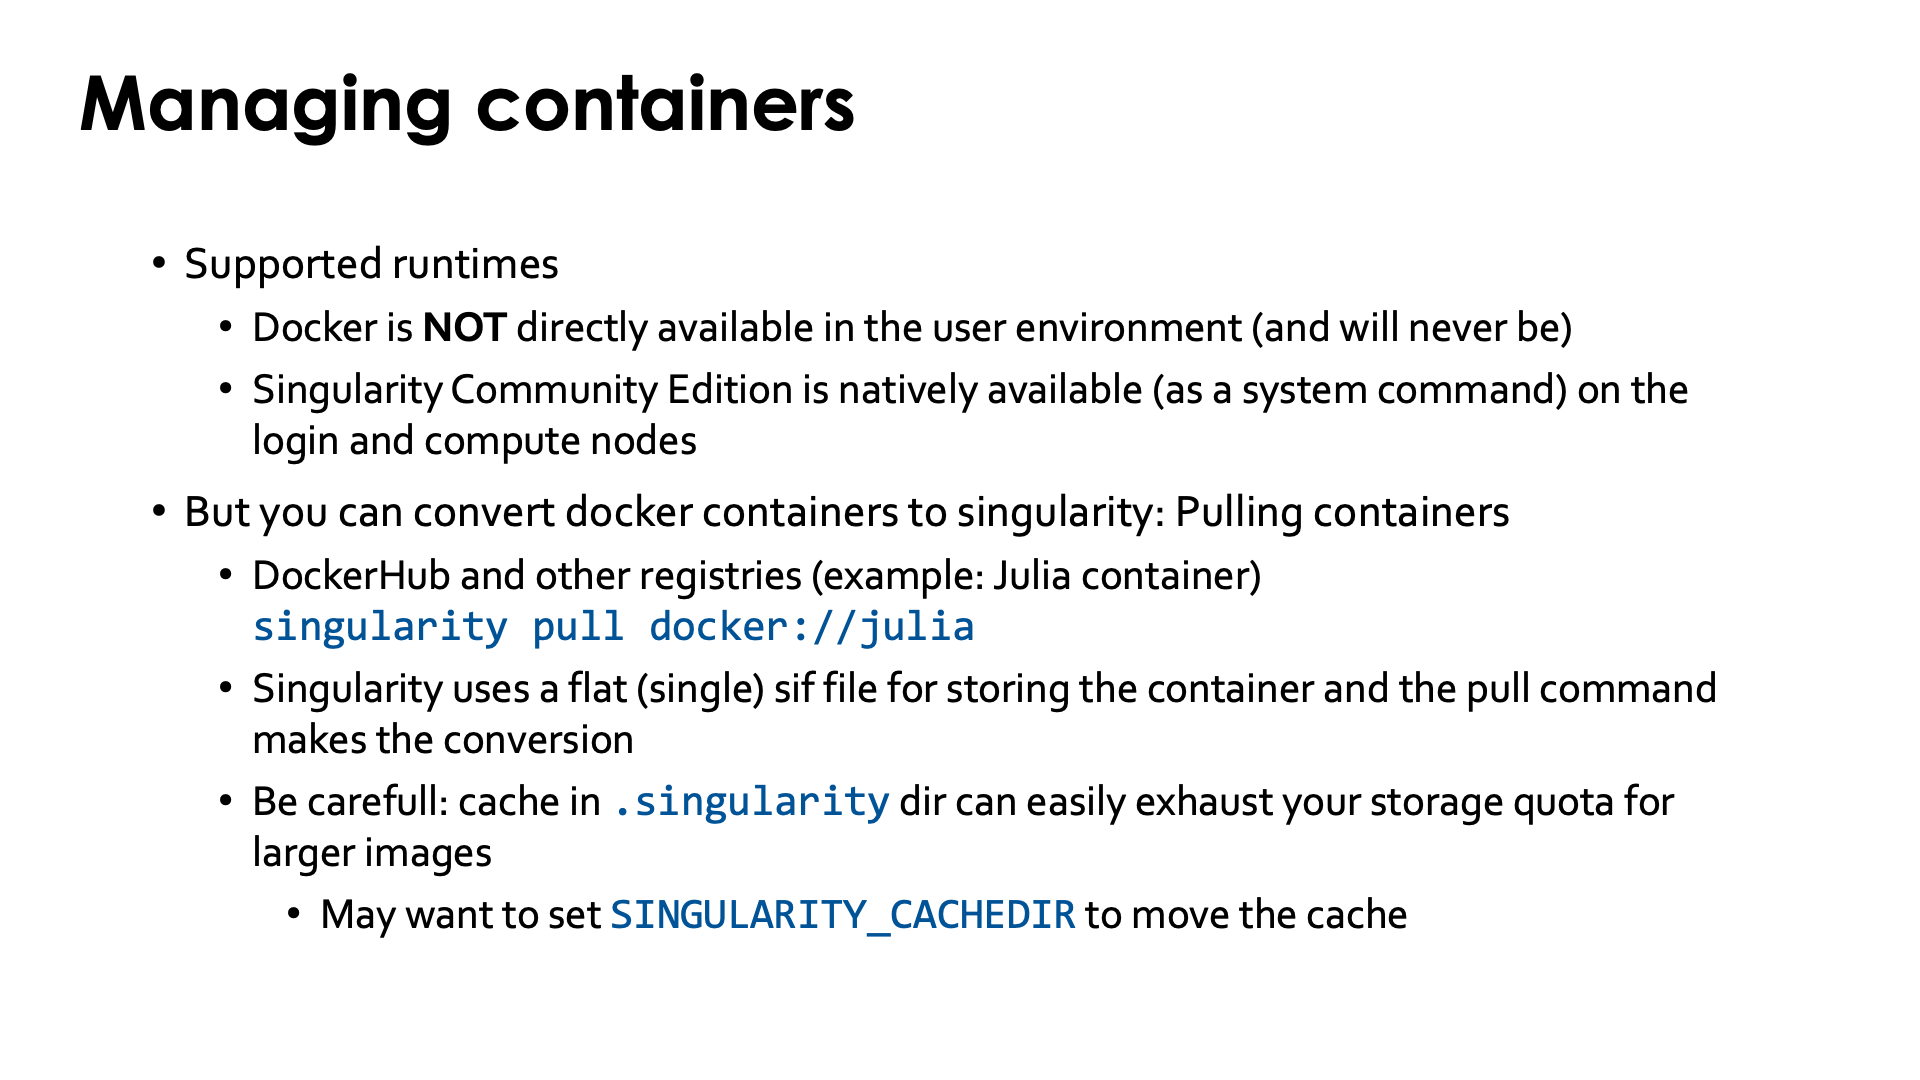
Not all container runtimes are a good match with HPC systems and the security model on such a system. On LUMI, we currently support only one container runtime. In essence, any runtime that requires elevated privileges cannot be supported for security reasons. Runtimes that require user namespaces can also not be used on LUMI as user namespaces have known security vulnerabilities when used in combination with many networked filesystems that are not yet fully fixed.
Hence docker is not available, and will never be on the regular compute nodes as it requires elevated privileges to run the container which cannot be given safely to regular users of the system.
Singularity Community Edition is currently the only supported container runtime and is available on the login nodes and the compute nodes. It is a system command that is installed with the OS, so no module has to be loaded to enable it. We can also offer only a single version of singularity or its close cousin AppTainer as singularity/AppTainer simply don't really like running multiple versions next to one another. Currently we offer Singularity Community Edition 4.1.3. The reason to chose for Singularity Community Edition rather than Apptainer is that it supports a build model that is compatible with the security restrictions on LUMI and is not offered in Apptainer.
To work with containers on LUMI you will either need to pull the container from a container registry,
e.g., DockerHub, bring in the container either by creating a tarball from a
docker container on the remote system and then converting that to the singularity .sif format on LUMI
or by copying the singularity .sif file, or use those container build features of singularity
that can be supported on LUMI within the security constraints.
Singularity does offer a command to pull in a Docker container and to convert it to singularity format. E.g., to pull a container for the Julia language from DockerHub, you'd use
singularity pull docker://julia
Singularity uses a single flat sif file for storing containers. The singularity pull command does the
conversion from Docker format to the singularity format.
Singularity caches files during pull operations and that may leave a mess of files in
the .singularity cache directory. This can lead to exhaustion of your disk quota for your
home directory. So you may want to use the environment variable SINGULARITY_CACHEDIR
to put the cache in, e.g,, your scratch space (but even then you want to clean up after the
pull operation to save on your storage billing units).
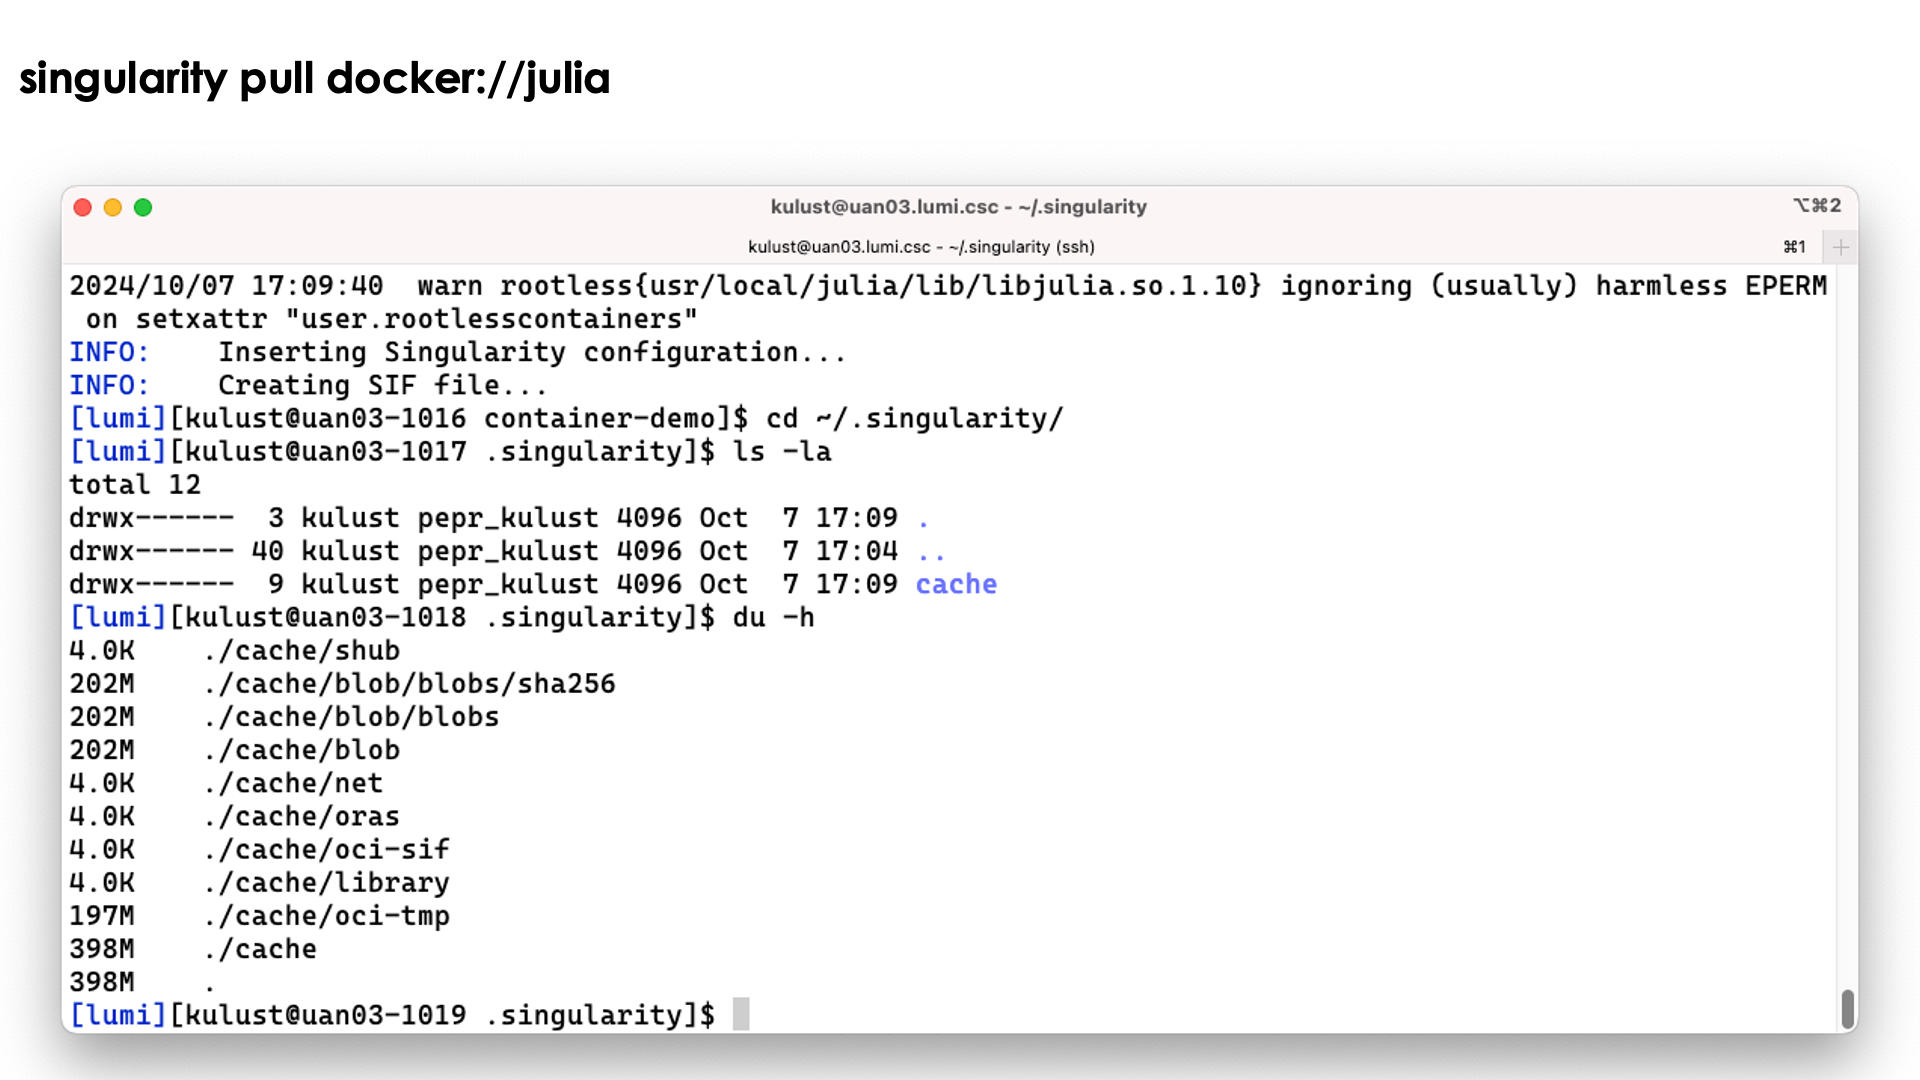
Demo singularity pull
Let's try the singularity pull docker://julia command:
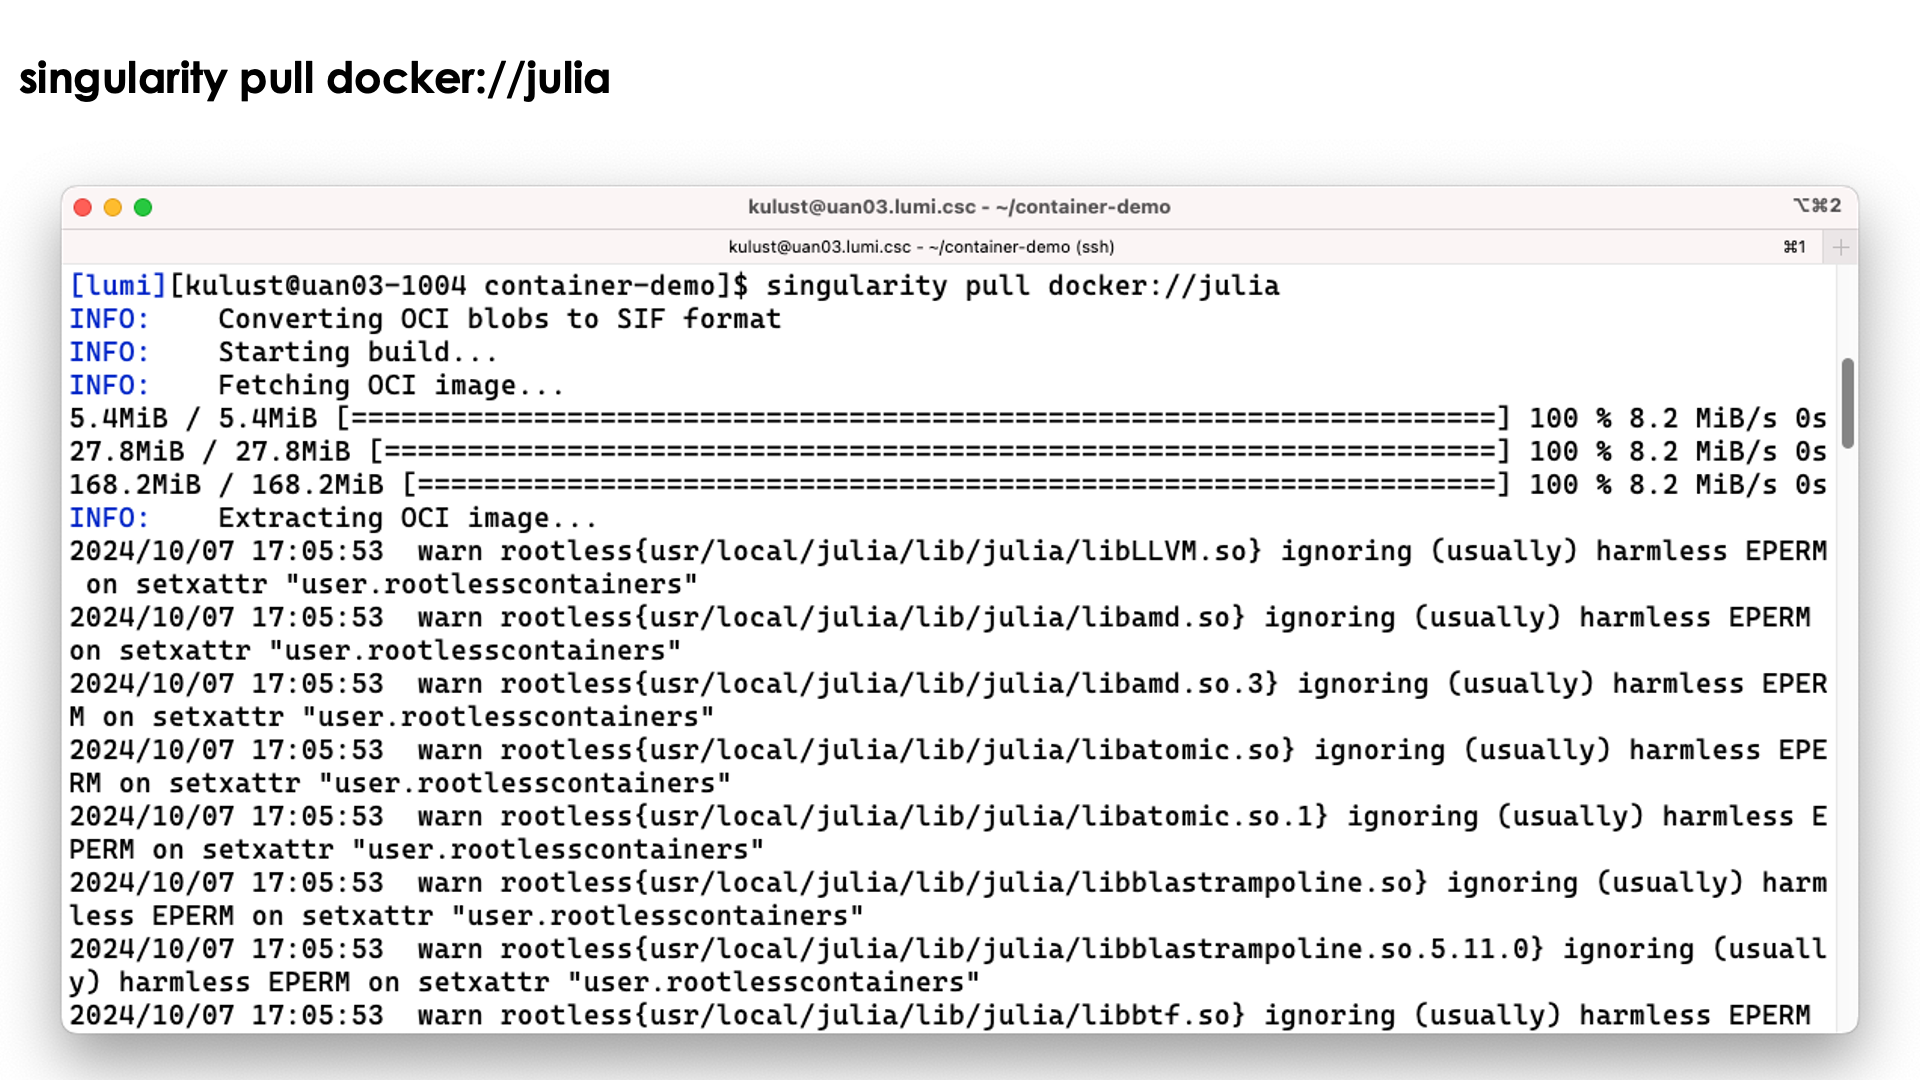
We do get a lot of warnings but usually this is perfectly normal and usually they can be safely ignored.
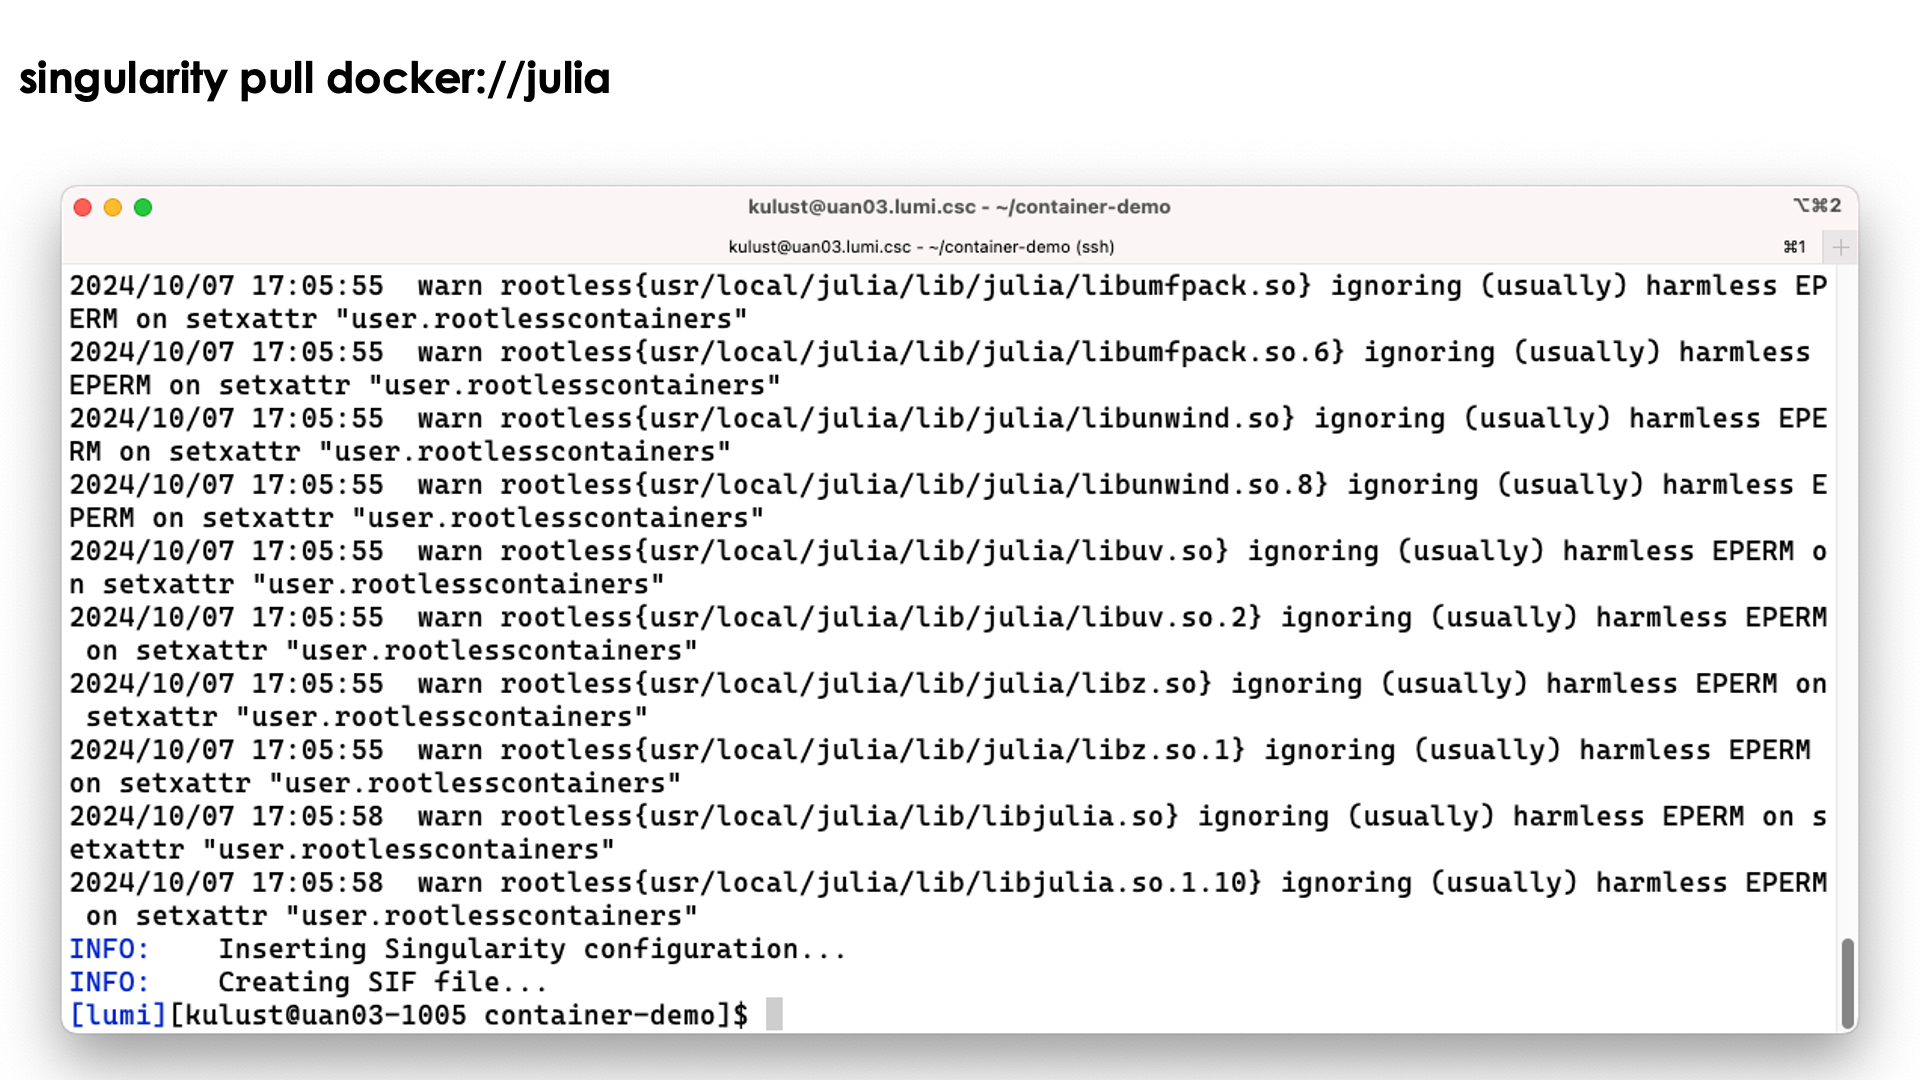
The process ends with the creation of the file jula_latest.sif.
Note however that the process has left a considerable number of files in ~/.singularity also:
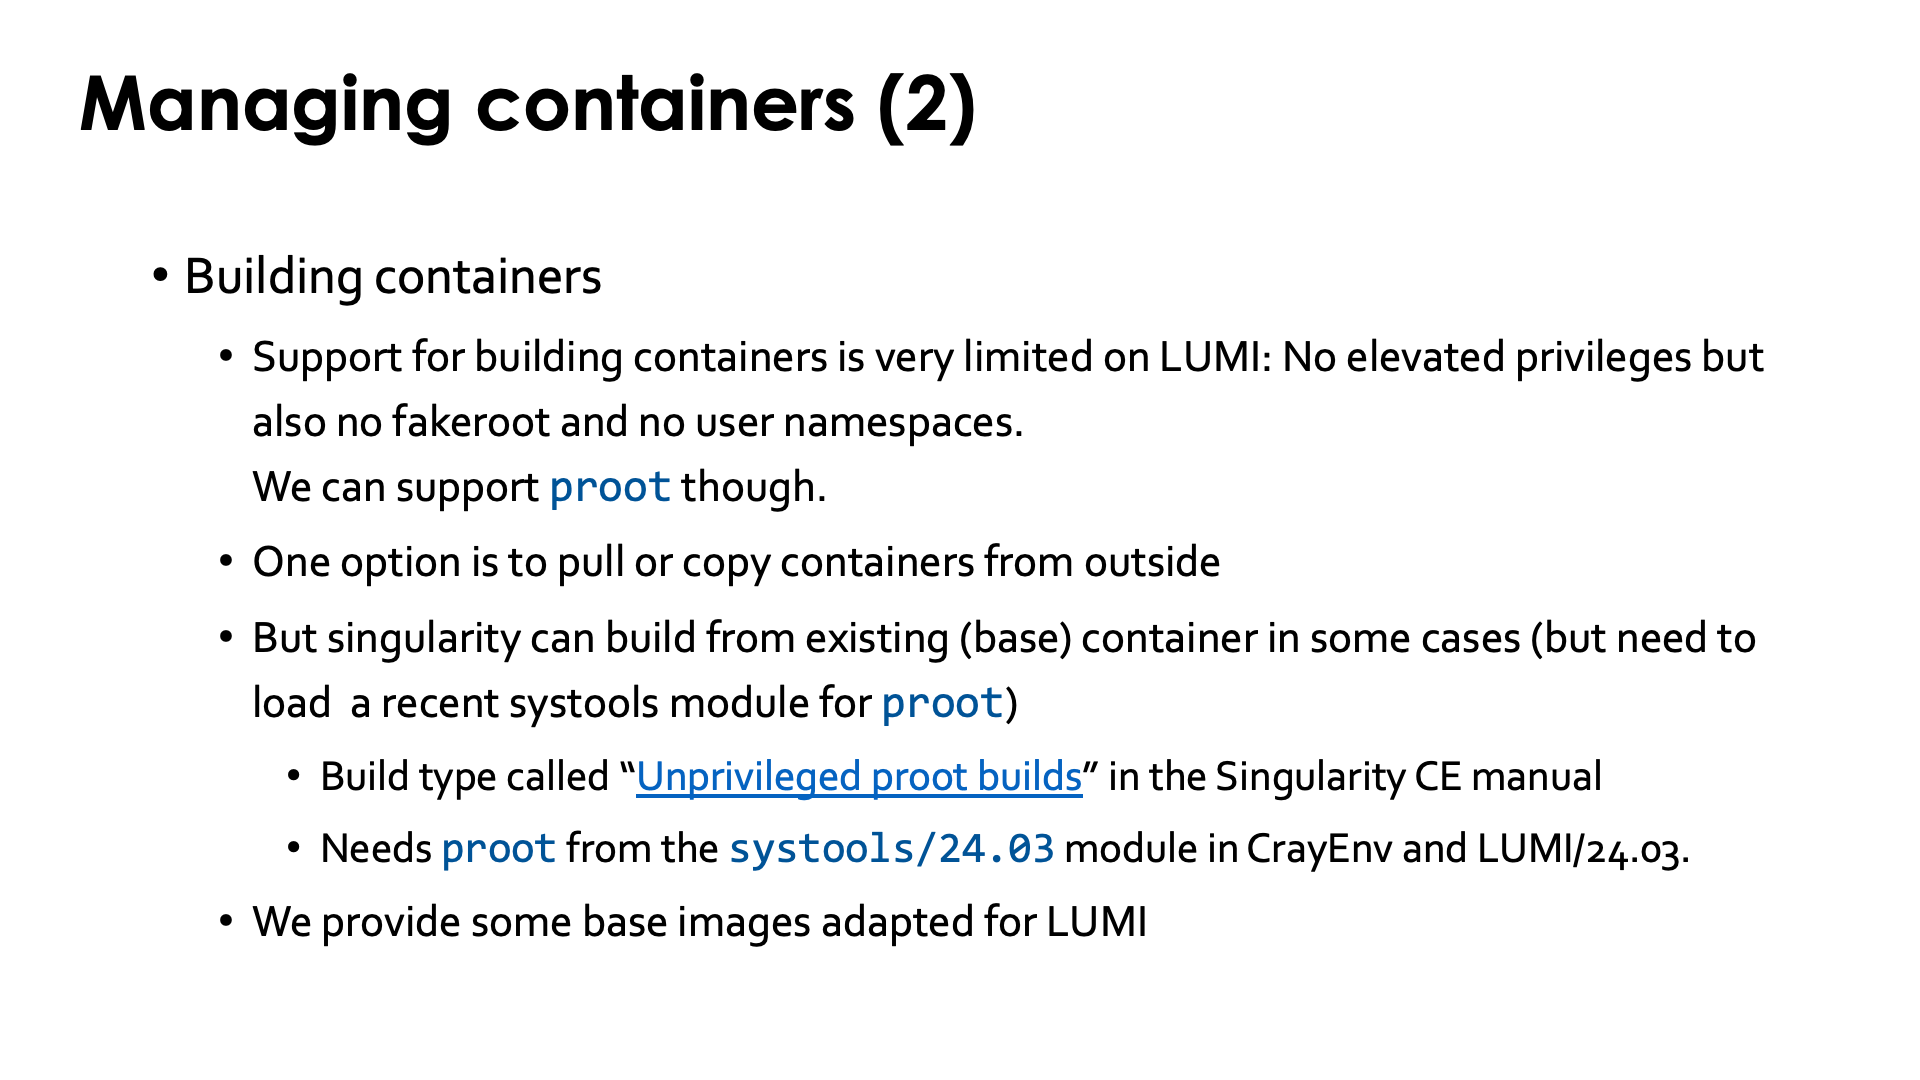
There is currently limited support for building containers on LUMI and I do not expect that to change quickly. Container build strategies that require elevated privileges, and even those that require user namespaces, cannot be supported for security reasons. You have to keep in mind that an HPC machine is a shared infrastructure with little to no isolation between users, unlike a cloud solution where containers can be locked up in a micro virtual machine and filesystems are completely virtualised also or work with different security models from traditional parallel filesystems or other popular networked filesystems from the PC and workstation world.. Enabling features that are known to have had several serious security vulnerabilities in the recent past, or that themselves are unsecure by design and could allow users to do more on the system than a regular user should be able to do, will never be supported.
So you should pull containers from a container repository, or build the container on your own workstation and then transfer it to LUMI.
There is some support for building on top of an existing singularity container using what the SingularityCE user guide
calls "unprivileged proot builds".
This requires loading the proot command which is provided by the systools module
in CrayEnv or LUMI/23.09 or later or the PRoot module. The SingularityCE user guide
mentions several restrictions of this process.
The general guideline from the manual is: "Generally, if your definition file starts from an existing SIF/OCI container image,
and adds software using system package managers, an unprivileged proot build is appropriate.
If your definition file compiles and installs large complex software from source,
you may wish to investigate --remote or --fakeroot builds instead."
But as we just said,
on LUMI we cannot yet
provide --fakeroot builds due to security constraints.
We have managed to compile software from source in the container, but the installation
process through proot does come with a performance penalty. This is only when building
the container though; there is no difference when running the container.
We also provide a number of base images to build upon, where the base images are tested with the OS kernel on LUMI.
Interacting with containers
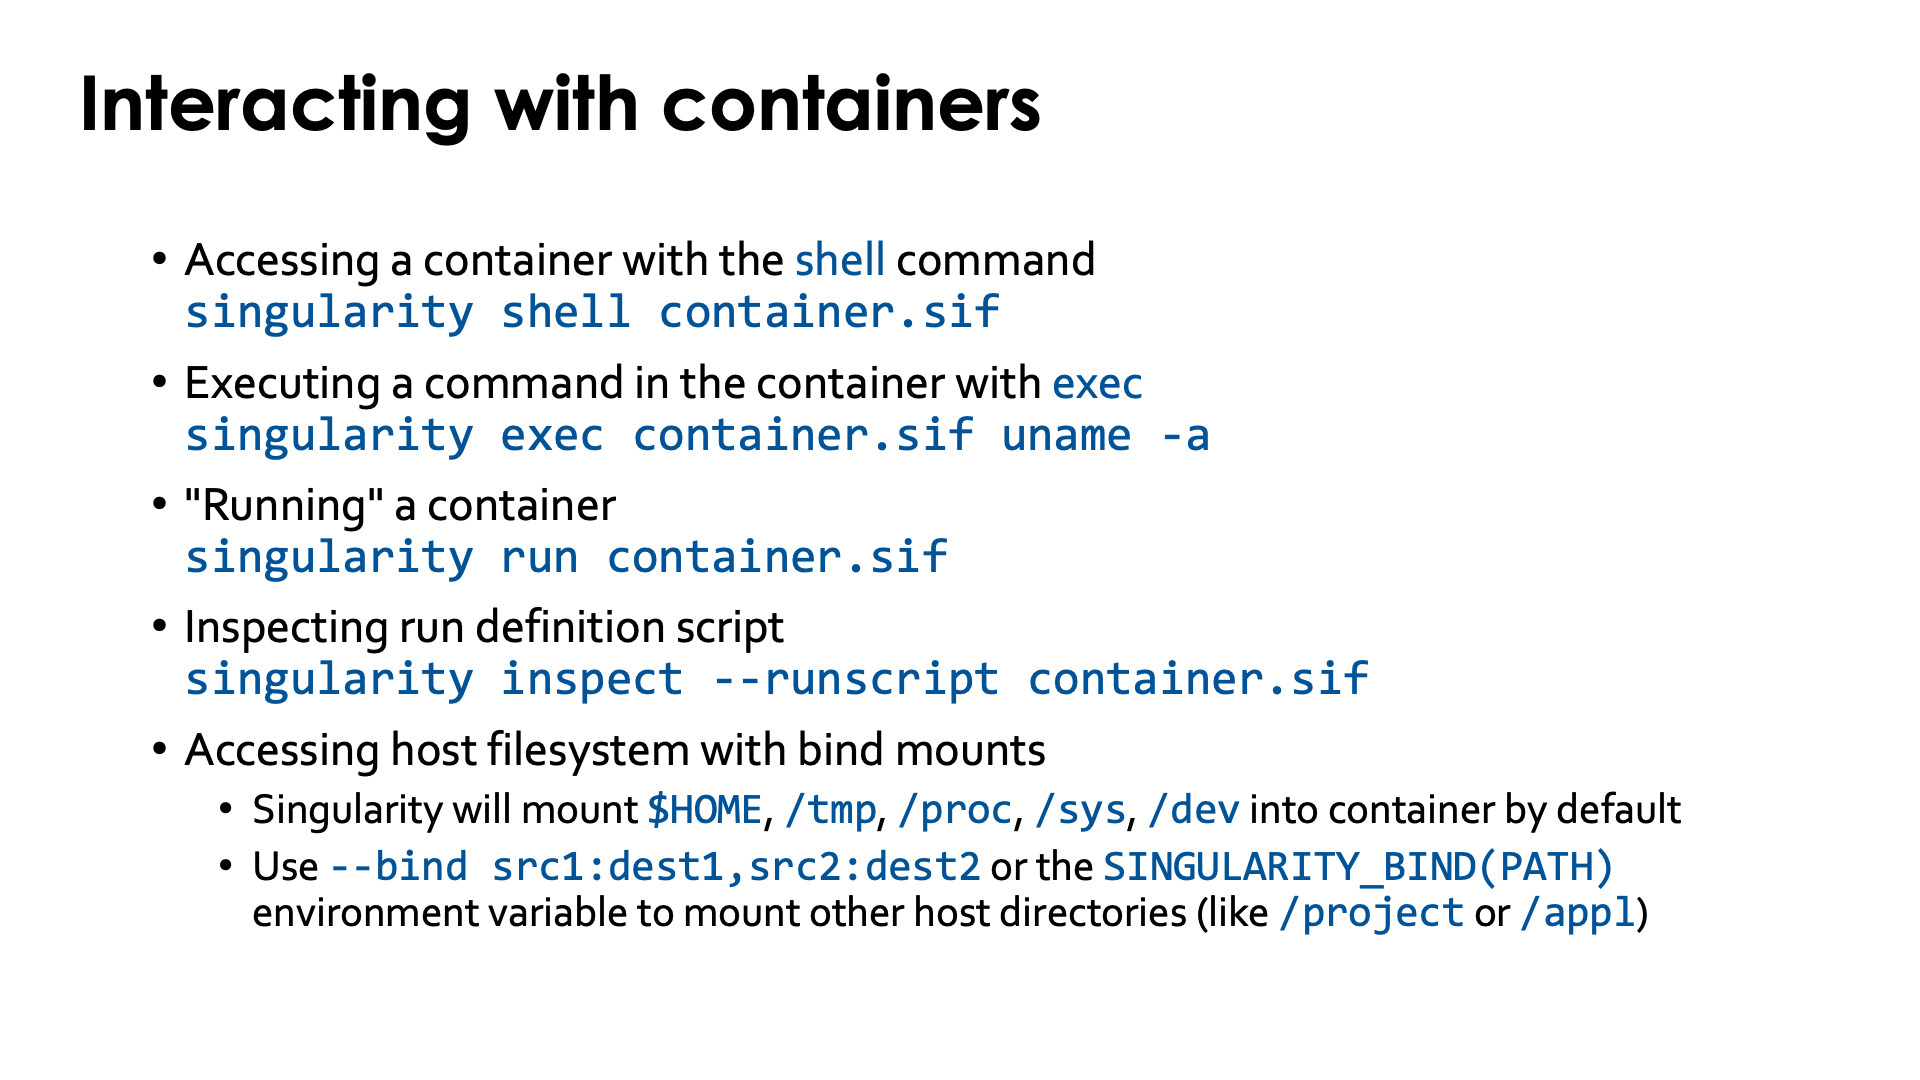
There are basically three ways to interact with containers.
If you have the sif file already on the system you can enter the container with an interactive shell:
singularity shell container.sif
Note however that that shell usually does no execute your .profile and/or .bashrc file, depending
also on how the shell command is defined internally in the container
(which you can check in /.singularity.d/actions/shell).
Demo singularity shell
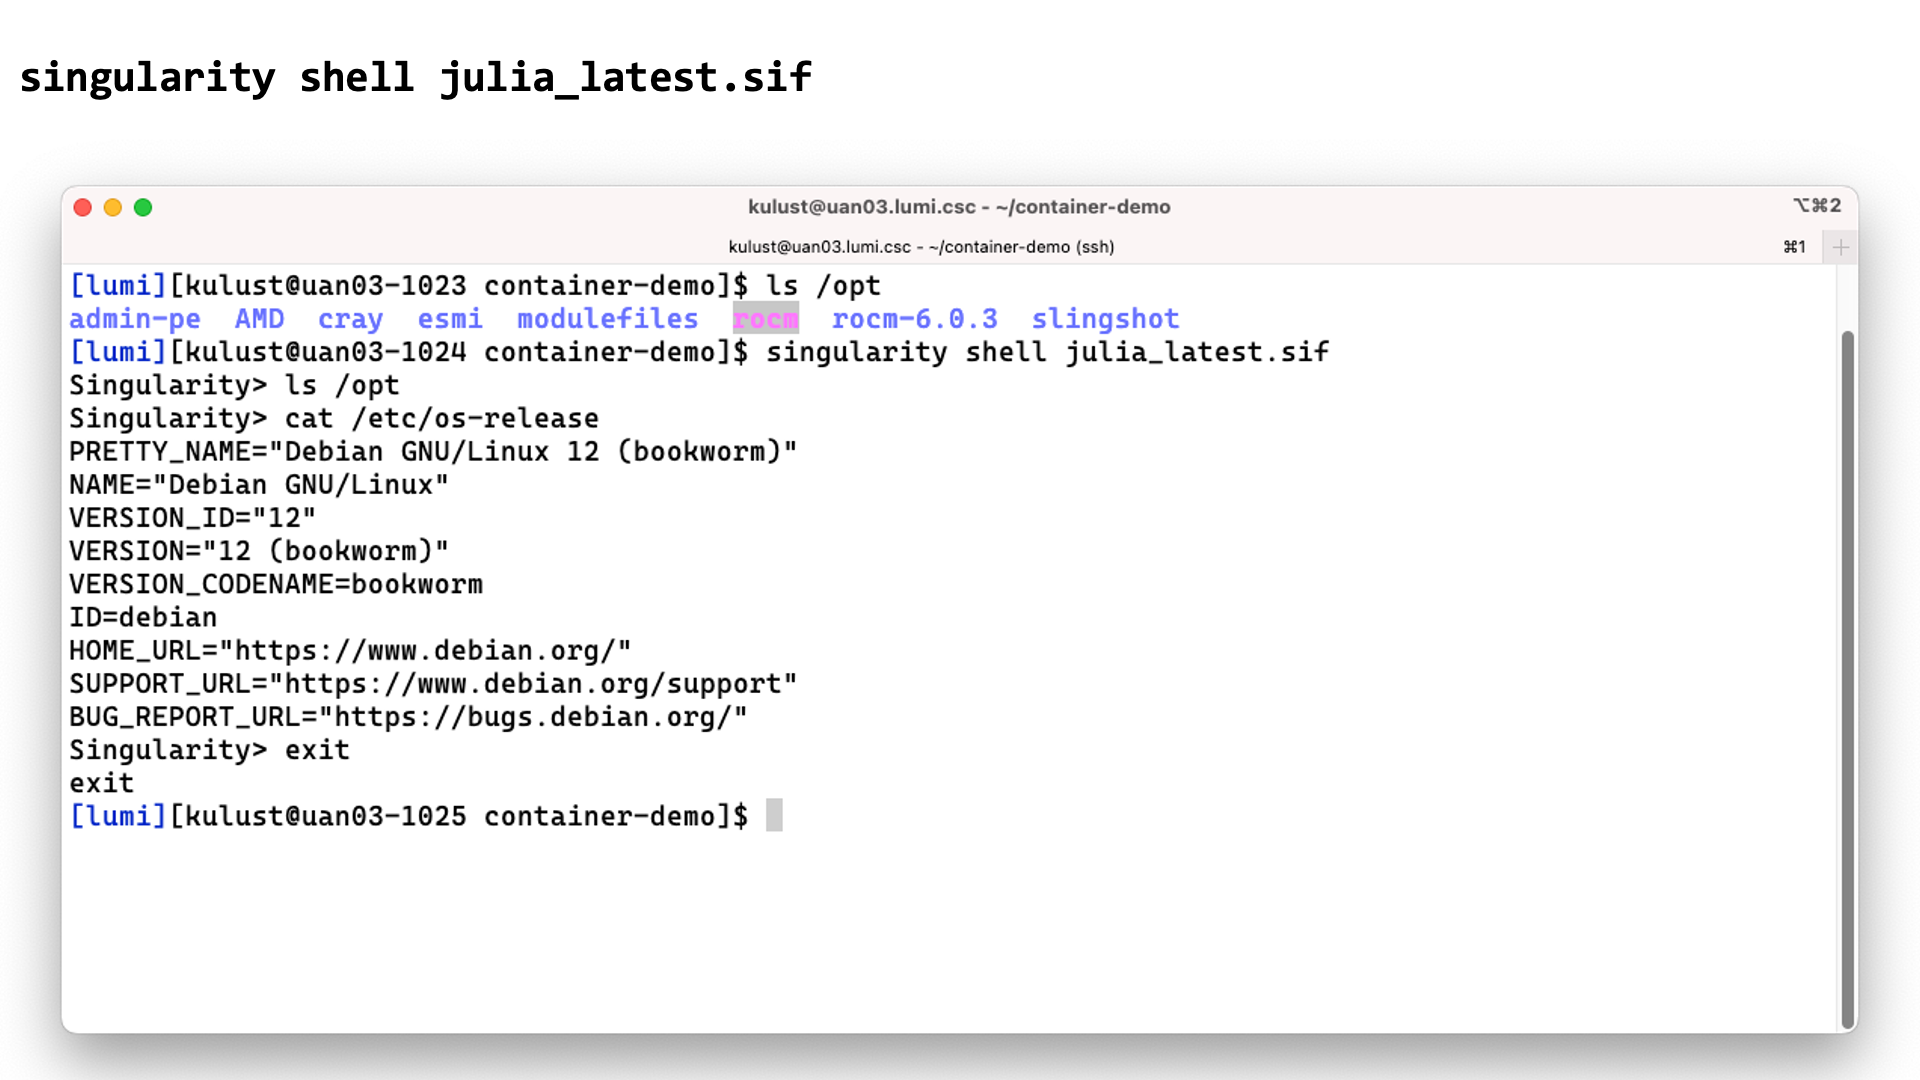
In this screenshot we checked the contents of the /opt directory before and after the
singularity shell julia_latest.sif command. This shows that we are clearly in a different
environment. Checking the /etc/os-release file only confirms this as LUMI runs SUSE Linux
on the login nodes, not a version of Debian.
The second way is to execute a command in the container with singularity exec. E.g., assuming the
container has the uname executable installed in it,
singularity exec container.sif uname -a
Demo singularity exec
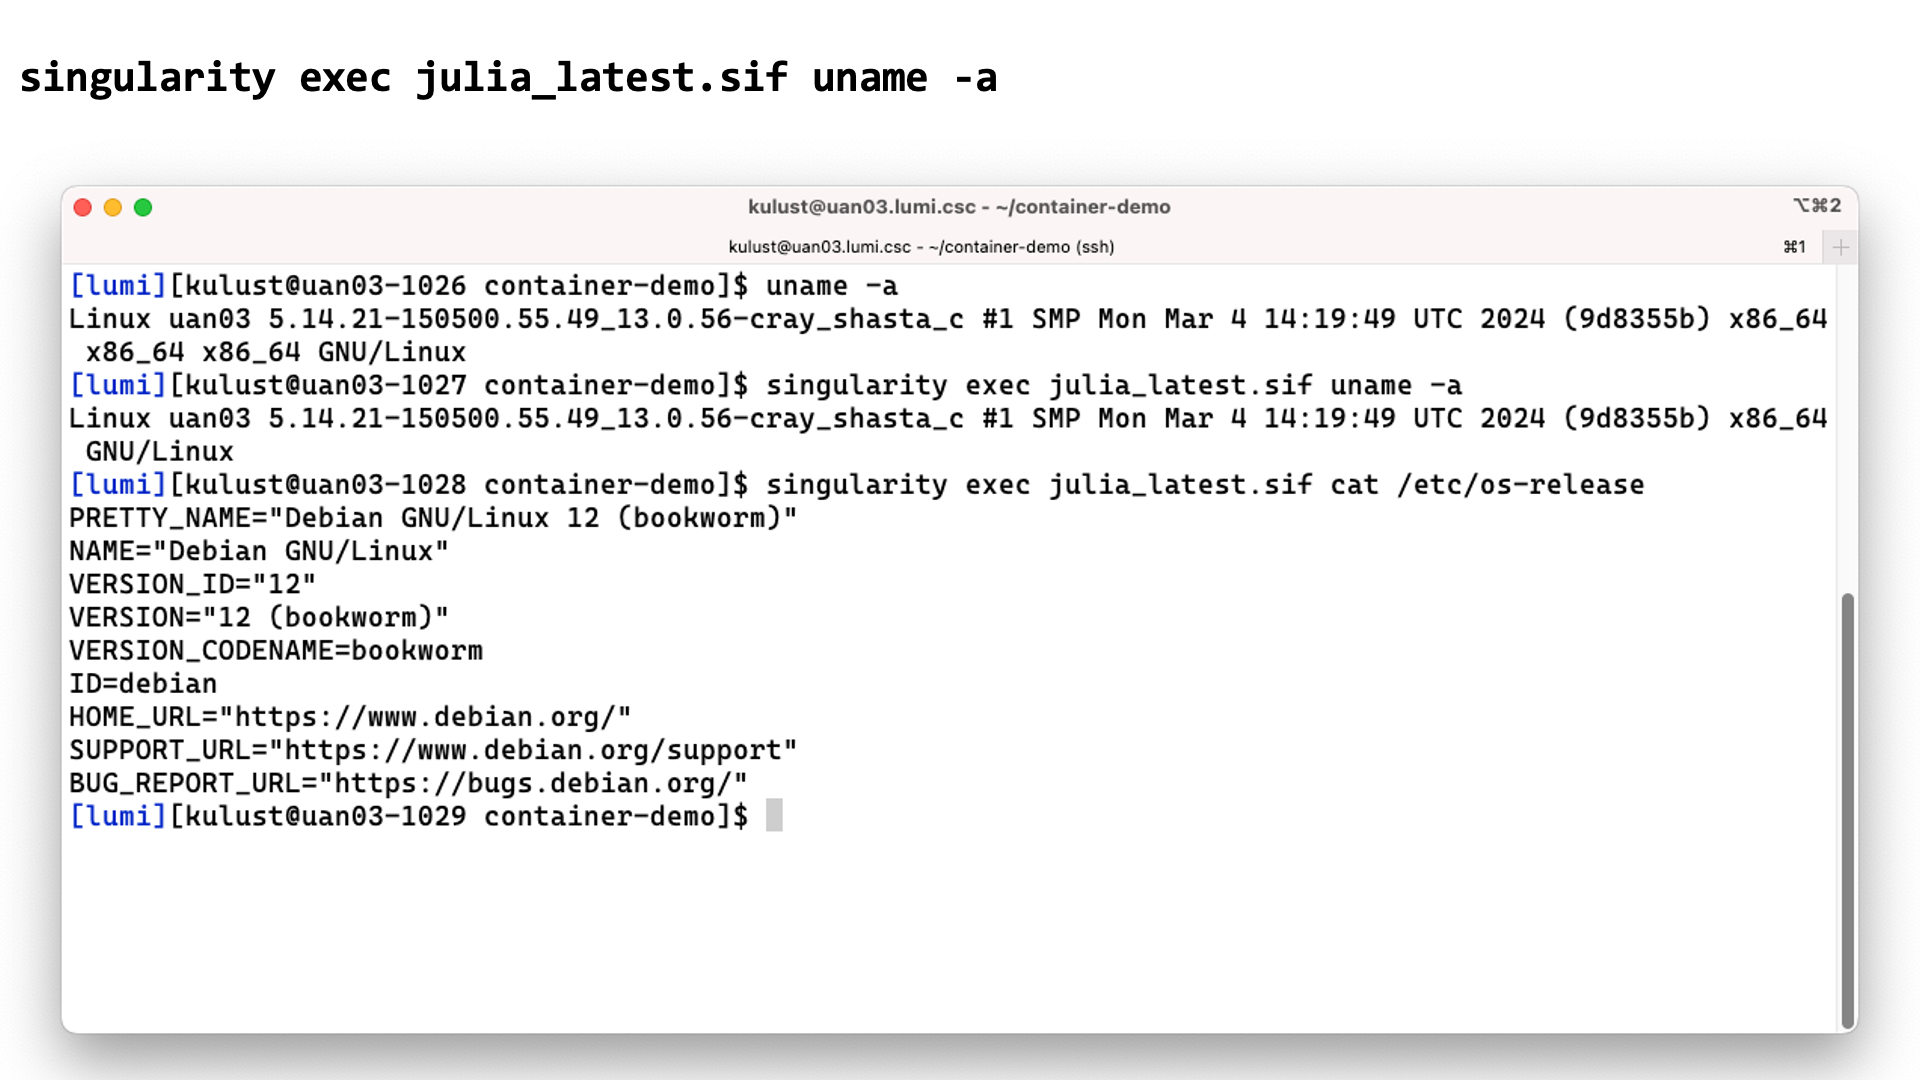
In this screenshot we execute the uname -a command before and with the
singularity exec julia_latest.sif command. There are some slight differences in the
output though the same kernel version is reported as the container uses the host kernel.
Executing
singularity exec julia_latest.sif cat /etc/os-release
confirms though that the commands are executed in the container.
The third option is often called running a container, which is done with singularity run:
singularity run container.sif
It does require the container to have a special script that tells singularity what
running a container means. You can check if it is present and what it does with singularity inspect:
singularity inspect --runscript container.sif
Demo singularity run
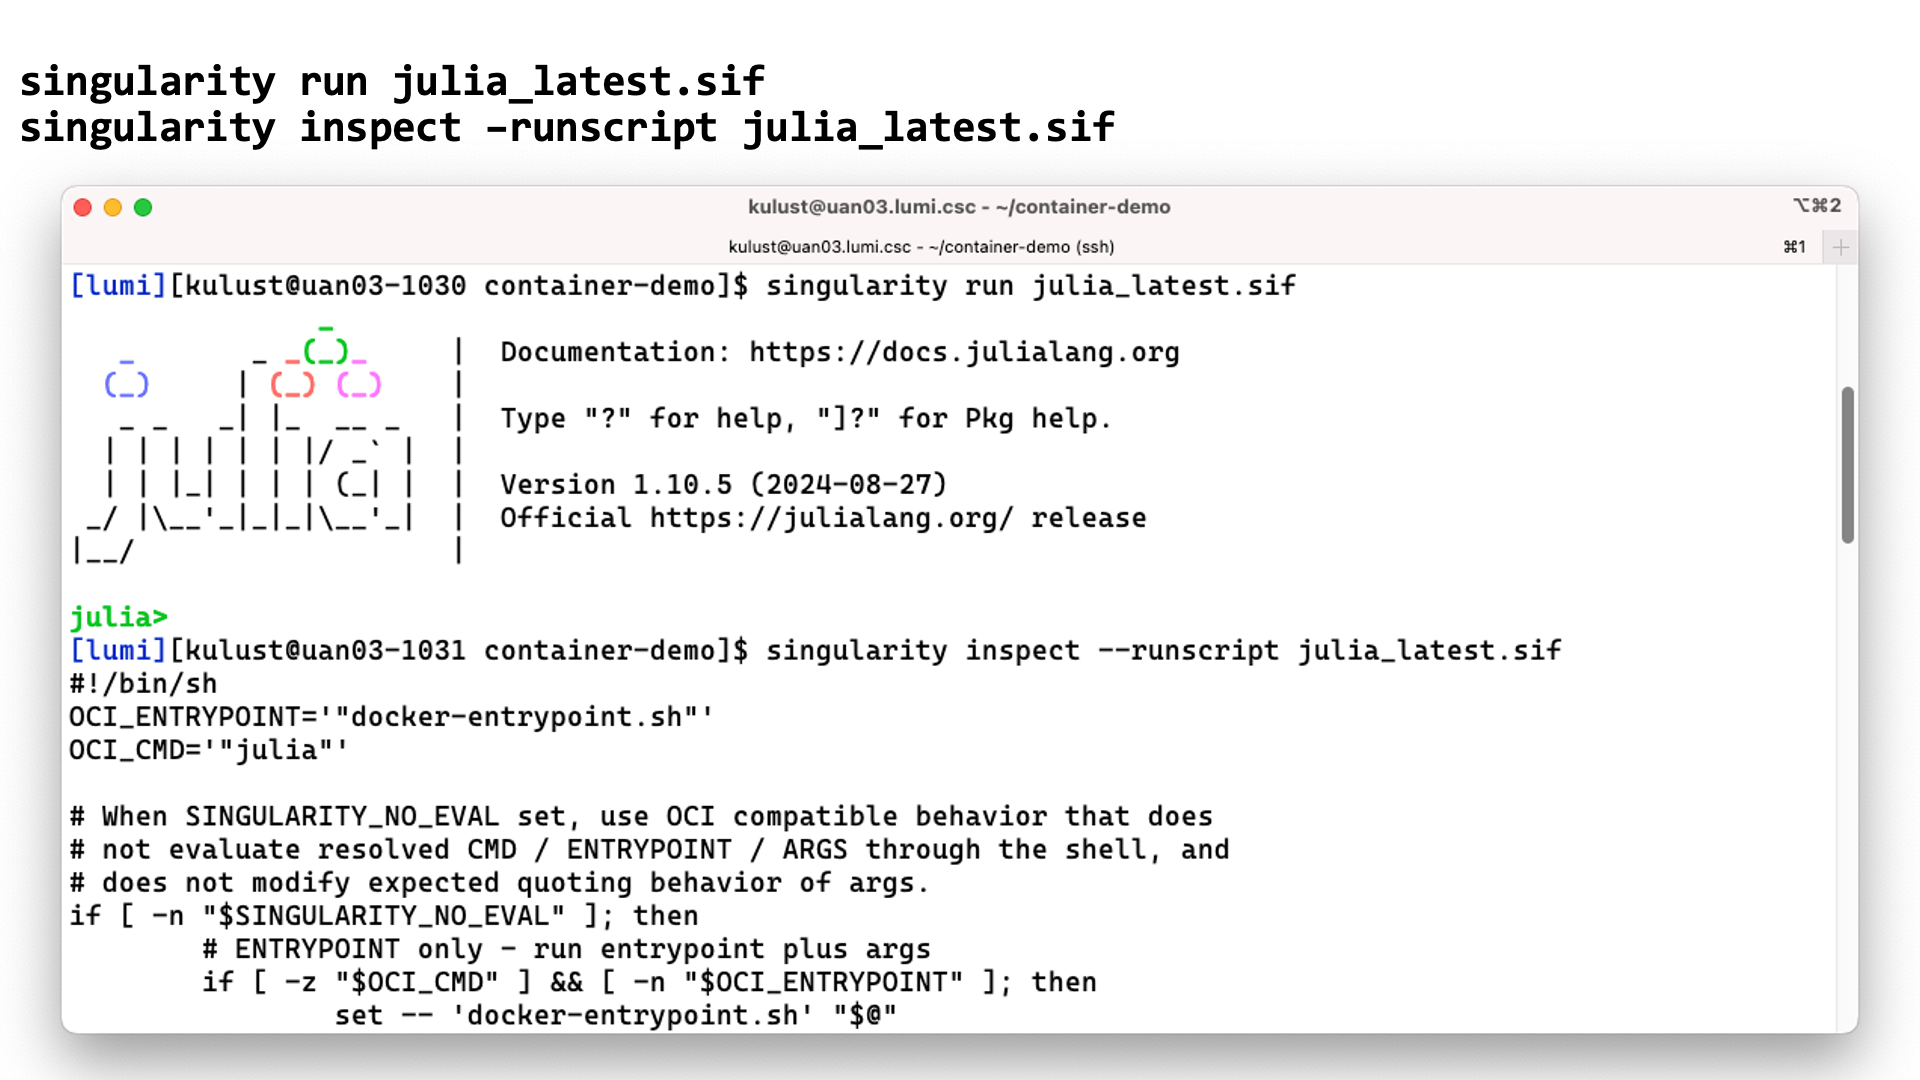
In this screenshot we start the julia interface in the container using
singularity run. The second command shows that the container indeed
includes a script to tell singularity what singularity run should do.
LUMI AI Factory containers
The containers from the LUMI AI Factory have a rather special runscript.
Rather than starting a standard command and passing it the extra arguments
that you give to the singularity run command, they simply execute the
extra arguments. So the first extra argument (after the name of the container
file) should be the command that you want to execute in the container, followed
by its arguments.
You want your container to be able to interact with the files in your account on the system.
Singularity will automatically mount $HOME, /tmp, /proc, /sys and /dev in the container,
but this is not enough as your home directory on LUMI is small and only meant to be used for
storing program settings, etc., and not as your main work directory. (And it is also not billed
and therefore no extension is allowed.) Most of the time you want to be able to access files in
your project directories in /project, /scratch or /flash, or maybe even in /appl.
To do this you need to tell singularity to also mount these directories in the container,
either using the
--bind src1:dest1,src2:dest2
flag (or -B) or via the SINGULARITY_BIND or SINGULARITY_BINDPATH environment variables.
E.g.,
export SINGULARITY_BIND='/pfs,/scratch,/projappl,/project,/flash'
will ensure that you have access to the scratch, project and flash directories of your project, and
export SINGULARITY_BIND='/pfs,/scratch,/projappl,/project,/flash,appl'
/appl though you should not expect that you can run the LUMI software stack in
your container.
Another useful directory to add to the list is /var/spool/slurmd if your container contains an
MPI implementation that can talk to the Slurm resource manager.
For some containers that are provided by the LUMI User Support Team, modules are also available that
set SINGULARITY_BINDPATH so that all necessary system libraries are available in the container and
users can access all their files using the same paths as outside the container.
Running containers on LUMI
Just as for other jobs, you need to use Slurm to run containers on the compute nodes.
For MPI containers one should use srun to run the singularity exec command, e.g,,
srun singularity exec --bind ${BIND_ARGS} \
${CONTAINER_PATH} mp_mpi_binary ${APP_PARAMS}
(and replace the environment variables above with the proper bind arguments for --bind, container file and
parameters for the command that you want to run in the container).
On LUMI, the software that you run in the container should either be compiled with an MPI library that can talk to the libfabric and libcxi from the system, or be compiled with an MPI library that has those libraries in the container already, or should be compatible with Cray MPICH, i.e., use the MPICH ABI (currently Cray MPICH is based on MPICH 3.4) so that you can tell the container to use Cray MPICH (from outside the container) rather than the MPICH variant installed in the container, so that it can offer optimal performance on the LUMI Slingshot 11 interconnect.
Open MPI containers are currently not well supported on LUMI and we do not recommend using them. We only have a partial solution for the CPU nodes that is not tested in all scenarios, and on the GPU nodes Open MPI is very problematic at the moment. This is due to some design issues in the design of Open MPI and what it expects from a network fabric library, and also to some piece of software to interact with the resource manager that recent versions of Open MPI require but that HPE only started supporting recently on Cray EX systems and that we haven't been able to fully test. Open MPI has a slight preference for the UCX communication library over the OFI libraries, and until version 5 full GPU support required UCX. Moreover, binaries using Open MPI often use the so-called rpath linking process so that it becomes a lot harder to inject an Open MPI library that is installed elsewhere. The good news though is that the Open MPI developers of course also want Open MPI to work on biggest systems in the USA, and all three currently operating or planned exascale systems use the Slingshot 11 interconnect, so work is going on for better support for OFI in general and Cray Slingshot in particular and for full GPU support.
Enhancements to the environment
To make life easier, LUST with the support of CSC did implement some modules that are either based on containers or help you run software with containers.
Bindings for singularity
singularity-bindings/system
The singularity-bindings/system module which can be installed via EasyBuild
helps to set SINGULARITY_BIND and SINGULARITY_LD_LIBRARY_PATH to use
Cray MPICH. Figuring out those settings is tricky, and sometimes changes to the
module are needed for a specific situation because of dependency conflicts
between Cray MPICH and other software in the container, which is why we don't
provide it in the standard software stacks but instead make it available as
an EasyBuild recipe that you can adapt to your situation and install.
As it needs to be installed through EasyBuild, it is really meant to be
used in the context of a LUMI software stack (so not in CrayEnv).
To find the EasyConfig files, load the EasyBuild-user module and
run
eb --search singularity-bindings
You can also check the
page for the singularity-bindings in the LUMI Software Library.
You may need to change the EasyConfig for your specific purpose though.
E.e., the module injects LD_LIBRARY_PATH into the container to force it to talk to
Cray MPICH, but if LD_LIBRARY_PATH is already set in the container, you may need to
modify the list of directories in that environment variable as it overwrites what is
set in the container and not adds to it. Also, sometimes, libc needs to be injected
from the system while in other cases the one in the container has to be used, depending
on which on is the newest. There is no "one solution fits all" for such a module which is
also why it is not installed in the system.
singularity-AI-bindings
A third module helping with bindings, is the
singularity-AI-bindings module.
This module provides bindings for the AI containers in
/appl/local/containers/sif-images (and some containers in
/appl/local/containers/easybuild-sif-images).
It is available as an EasyConfig if you want to install it where it works best for you,
or you can access it after
module use /appl/local/containers/ai-modules
This module provides bindings to some system libraries and to the regular file systems for some of the AI containers that are provided on LUMI. The module is in no way a generic module that will also work properly for containers that you pull, e.g., from Docker! Also, it tries to bind some files that are not needed in the newest versions of the AI containers that are provided by LUST, but it does no harm either.
Build tools for Conda and Python
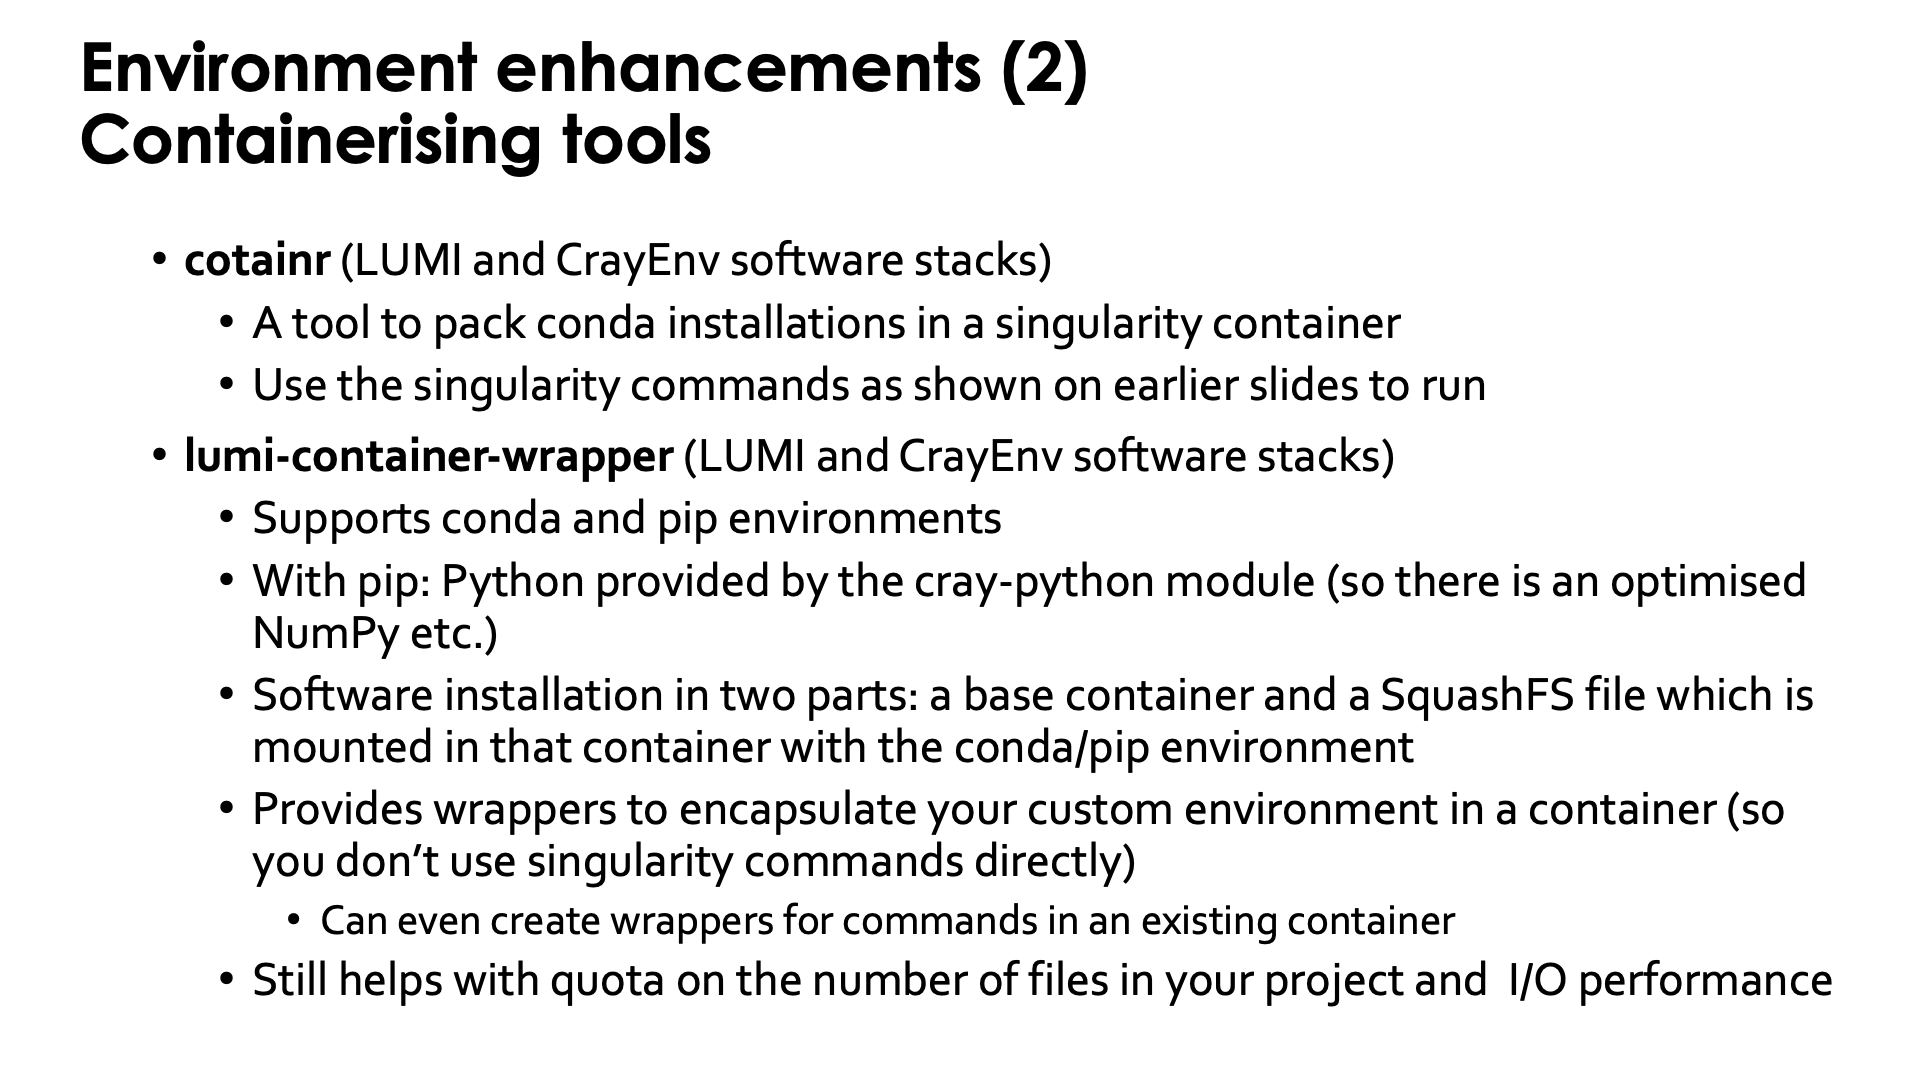
cotainr: Build Conda containers on LUMI
The next tool is cotainr,
a tool developed by DeIC, the Danish partner in the LUMI consortium.
It is a tool to pack a Conda installation into a container. It runs entirely in user space and doesn't need
any special rights. (For the container specialists: It is based on the container sandbox idea to build
containers in user space.)
Containers build with cotainr are used just as other containers, so through the singularity commands discussed
before.
AI course
The cotainr tool is also used extensively in the
AI workshop that the LUMI User Support Team
organises from time to time.
It is used in that course to build containers
with AI software on top of some
ROCmTM containers that LUST provides or that are provided by the LUMI AI factory.
Container wrapper for Python packages and conda
The fifth tool is a container wrapper tool that users from Finland may also know
as Tykky (the name on their national systems).
It is a tool to wrap Python and conda installations in a container and then
create wrapper scripts for the commands in the bin subdirectory so that for most
practical use cases the commands can be used without directly using singularity
commands.
Whereas cotainr fully exposes the container to users and its software is accessed
through the regular singularity commands, Tykky tries to hide this complexity with
wrapper scripts that take care of all bindings and calling singularity.
On LUMI, it is provided by the lumi-container-wrapper
module which is available in the CrayEnv environment and in the LUMI software stacks.
The tool can work in four modes:
-
It can create a conda environment based on a Conda environment file and create wrapper scripts for that installation.
-
It can install a number of Python packages via
pipand create wrapper scripts. On LUMI, this is done on top of one of thecray-pythonmodules that already contain optimised versions of NumPy, SciPy and pandas. Python packages are specified in arequirements.txtfile used bypip. -
It can do a combination of both of the above: Install a Conda-based Python environment and in one go also install a number of additional Python packages via
pip. -
The fourth option is to use the container wrapper to create wrapper scripts for commands in an existing container.
For the first three options, the container wrapper will then perform the installation
in a work directory, create some wrapper commands in the bin subdirectory of the directory
where you tell the container wrapper tool to do the installation,
and it will use SquashFS to create as single file
that contains the conda or Python installation. So strictly speaking it does not create a
container, but a SquashFS file that is then mounted in a small existing base container.
However, the wrappers created for all commands in the bin subdirectory of the conda or
Python installation take care of doing the proper bindings. If you want to use the container
through singularity commands however, you'll have to do that mounting by hand, including
mounting the SquashFS file on the right directory in the container.
Note that the wrapper scripts may seem transparent, but running a script that contains the wrapper commands outside the container may have different results from running the same script inside the container. After all, the script that runs outside the container sees a different environment than the same script running inside the container.
We do strongly recommend to use cotainr or the container wrapper tool for larger conda and Python installation.
We will not raise your file quota if it is to house such installation in your /project directory.
Demo lumi-container-wrapper for a Conda installation
Create a subdirectory to experiment. In that subdirectory, create a file named env.yml with
the content:
channels:
  - conda-forge
dependencies:
  - python=3.8.8
  - scipy
  - nglview
and create an empty subdirectory conda-cont-1.
Now you can follow the commands on the slides below:
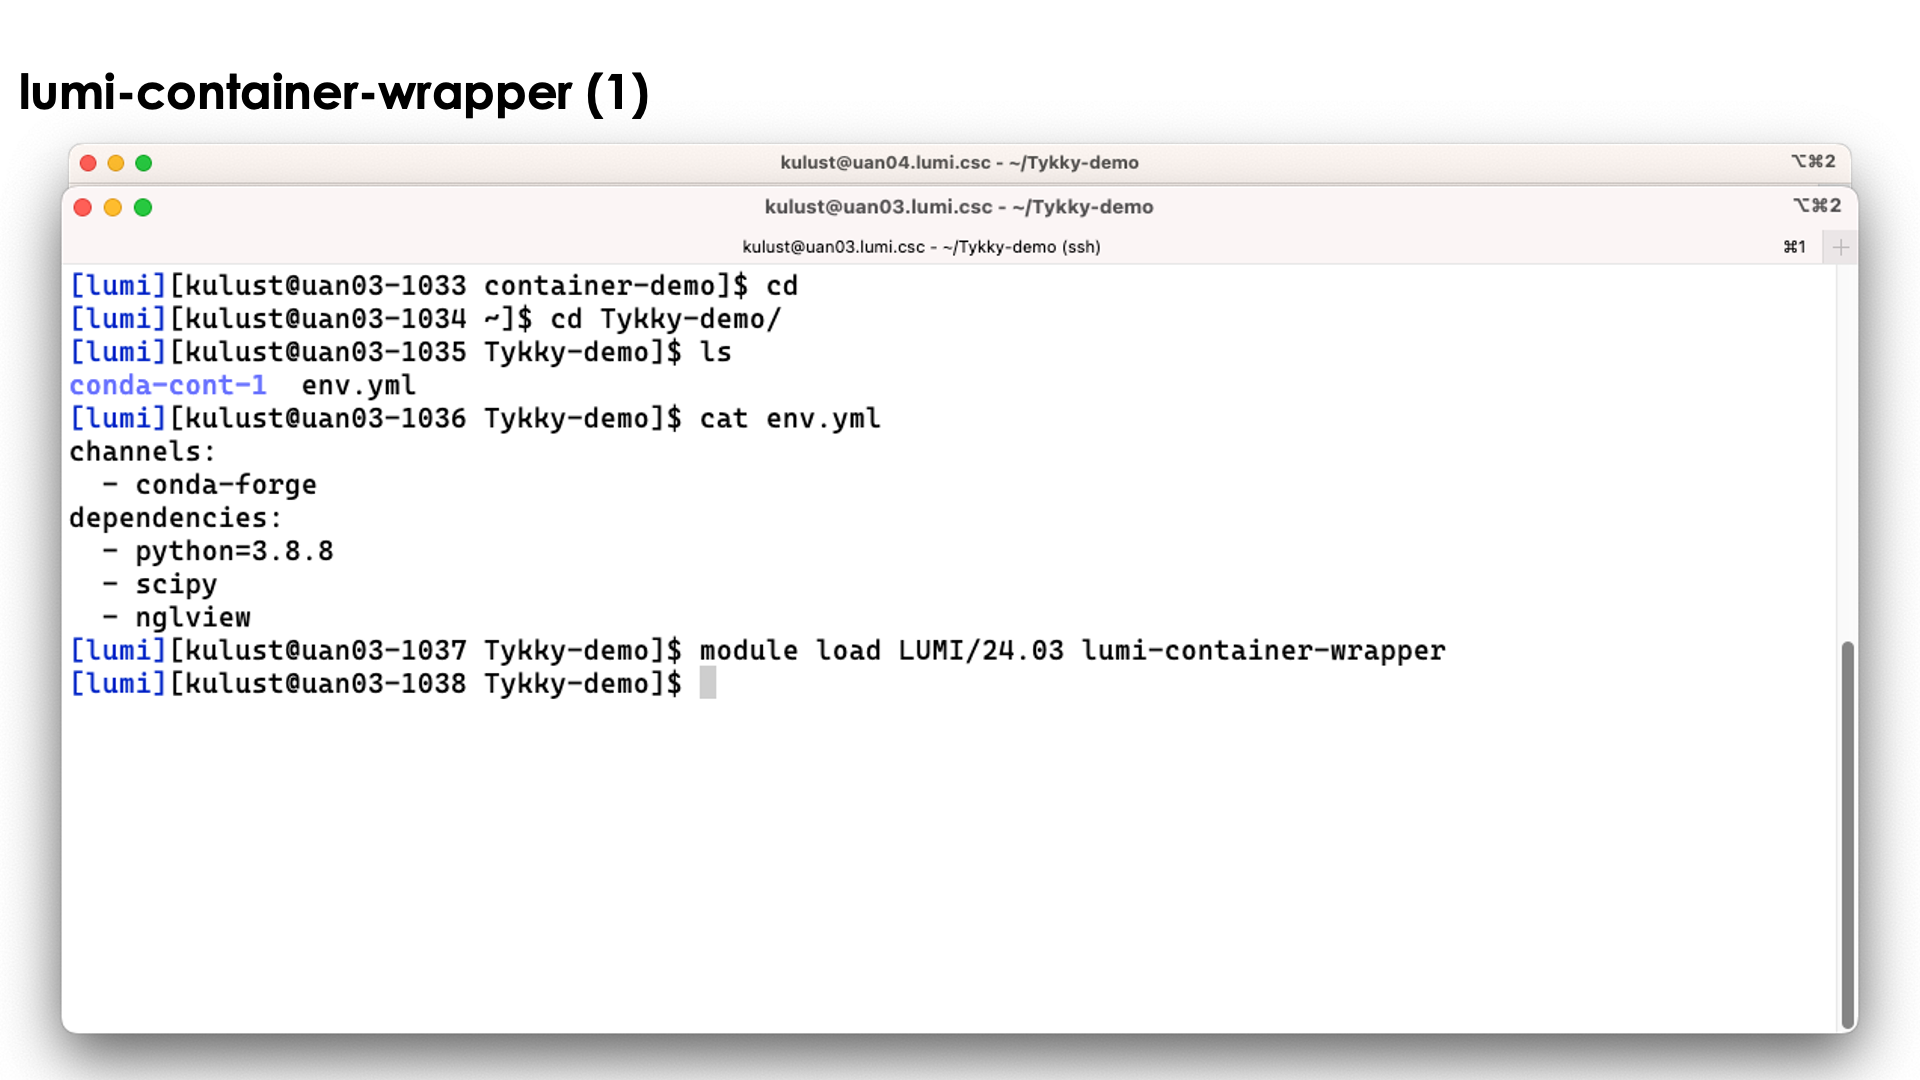
On the slide above we prepared the environment.
Now lets run the command
conda-containerize new --prefix ./conda-cont-1 env.yml
and look at the output that scrolls over the screen. The screenshots don't show the full output as some parts of the screen get overwritten during the process:
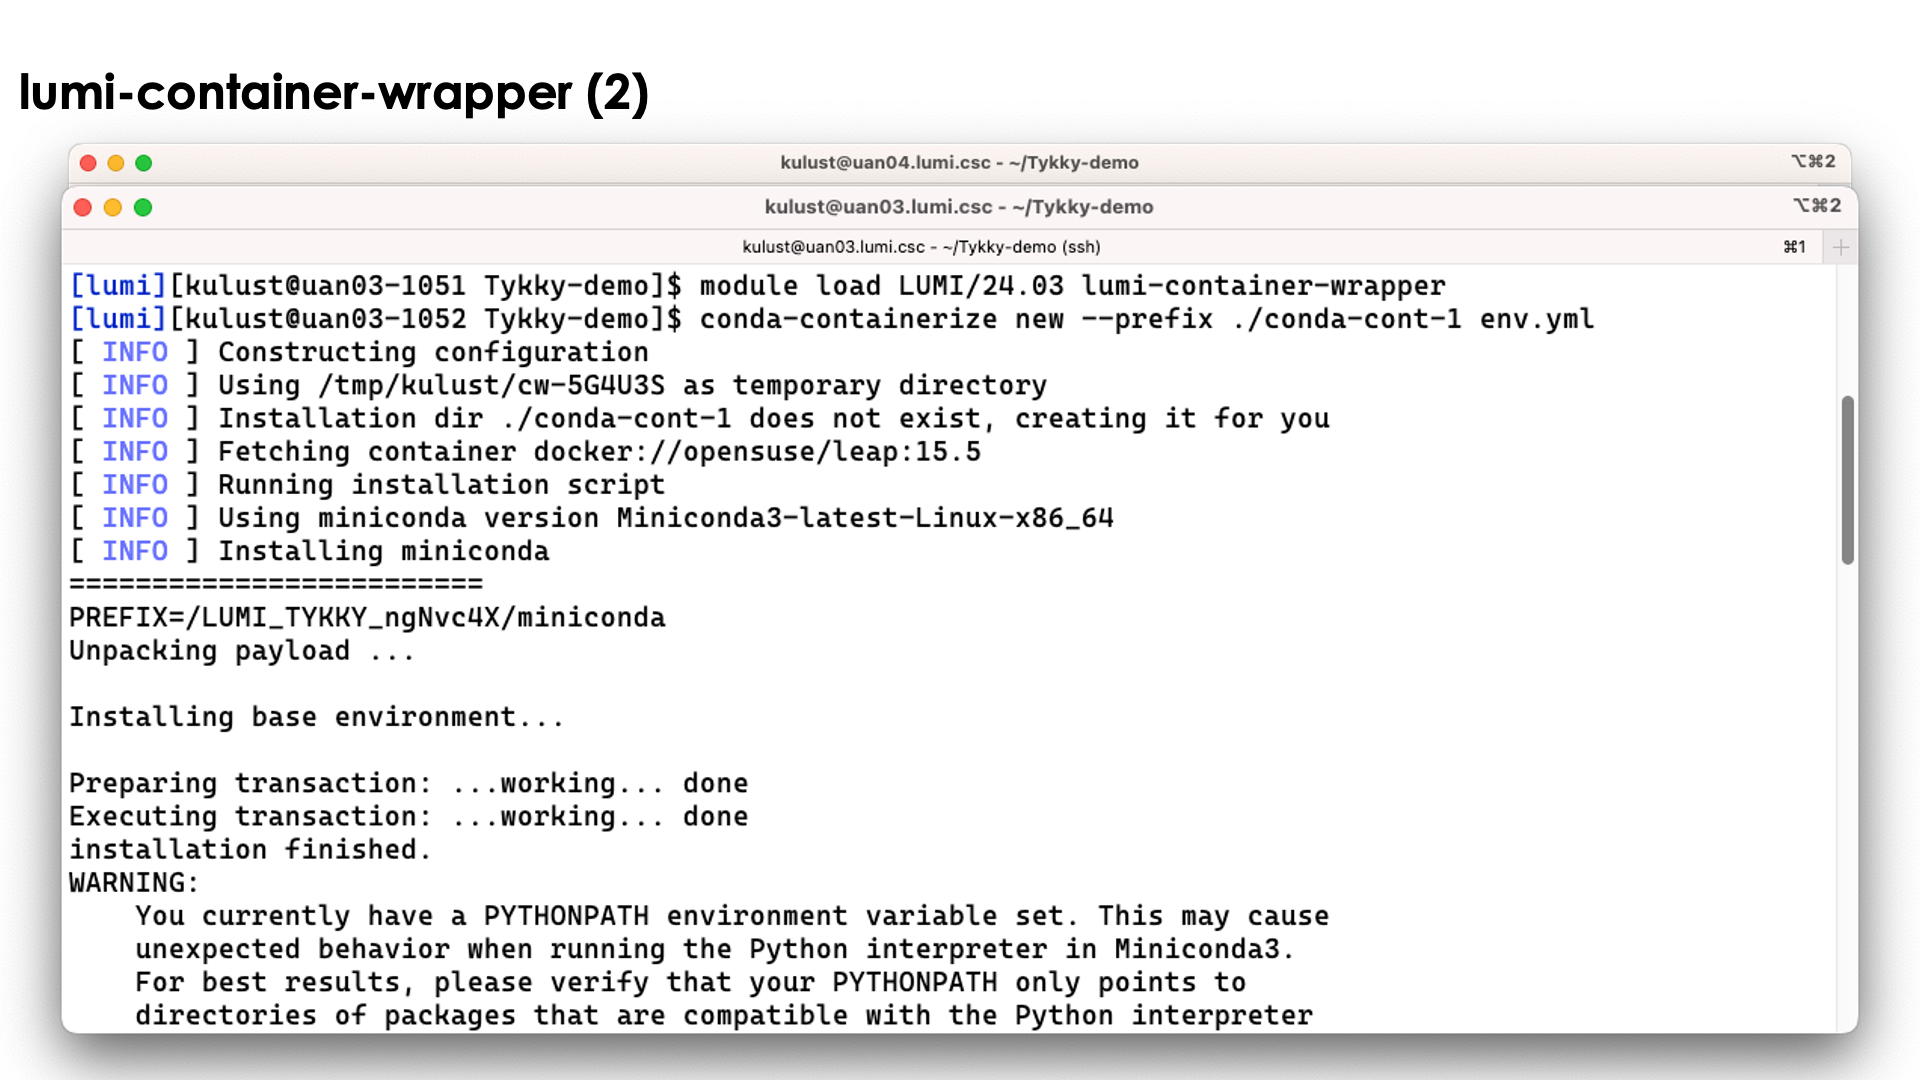
The tool will first build the conda installation in a temporary work directory and also uses a base container for that purpose.
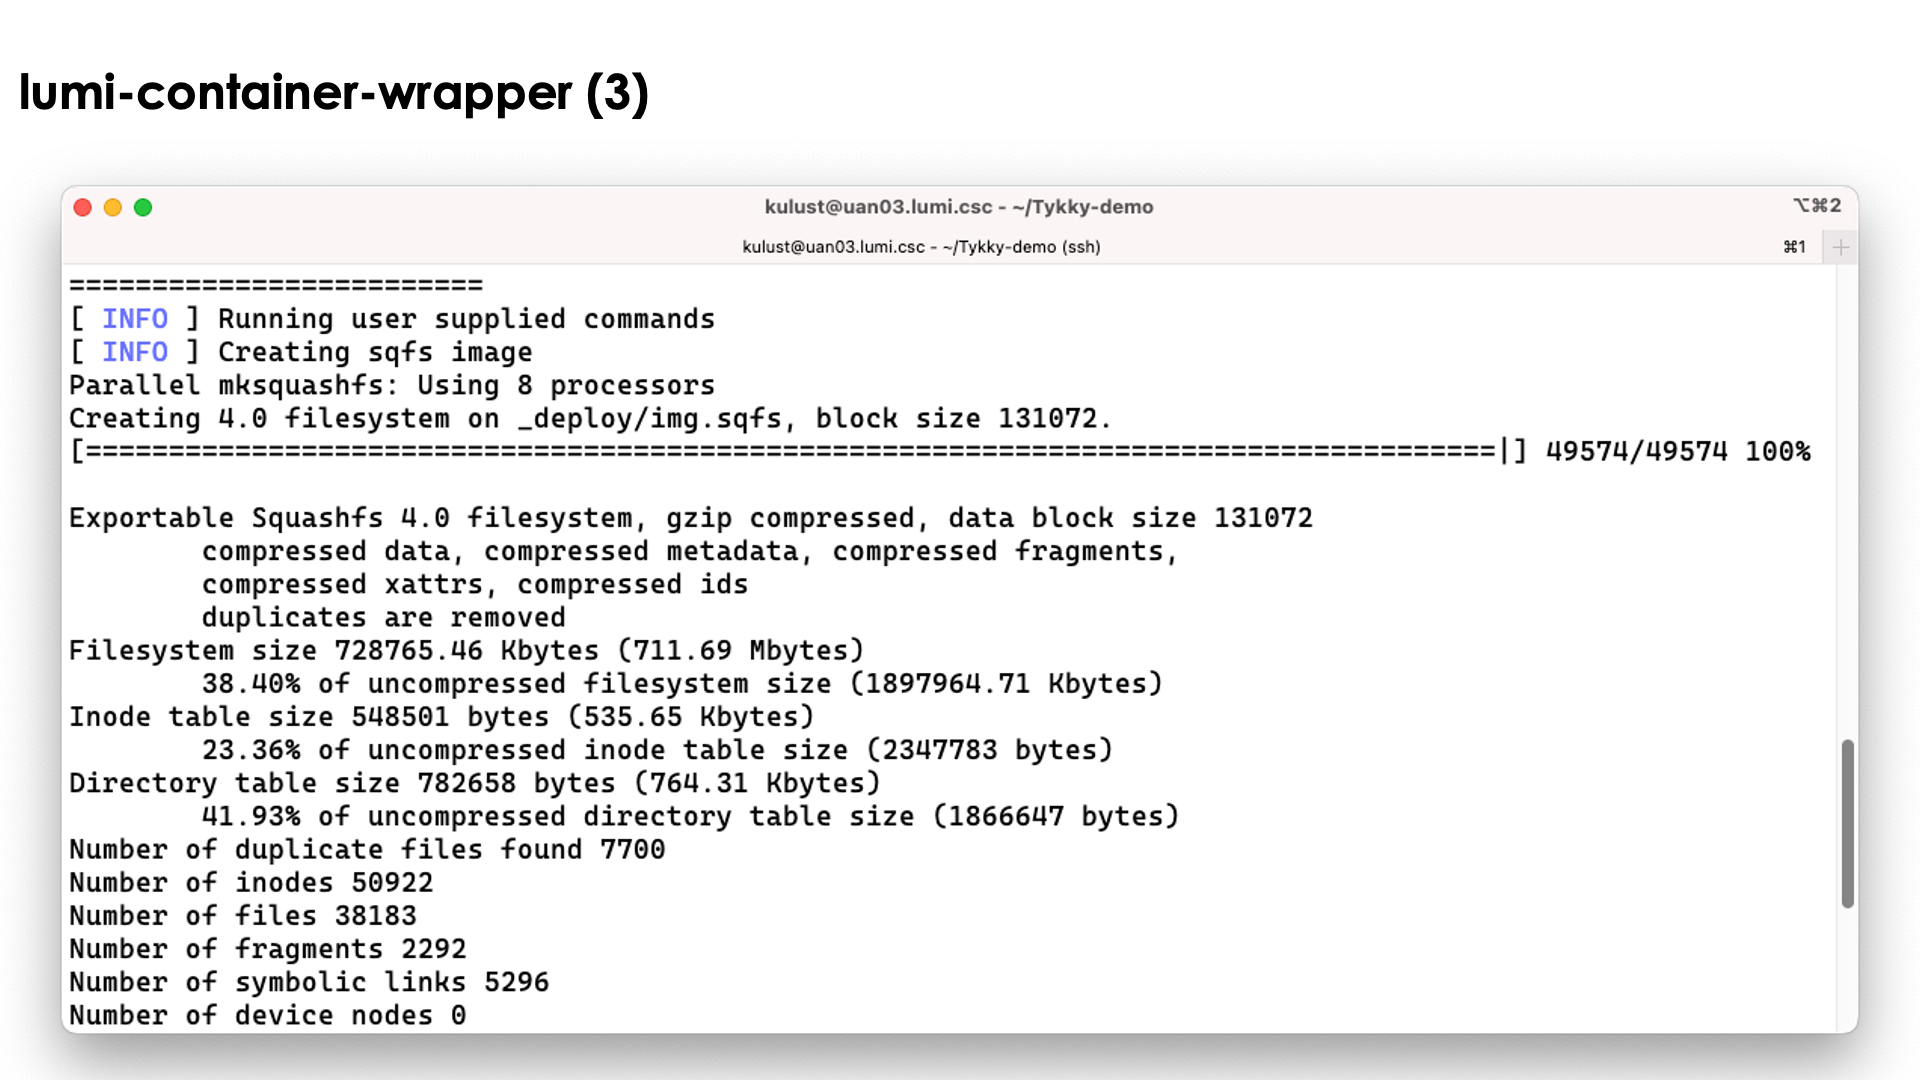
The conda installation itself though is stored in a SquashFS file that is then used by the container.
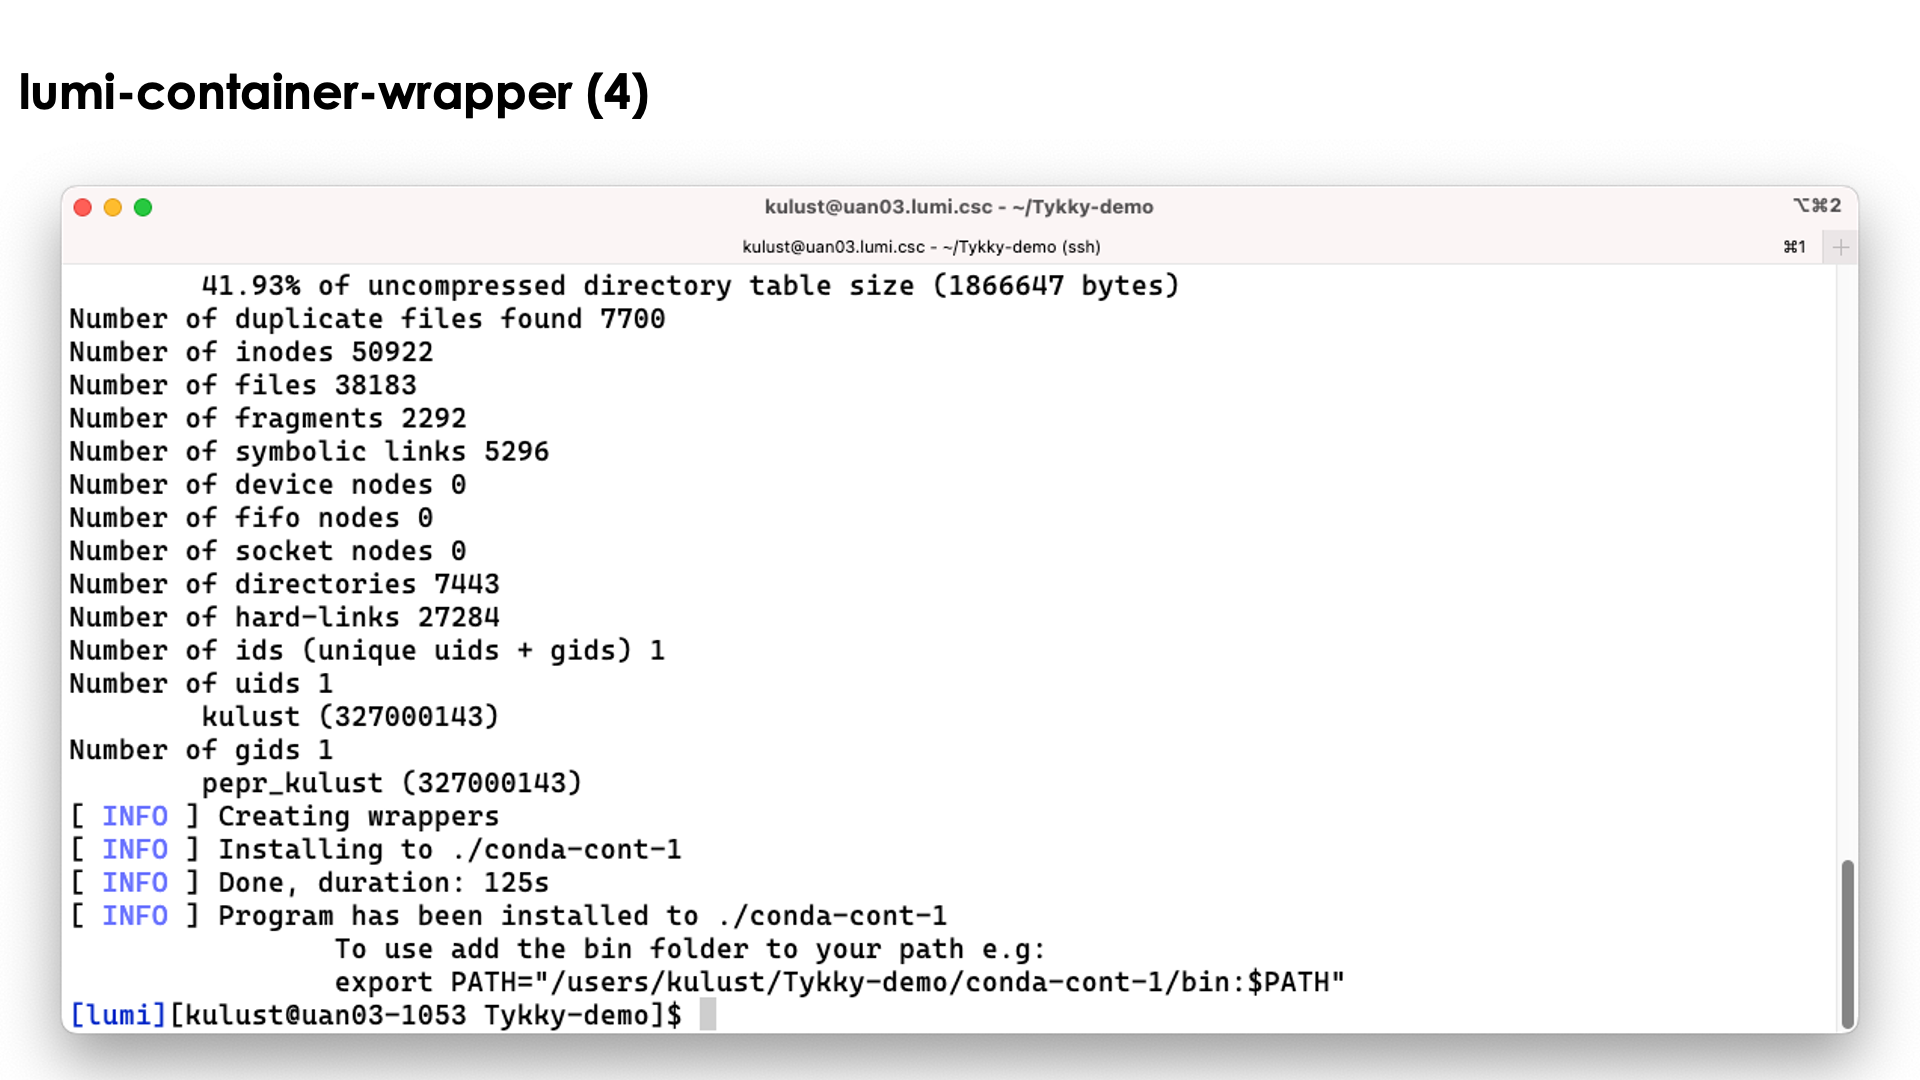
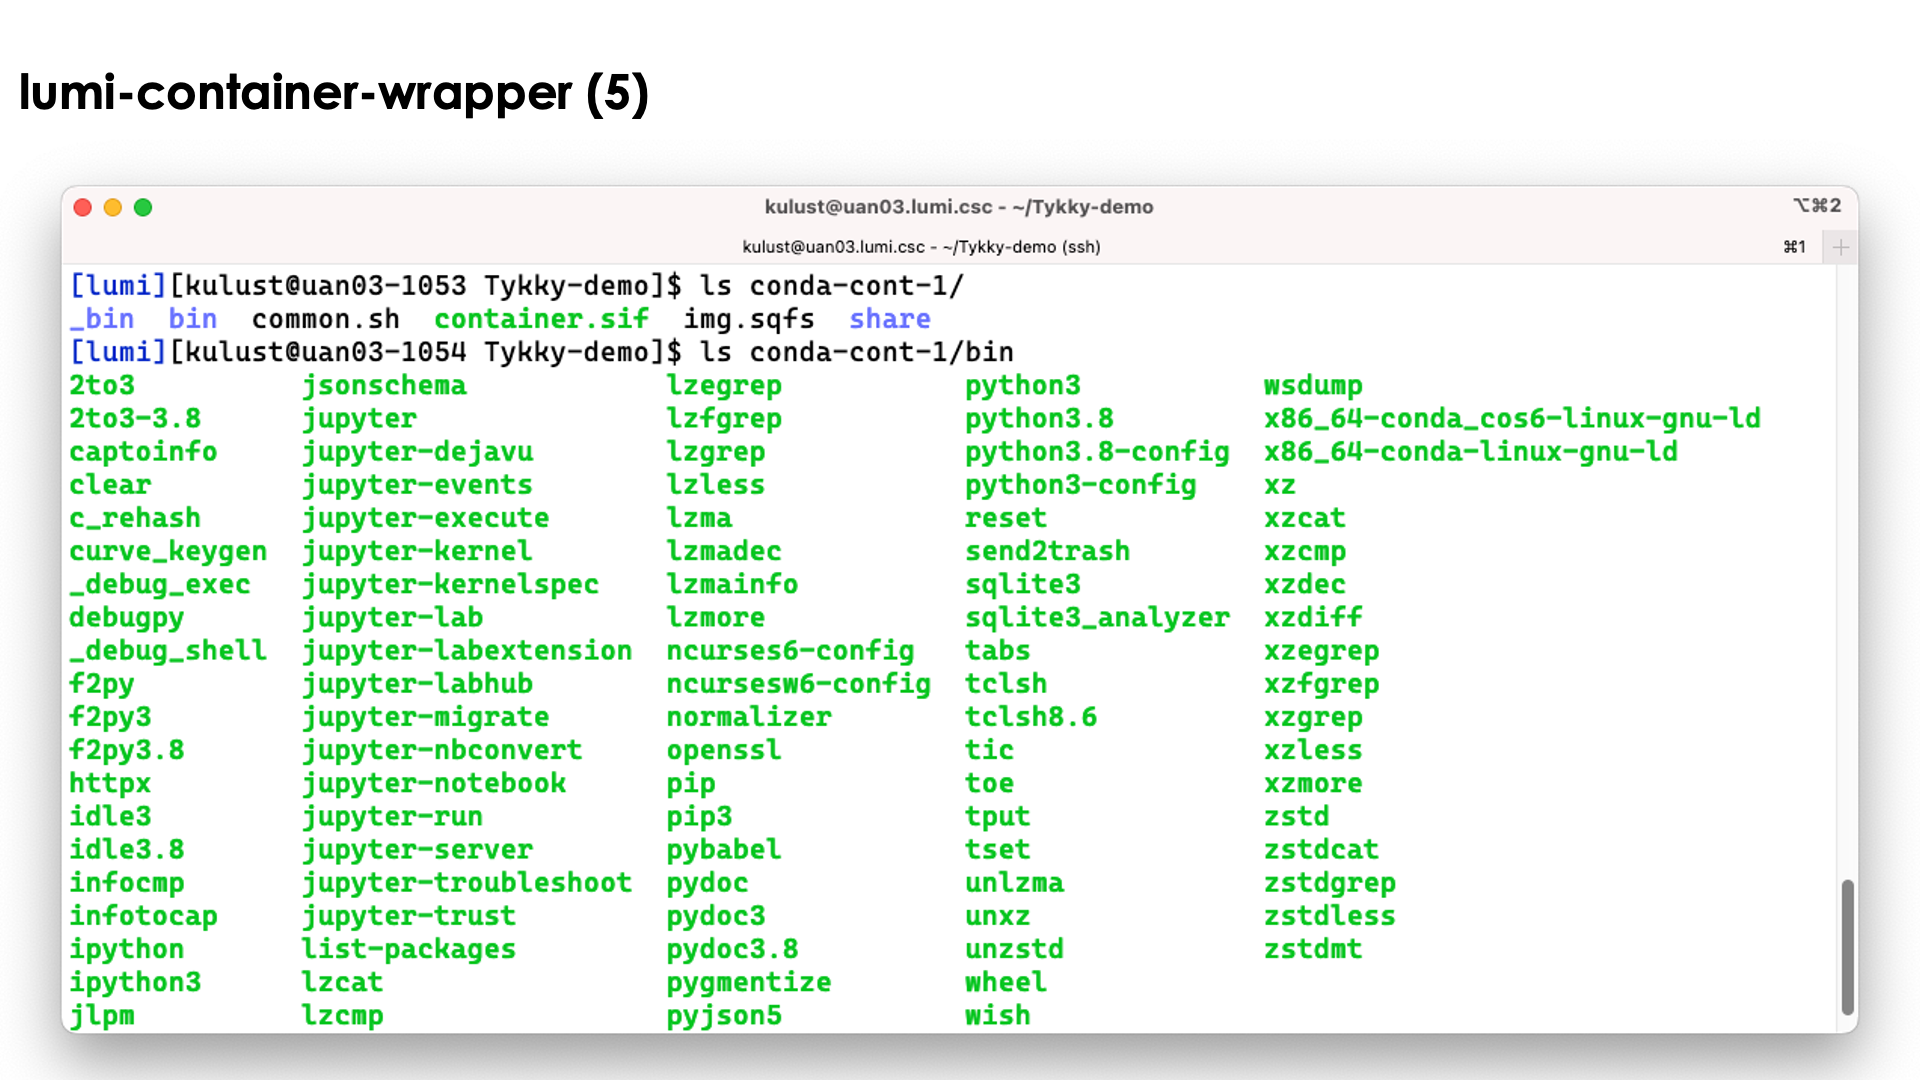
In the slide above we see the installation contains both a singularity container and a SquashFS file. They work together to get a working conda installation.
The bin directory seems to contain the commands, but these are in fact scripts
that run those commands in the container with the SquashFS file system mounted in it.

So as you can see above, we can simply use the python3 command without realising
what goes on behind the screen...
Relevant documentation for lumi-container-wrapper
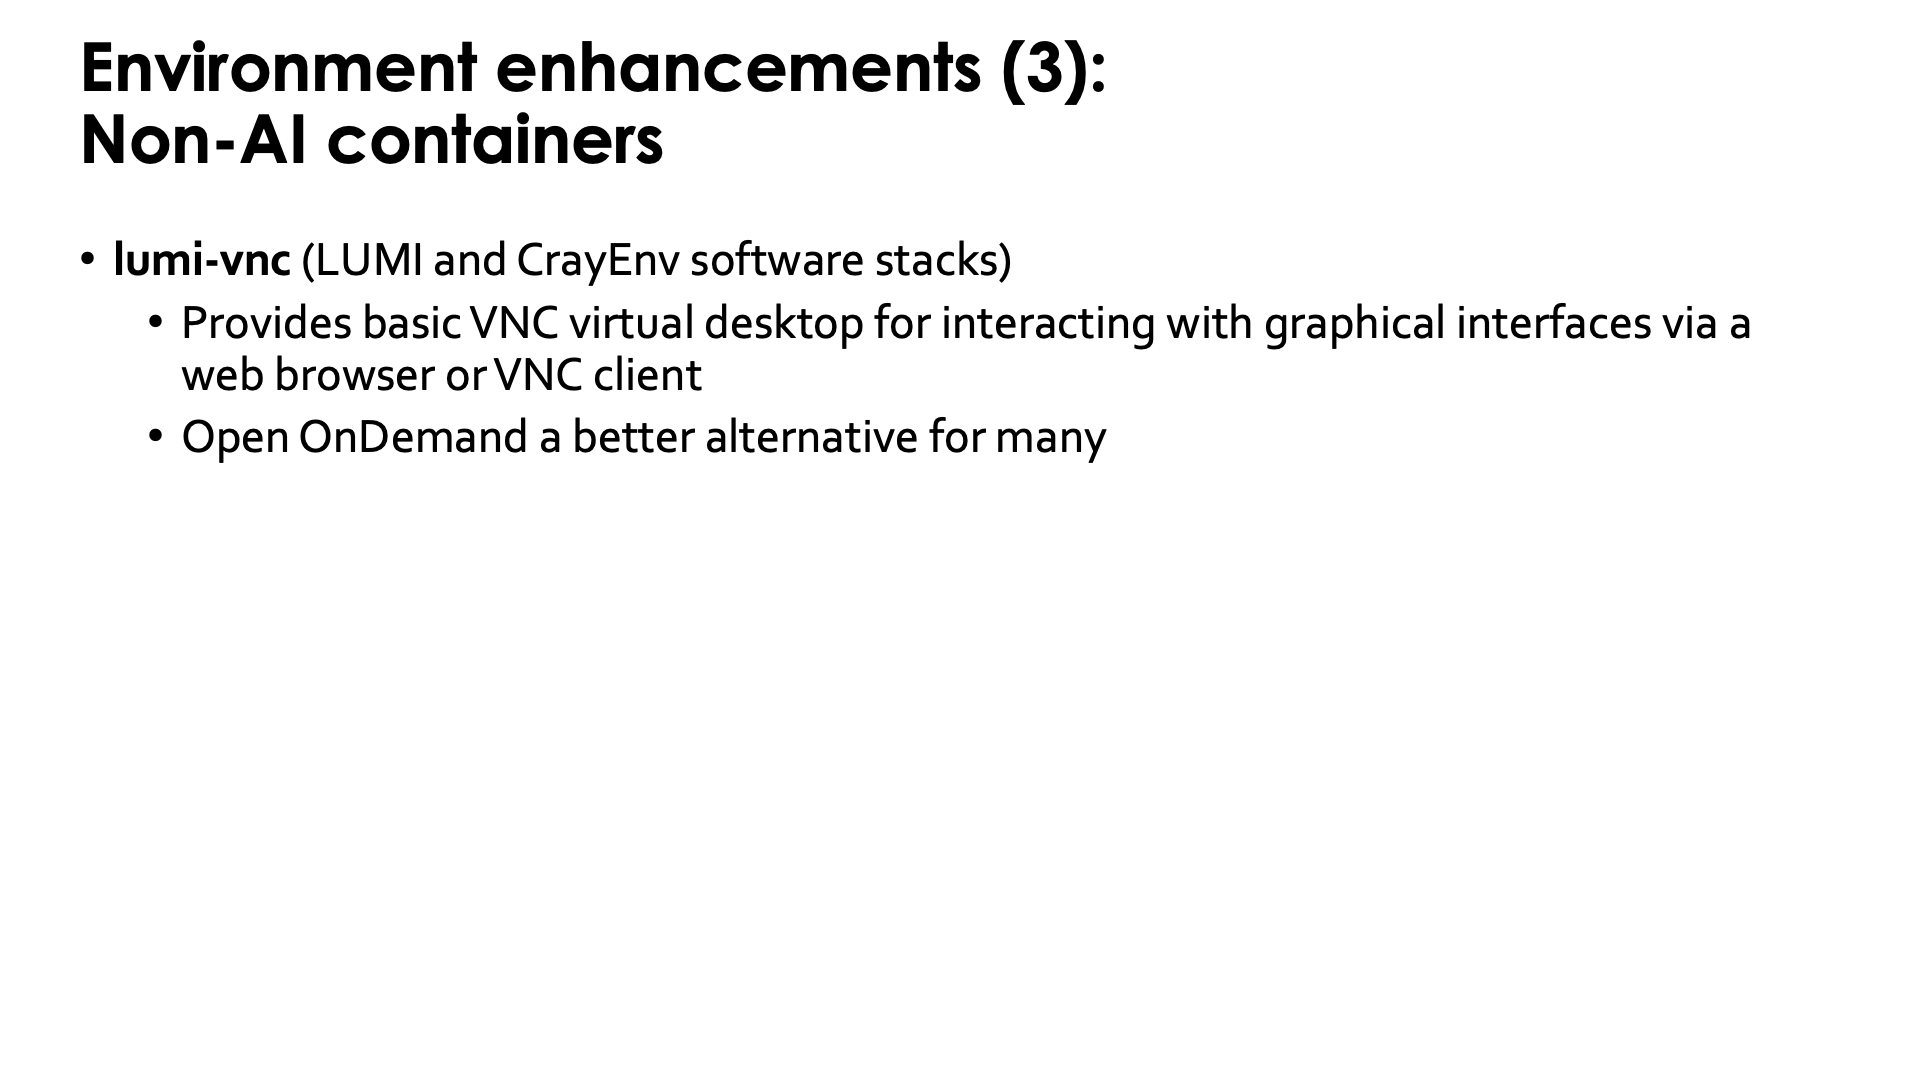
Pre-build containers: VNC and CCPE

VNC
LUMI also provides a container that we provide with some bash functions
to start a VNC server as one way to run GUI programs and as an alternative to
the (currently more sophisticated) VNC-based GUI desktop setup offered in Open OnDemand
(see the "Getting Access to LUMI notes").
It can be used in CrayEnv or in the LUMI stacks through the
lumi-vnc module.
The container also
contains a poor men's window manager (and yes, we know that there are sometimes
some problems with fonts). It is possible to connect to the VNC server either
through a regular VNC client on your PC or a web browser, but in both cases you'll
have to create an ssh tunnel to access the server. Try
module help lumi-vnc
for more information on how to use lumi-vnc.
For most users, the Open OnDemand web interface and tools offered in that interface will be a better alternative.
CCPE
LUST is currently also working with HPE to provide a containerised Cray Programming Environments to be able to test newer versions of the Cray PE than are offered on LUMI, or to keep using older ones that have been removed from the system.
As working in a container requires a very good understanding of the differences between the environment in and out of the container, using those containers is really only for more experienced users who understand how modules and environments work.
These containers are offered with user-installable EasyBuild recipes (ccpe in the LUMI Software Library) as customisation for the particular purpose of the user will often be necessary. This can often be done by minor changes to the recipes provided by LUST.
The functionality of this solution may still be limited though, in particular for GPU applications. Each version of the Cray PE is developed with one or a few specific versions of ROCm™ in mind, so if that version of ROCm™ is too new or too old for the current driver on the software, running GPU software may fail. Some containers may also expect a different version of the OS and though they contain the necessary userland libraries, these may expect a different version of the kernel or libraries that are injected from the system. Or they may require a different version of the network drivers.
User coffee break seminar on the CCPE containers
During the August 2025 LUMI user coffee break, there was a presentation on using the Cray PE containers.
Extending containers
Extend Python containers with a virtual environment
Python has a mechanism to install software on top of a read-only installation while keeping that installation properly isolated: Virtual environments.
This mechanism can also be used to extend a container with a Python installation, e.g., containers
created with cotainr (as extending a conda installation with conda is troublesome) or the
containers from the LUMI AI Factory. This can be used without rebuilding the container while
still doing it in a filesystem-friendly way by using a so-called
SquashFS file. This is a single
file that contains a whole filesystem that can be bind mounted to a container and in many
supercomputers even directly mounted on a directory in a compute node using
FUSE
(and we have it on LUMI
though some care is needed to clean up at the end of a job).
The basic idea works as follows:
-
We create a directory on one of the regular filesystems of LUMI where we will build the virtual environment. In fact, even
/tmpcan be used as we will not need that directory to be present permanently.Note that throughout the whole build, depending on who will use the SquashFS file that we generate in step 4, you need to be careful with file permissions so that those users have the proper access rights to the files in the SquashFS file as that file does contain all information on access rights used in the build directory (though that information can still be modified while building the SquashFS file, which we will do).
-
Now bind mount that directory to
/user-software(or another directory of your choice) in the container and open a shell in the container.By using
/user-softwarerather than the direct path to the directory created in the first step, we ensure that all software will be installed using a container-specific path and that the result that we will obtain at the end, can be ported easily to other projects on LUMI or even other similar supercomputers. -
In the container, create the virtual environment in
/user-softwareand install all packages.This will of course generate lots of small files, which is exactly the problem that we tried to solve by using a container. This is only temporary though. And if you used
/tmpin the first step, that will even speed up the installation of the packages. -
Now leave the container and make a SquashFS file of the directory created in the first step. Put that in a safe location if you used
/tmpbecause it is that file that we will use from now on to provide the Python packages.In fact, you can even safely delete the installation as it is always possible to un-squash the SquashFS file again (though with some loss of file time information., etc., but that usually doesn't matter at all).
-
From now on, instead of bind mounting the directory created in step 1 in the container, we'll bind mount the SquashFS file on
/user-softwareto provide the virtual environment in the container.You can now go into the container again, activate that virtual environment and start your work, and all that you're using from Lustre, is two big files: The container image and the SquashFS file with the Python installation. Lustre will be very happy.
Let us now walk through this procedure step-by-step
Step 1: Preparation: creating the directory

For the example, we will keep it simple and work in /tmp:
mkdir -p /tmp/$USER/user-software
We'll use one of the containers of the LUMI AI Factory in this example. As the full name is very long, we'll set an environment variable:
export SIF='/appl/local/laifs/containers/lumi-multitorch-u24r64f21m43t29-20260225_144743/lumi-multitorch-full-u24r64f21m43t29-20260225_144743.sif'
We also load the bindings module for the LAIF containers so that we have access to all our filespaces:
module load Local-LAIF lumi-aif-singularity-bindings
Just to demonstrate that the binding actually works, we will already create an empty file in
/tmp/$USER/user-software, but of course you would not do so if you are confident and this is
just for demonstration purposes:
touch /tmp/$USER/user-software/demofile
Note that we should pay attention to the permissions also as by default the userid, groupid and file permissions
are preserved in the SquashFS file that we will generate in step 4. Hence, if the environment will be shared
with other people in your project or with other projects, users may not be able to read the files.
Note that if you build in your home directory (which we strongly discourage) or on /tmp, the default
group for your files and directories is your personal group so with the typical permissions mask on LUMI,
others would not be able to read those files. However, rather than taking care of it here, we'll correct
owner and permissions when we build the SquashFS file.
Step 2: Entering the container
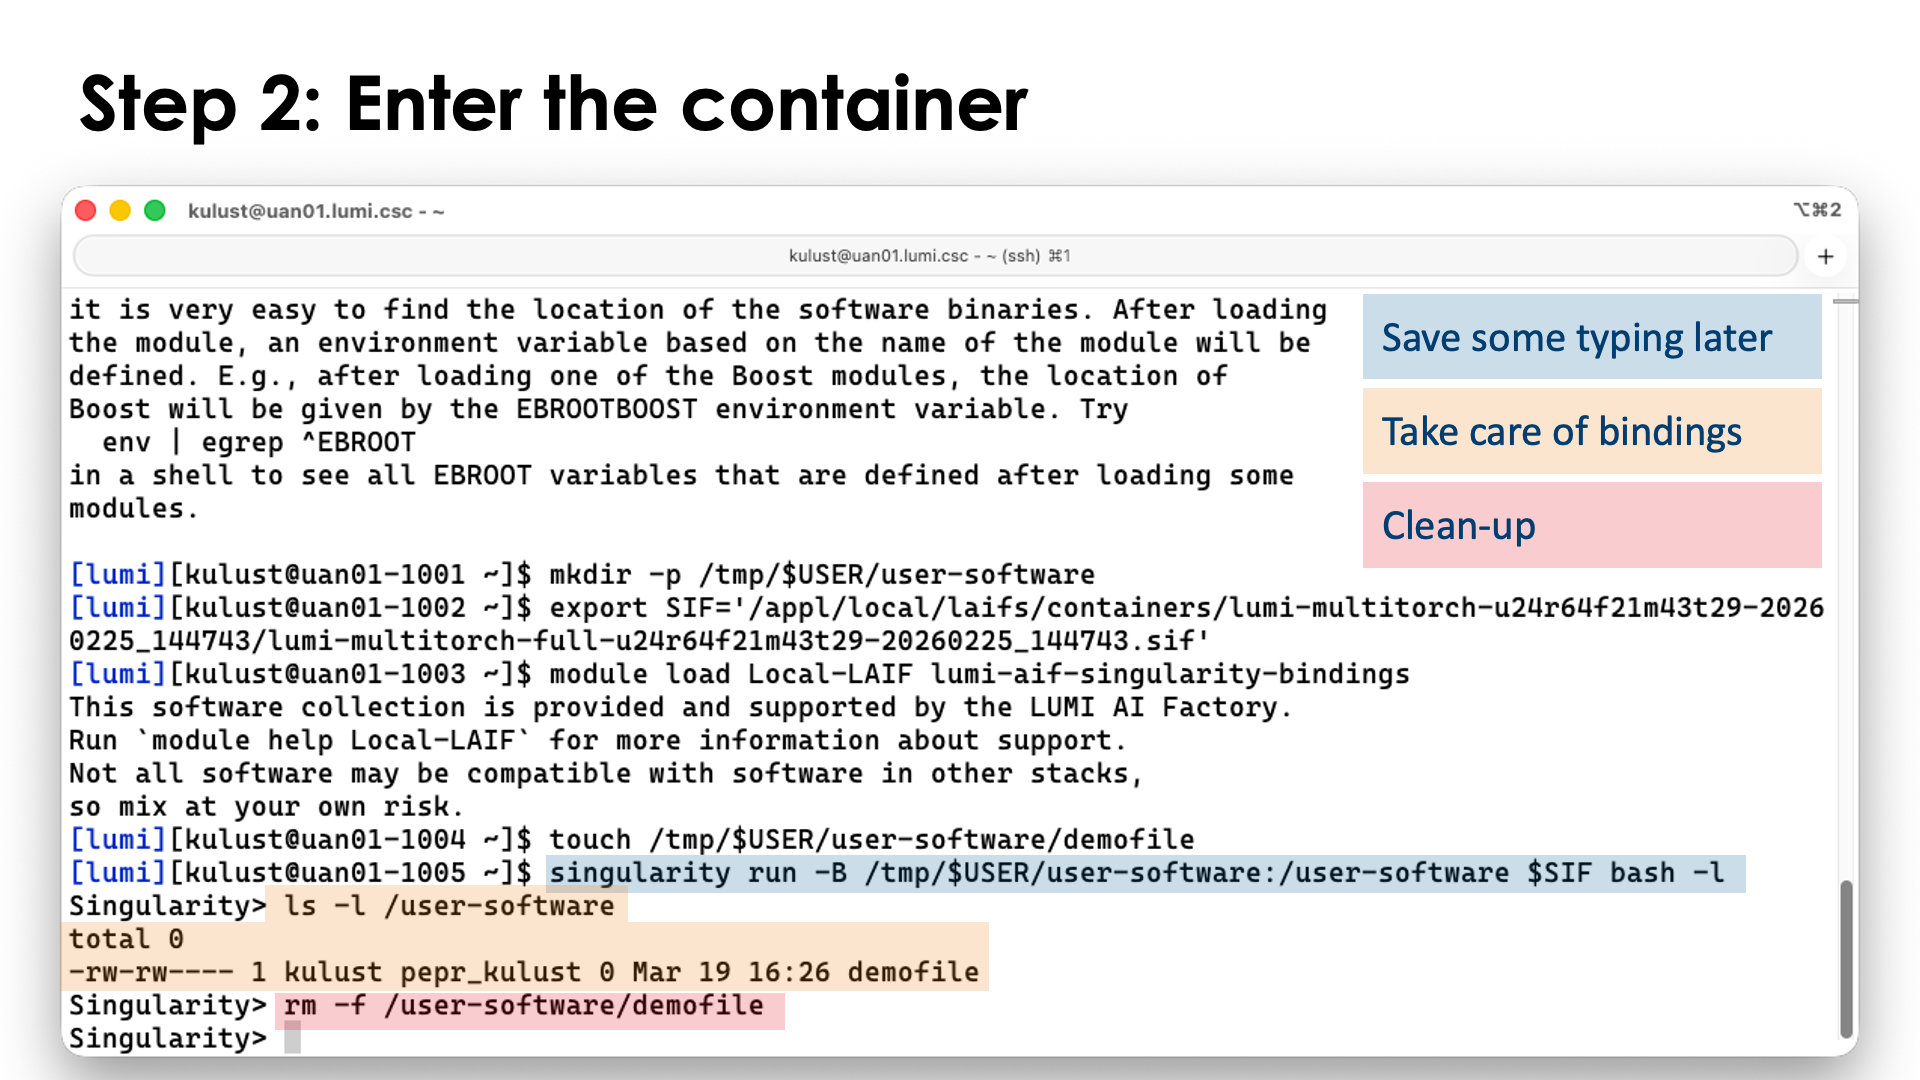
Now we can enter the container, binding /tmp/$USER/user-software to /user-software in the container.
As the LAIF containers do some extra initialisation when using singularity run, this is what we will use
and we'll simply start a login shell in the container with it (so that our .profile and .bashrc files
are also read). Remember that singularity run for the LAIF containers works just a little differently from
what you would expect for singularity run as it requires you to specify the command you want to execute
rather than executing a default command.
singularity run -B /tmp/$USER/user-software:/user-software $SIF bash -l
The -B flag (which we already discussed earlier in this chapter) is used to bind the source directory
/tmp/$USER/user-software to the /user-software directory in the container so that every file and directory
in /tmp/$USER/user-software will appear in /user-software in the container. Moreover, we can write in
the /user-software directory and those files will appear outside the container in /tmp/$USER/user-software.
If you've created the test file in the previous step, you can now indeed see that file in /user-software:
$ ls -l /user-software
total 0
-rw-rw---- 1 myuidXXX mygidXXX 0 Mar 19 11:47 demofile
As we don't need that file anymore, you may want to delete it (if you created this file for the demo in the first place):
rm -f /user-software/demofile
(using /user-software/demofile as we are still in the container). This demonstrates that we do indeed see
the files from /tmp/$USER/user-software in /user-software and that access is not read-only
(as we could delete the file).
Step 3: Create the virtual directory and install the packages
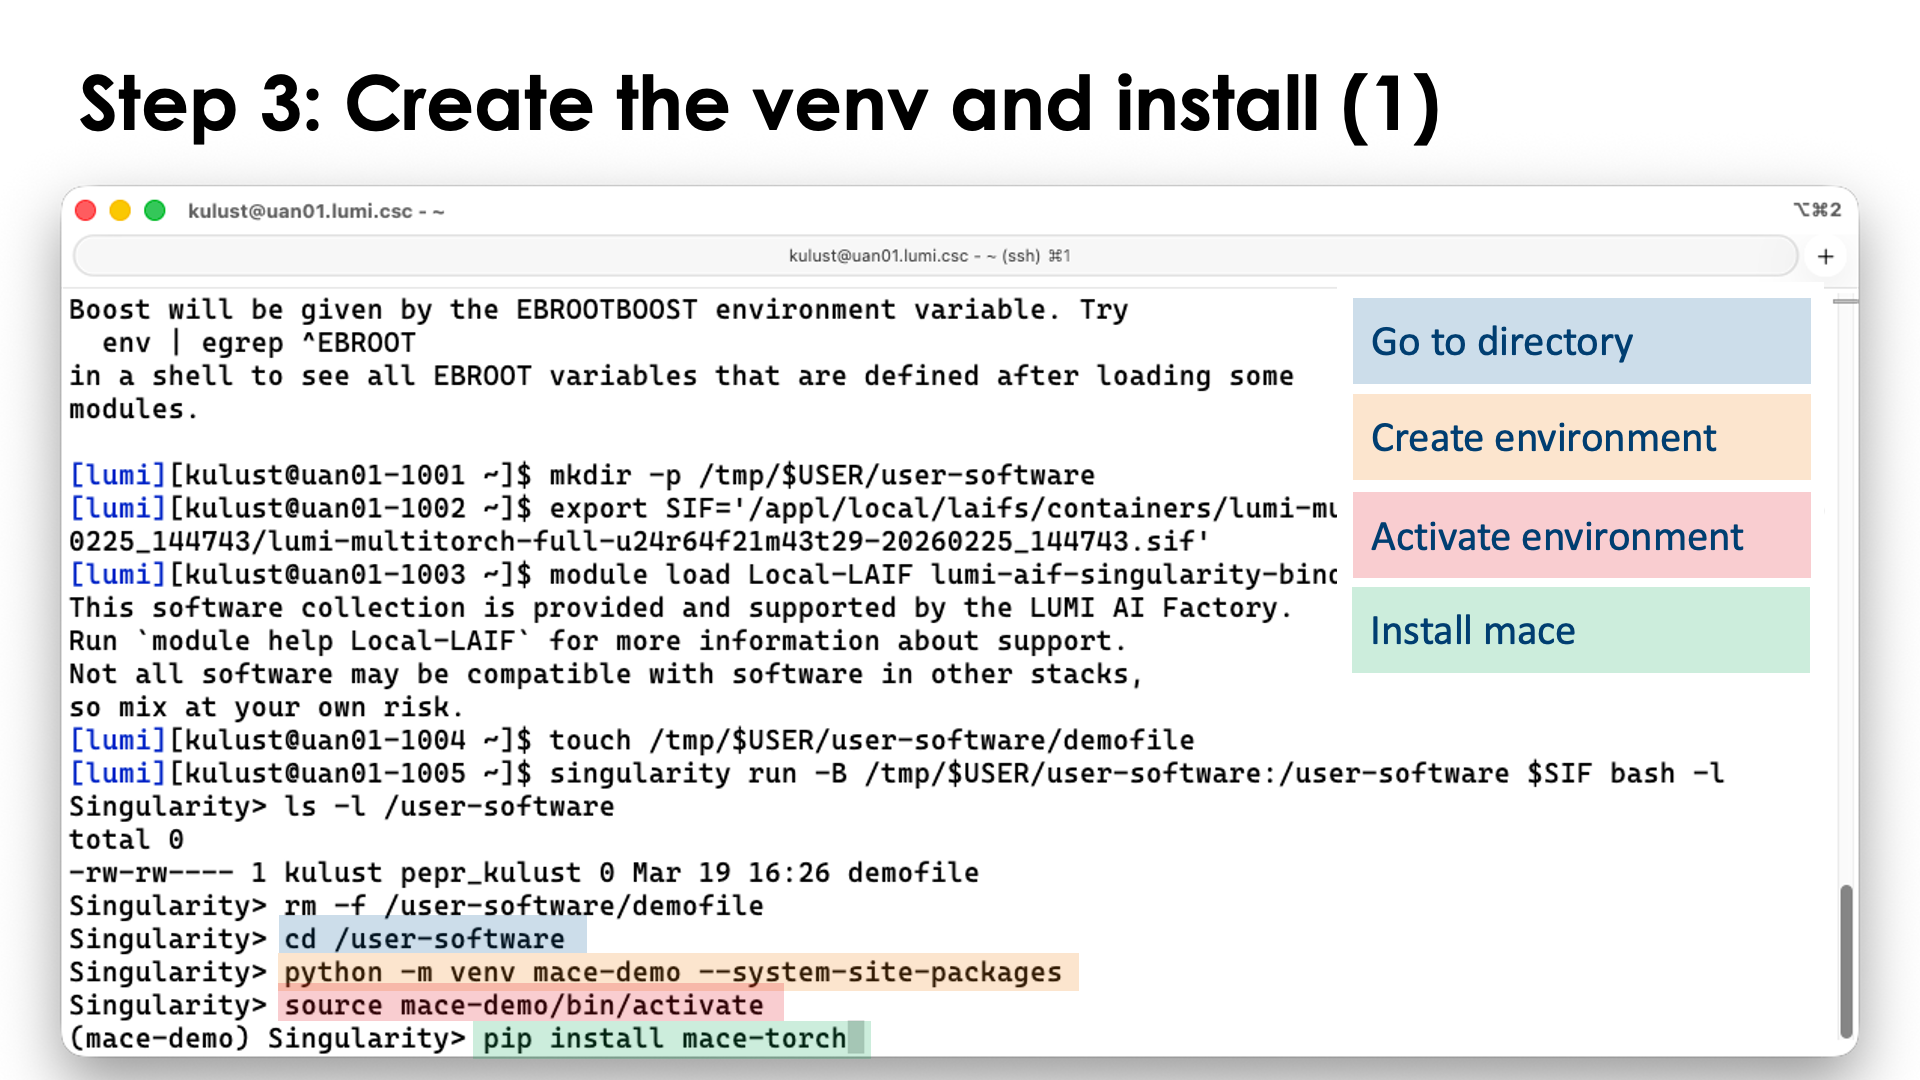
Now we can actually install the Python packages that we want to install.
First we go into the directory where we want to create the virtual environment:
cd /user-software
Next we create the virtual environment. For the demo, we'll call it mace-demo as it is the
mace-torch
package that we will install:
python -m venv mace-demo --system-site-packages
The --system-site-packages flag ensures that the virtual environment can use all packages
that are already present in the container.
Note that this is actually a tricky bit here. Packages in the container are already
installed in a virtual environment located in /opt/venv. That environment is automatically
activated when you open a shell in the container or use singularity exec instead of
singularity run. We are now building a second virtual environment on top of that one
that also uses its packages. Even though many people don't recommend nesting virtual environments,
it just works if you are careful. Don't try to take the new virtual environment that we've build
here to a different base container with different package versions though, as that may result in
version conflicts. It is definitely safer to rebuild the virtual environment if you switch
to a newer version of the PyTorch container.
We can now activate the environment:
source mace-demo/bin/activate
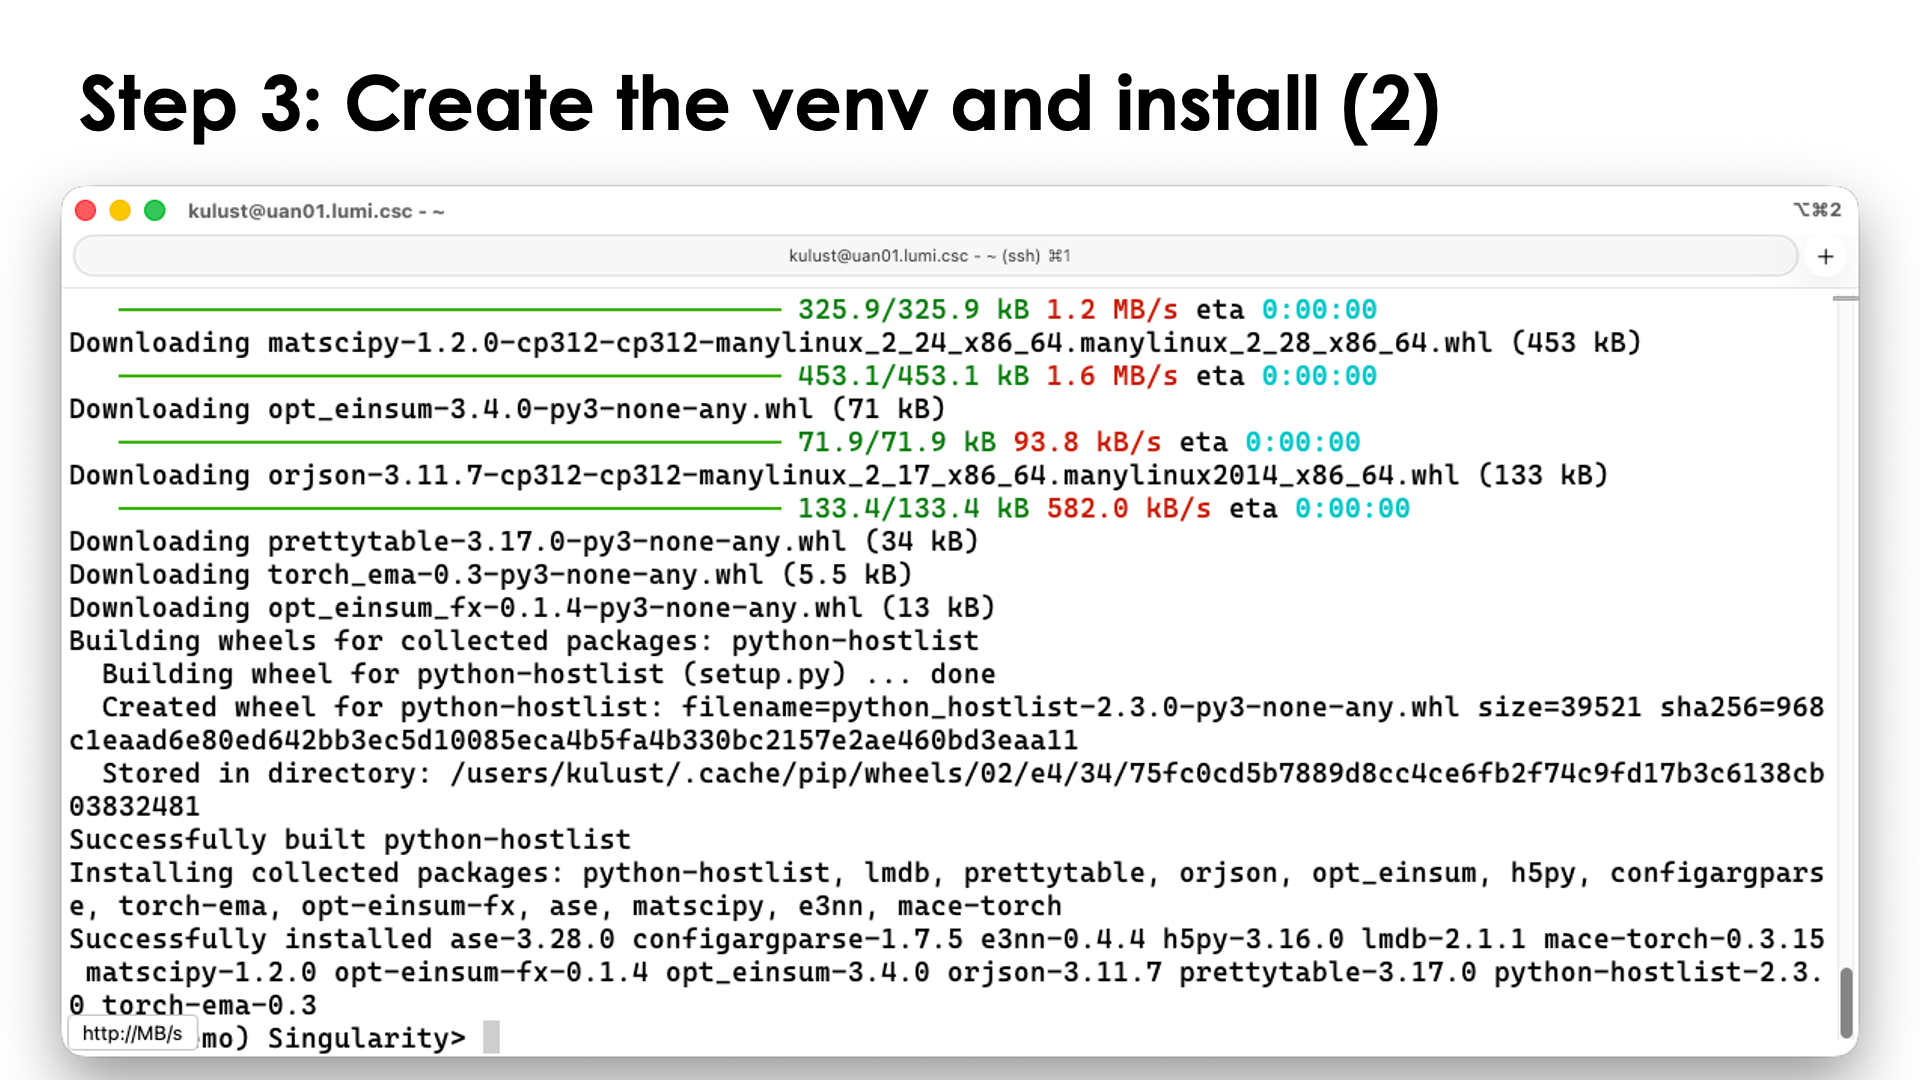
and install the packages that we want to install. For this demo, we install mace-torch:
pip install mace-torch
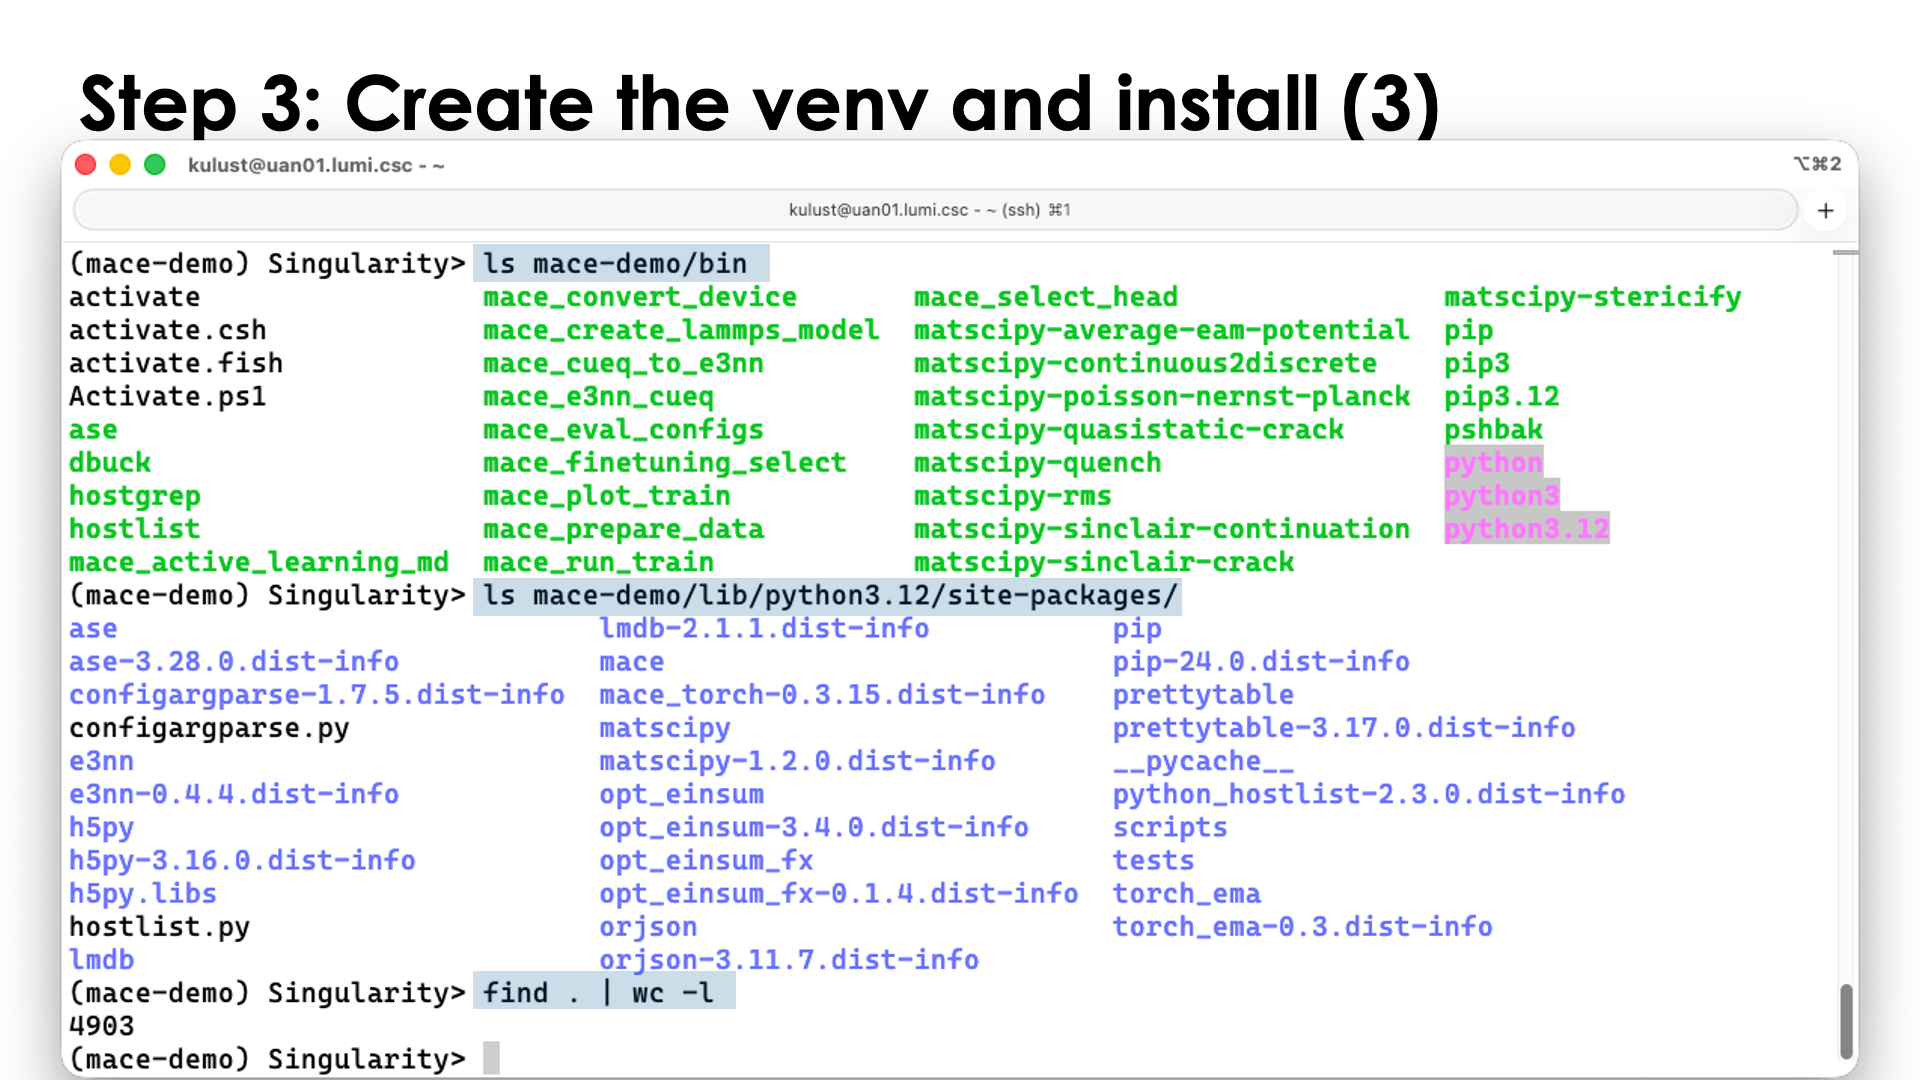
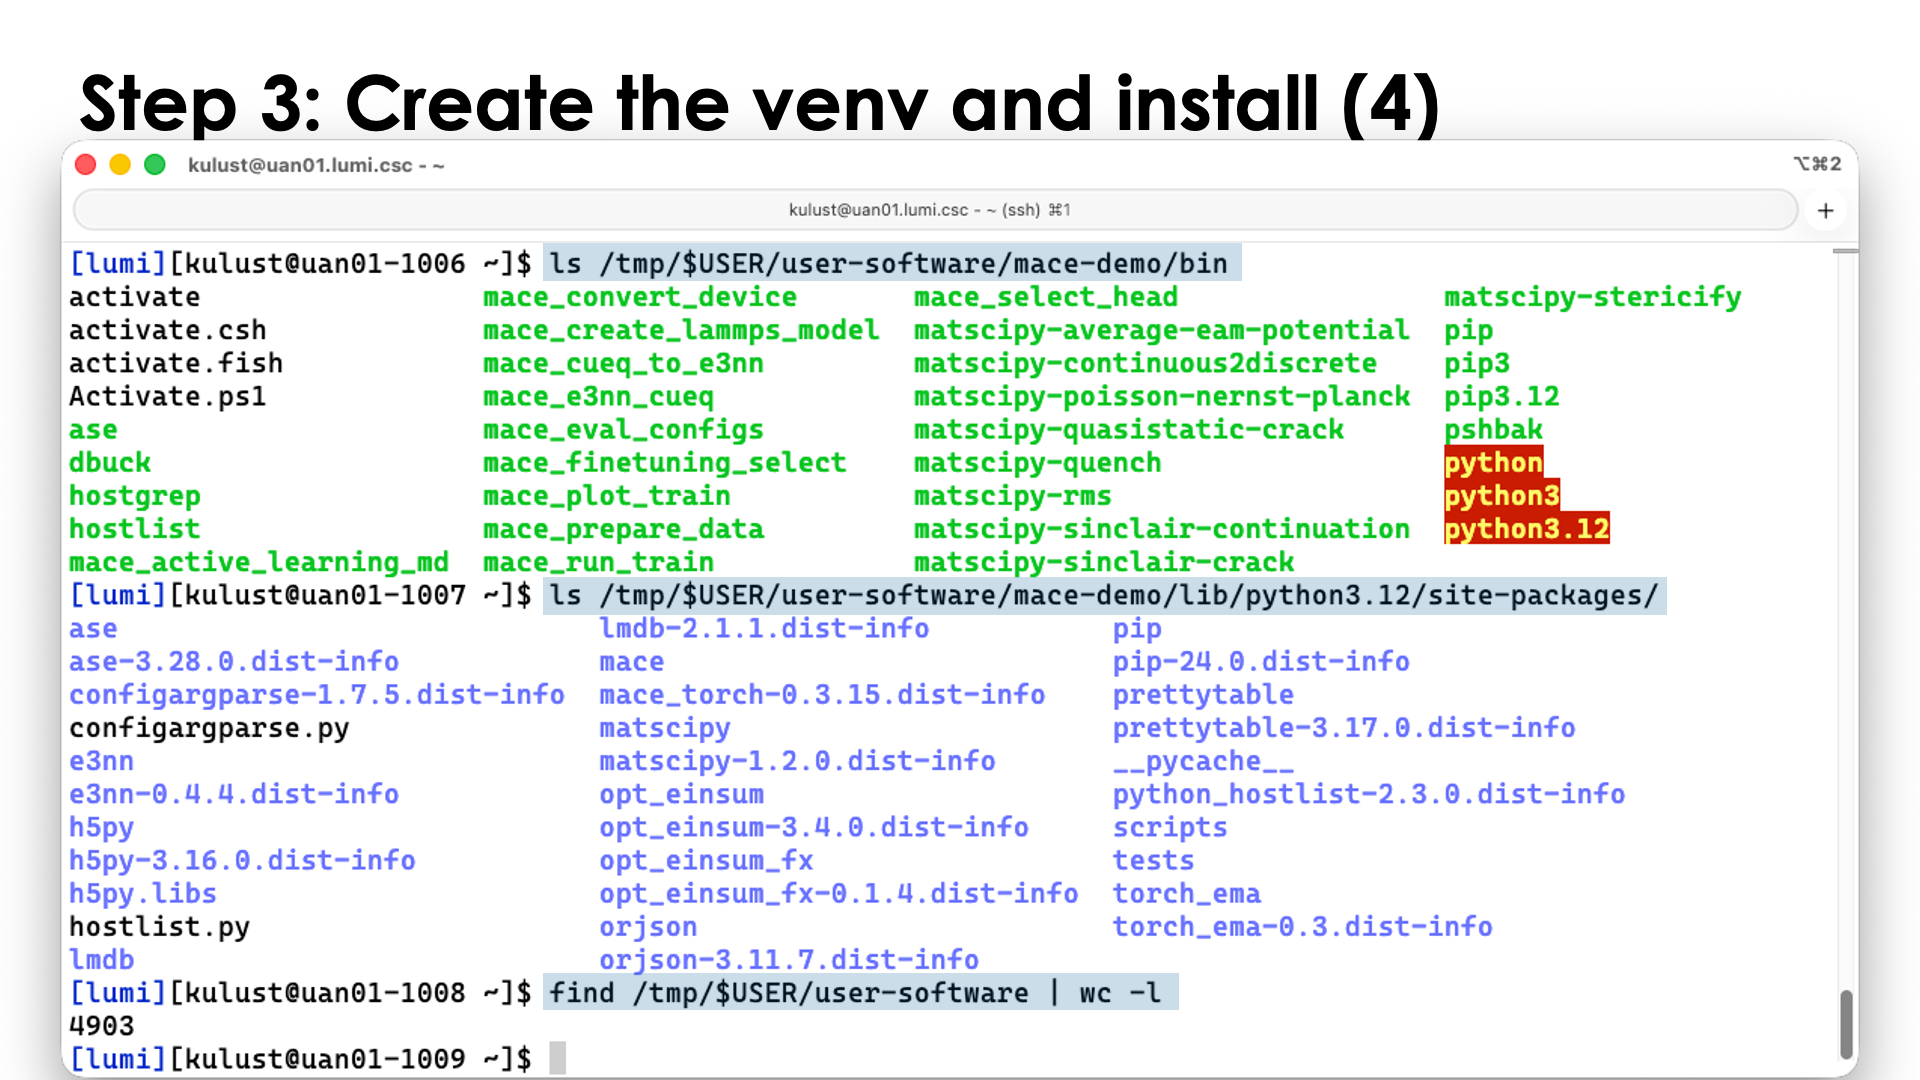
And you can check that there are indeed a lot of new files, e.g.,
ls mace-demo/bin
ls mace-demo/lib/python3.12/site-packages/
find . | wc -l
Now exit the container
exit
and do some of these commands outside the container:
ls /tmp/$USER/user-software/mace-demo/bin
ls /tmp/$USER/user-software/mace-demo/lib/python3.12/site-packages/
find /tmp/$USER/user-software | wc -l
and you can see we get the same output, showing again that /user-software in the container
mirrored /tmp/$USER/user-software on a filesystem outside the container.
Step 4: Creating the SquashFS file
In case you haven't left the container yet at the end of the previous step, exit the container now:
exit
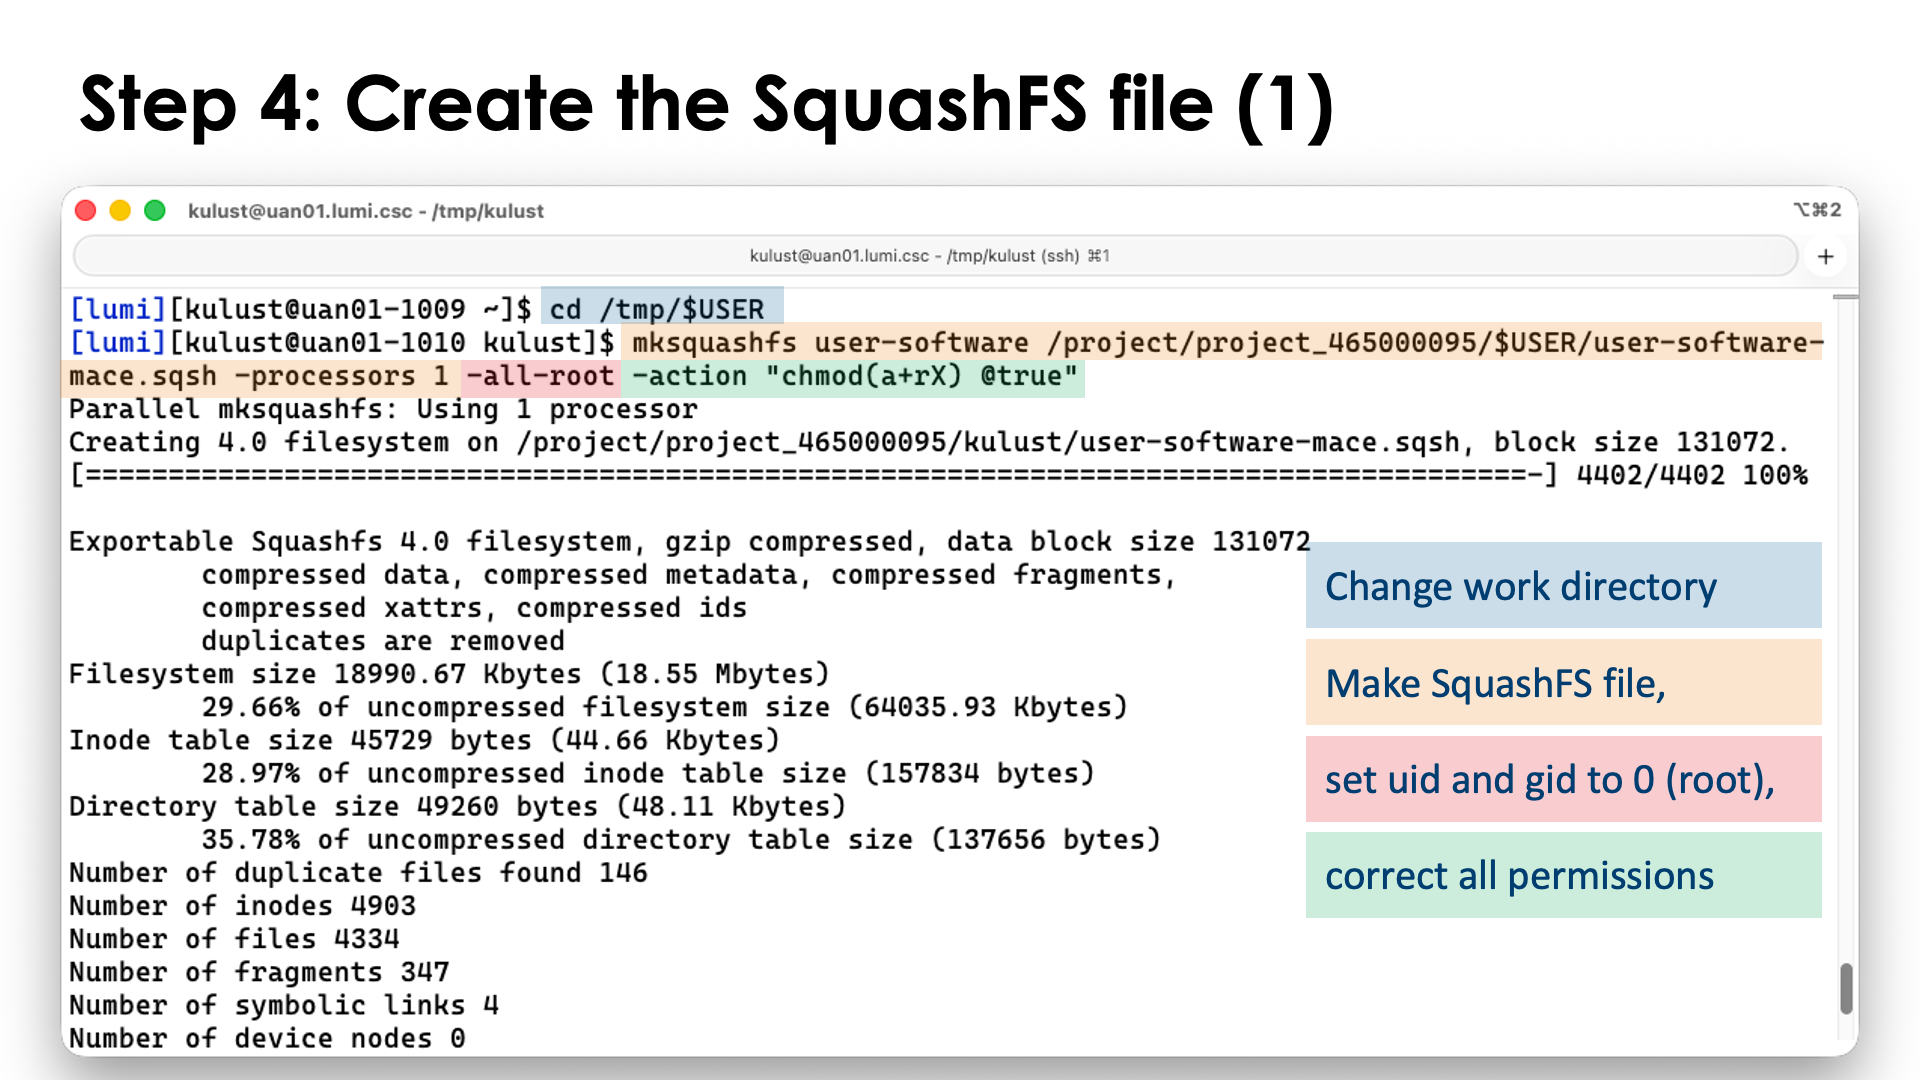
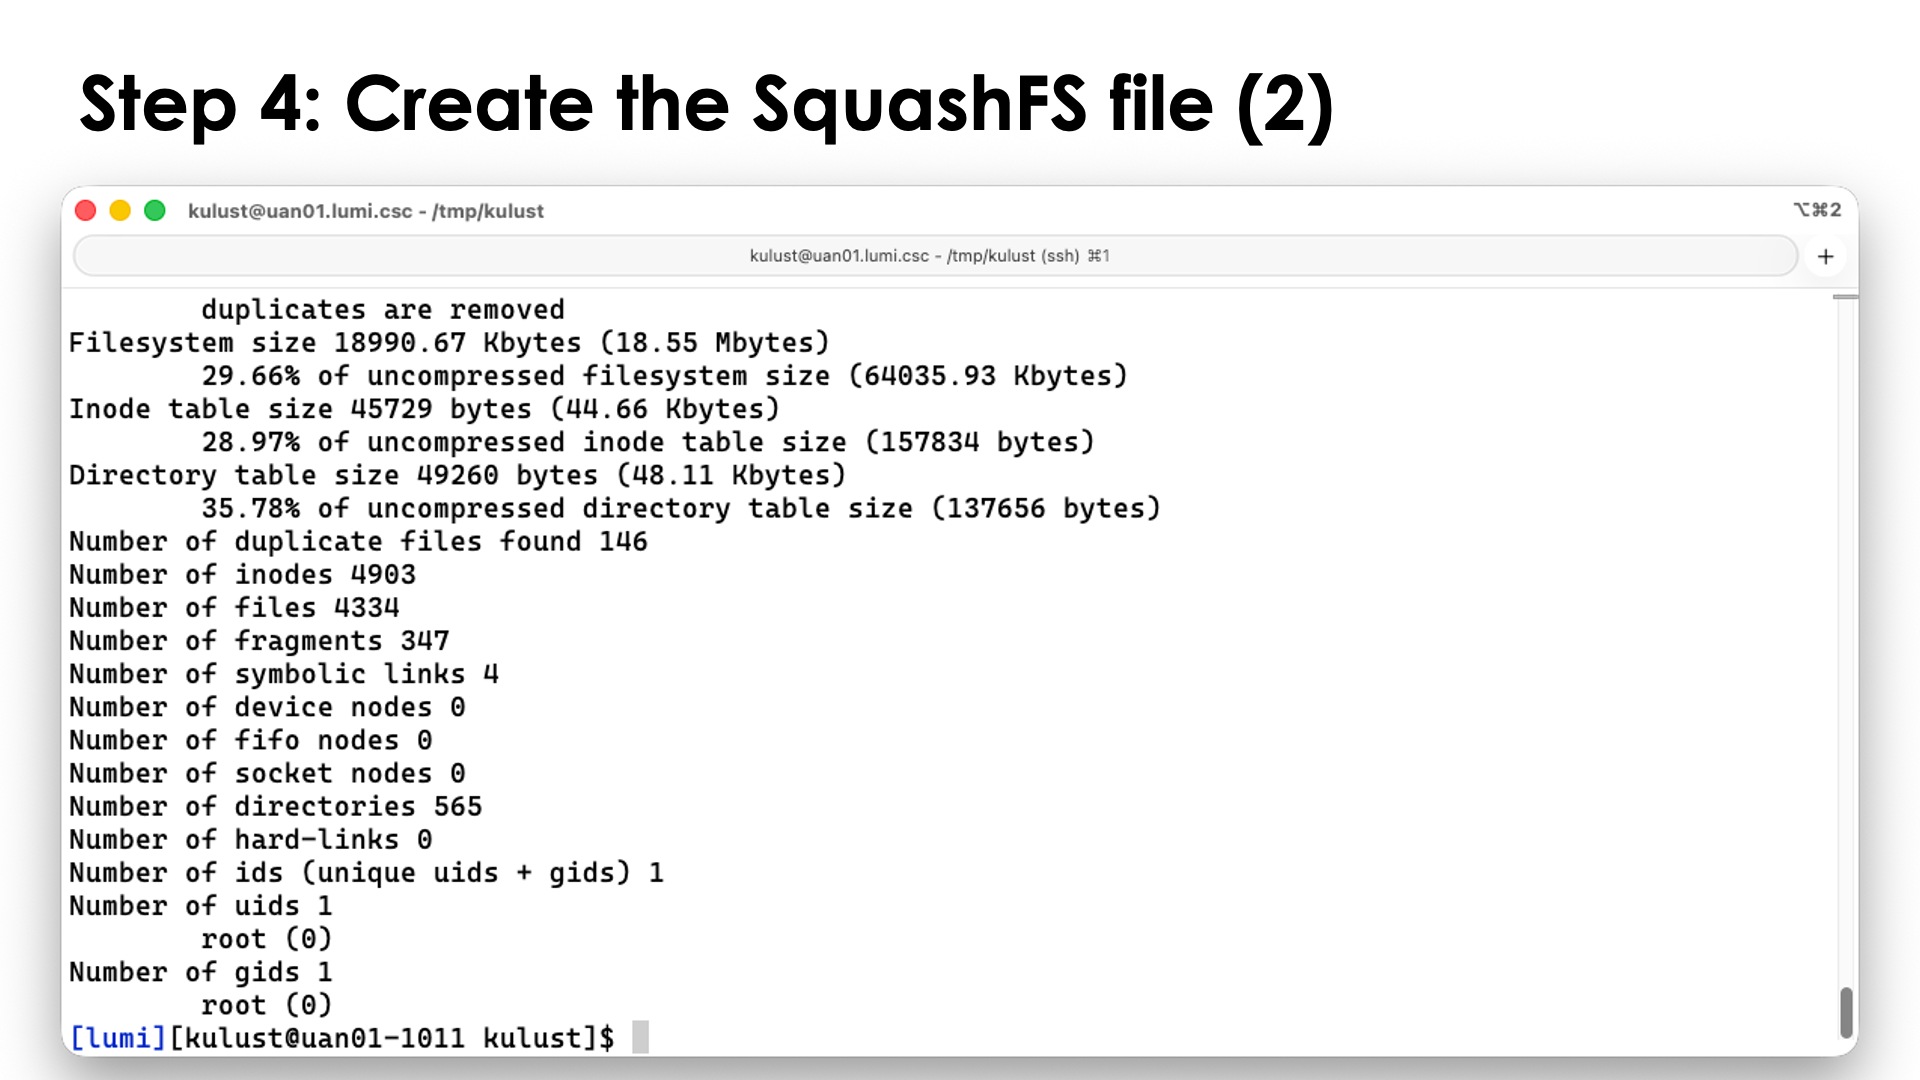
We will now create a SquashFS file from the directory in which we installed the Python packages.
Outside the container, in our example, this was /tmp/$USER/user-software. We switch to the parent
of that directory and use makesquashfs to generate the SquashFS file:
cd /tmp/$USER
mksquashfs user-software <SOME_DIR>/user-software-mace.sqsh -processors 1 -all-root -action "chmod(a+rX) @true"
You are free to chose the filename extension, but here we use sqsh which is one of the more popular
ones. The -processors 1 tells makesquashfs to use only a single processor as we want to keep
the load on the login nodes low. You can chose a higher number, but don't go over 16 as that would
likely not give you much gain anymore. On the LUMI login nodes there is a maximum percentage of the
CPU capacity a single user can use and hence letting makesquasfs use all the cores only creates
threads that will fight with each other for limited resources.
The -all-root flag is not strictly necessary but will reset the user and group IDs of all files
to 0, the root user and group. This is a good way to anonymize the container.
The last part, -action "chmod(a+rX) @true" is used to reset the file permissions on all files and
directories to ensure that everybody has read rights to all files and directories and execute rights
where needed (for files that were executable by the owner and for directories). The argument looks a bit
strange, but it really has the format -action "COMMAND @CONDITION" where the COMMAND is executed whenever
the CONDITON is true, and we set it to always true here to execute the COMMAND for all files and
directories.
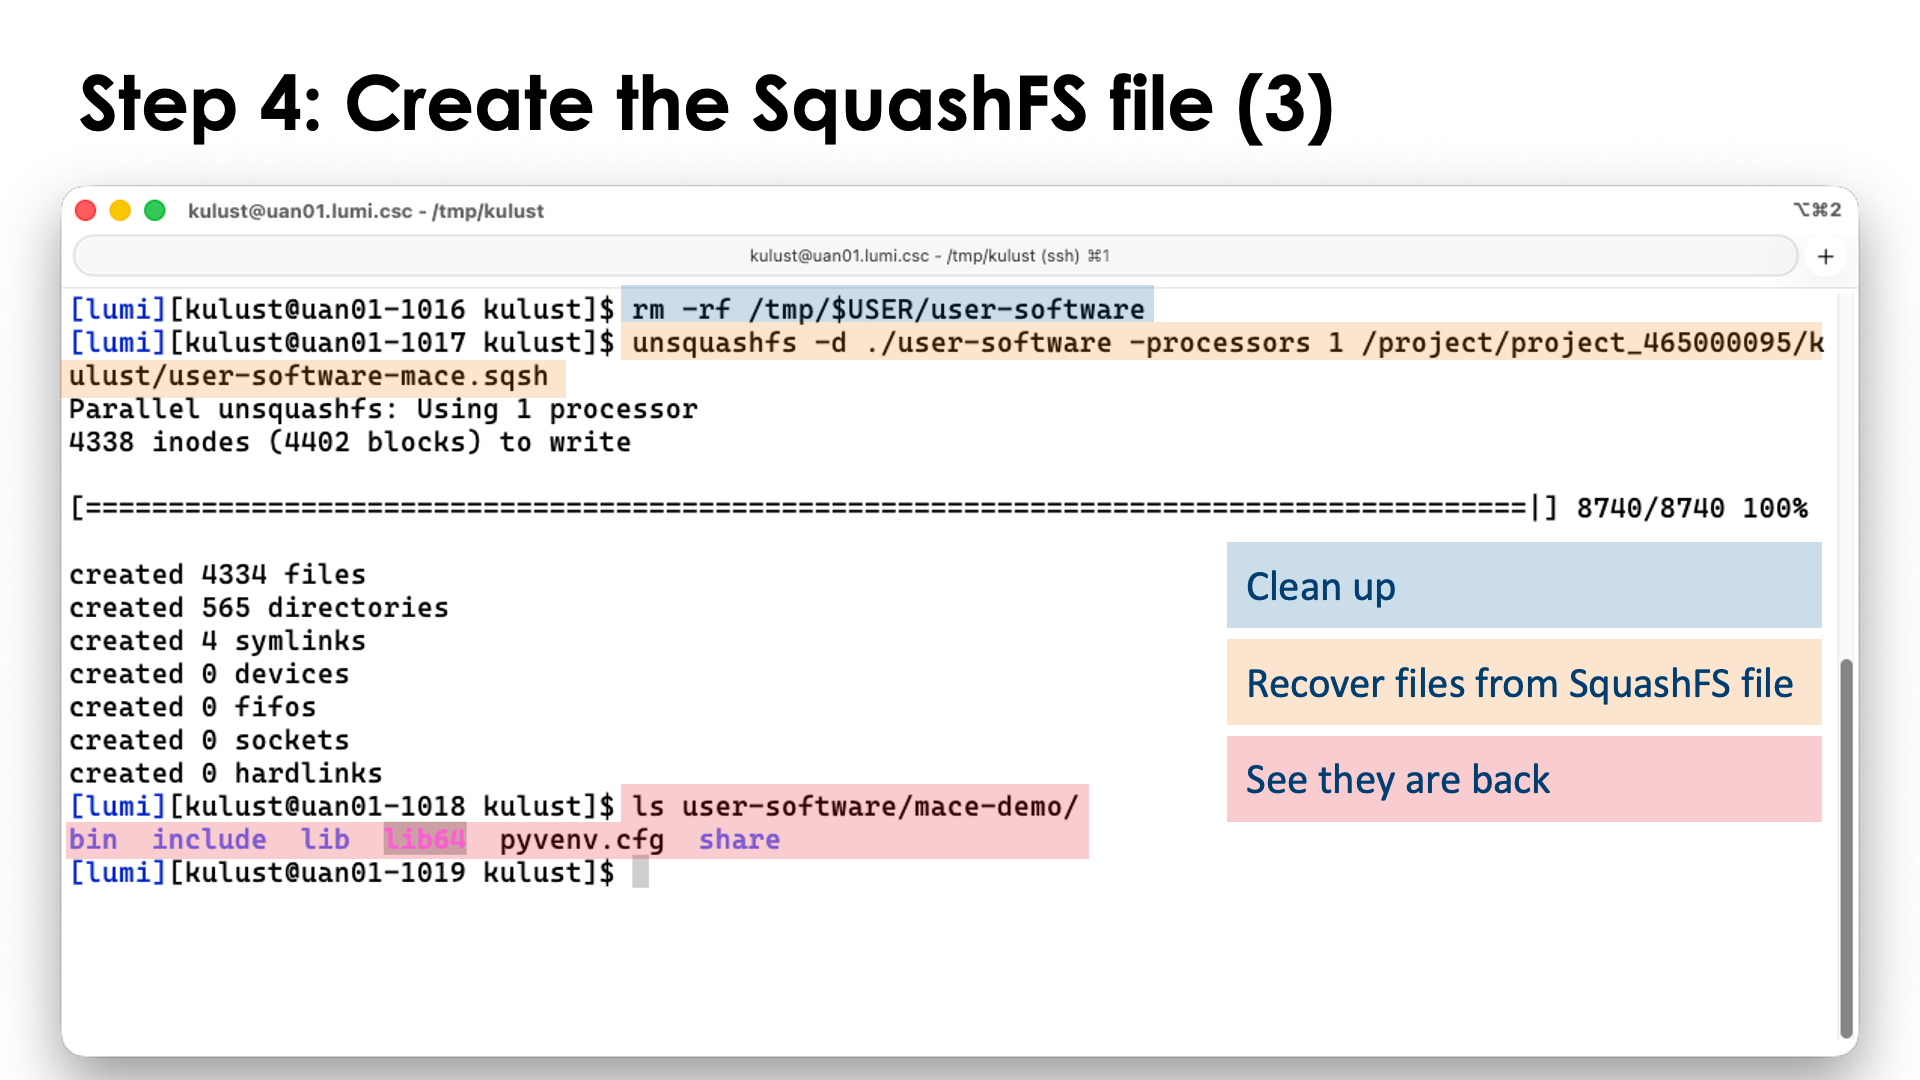
If you were not working in /tmp, it may be a good idea to keep the regular installation also as you
can still use that to install additional packages. It will save you time, but it is always possible to
unpack the installation again with unsquashfs, e.g., (and run this in a place where you want to
unpack):
unsquashfs -d ./user-software -processors 1 <SOME_DIR>/user-software-mace.sqsh
mksquashfs command, the
SquashFS file goes at the end now).
We'll now first clean up the mess we made on /tmp with this demo:
rm -rf /tmp/$USER/user-software
Step 5: Use software in the virtual environment
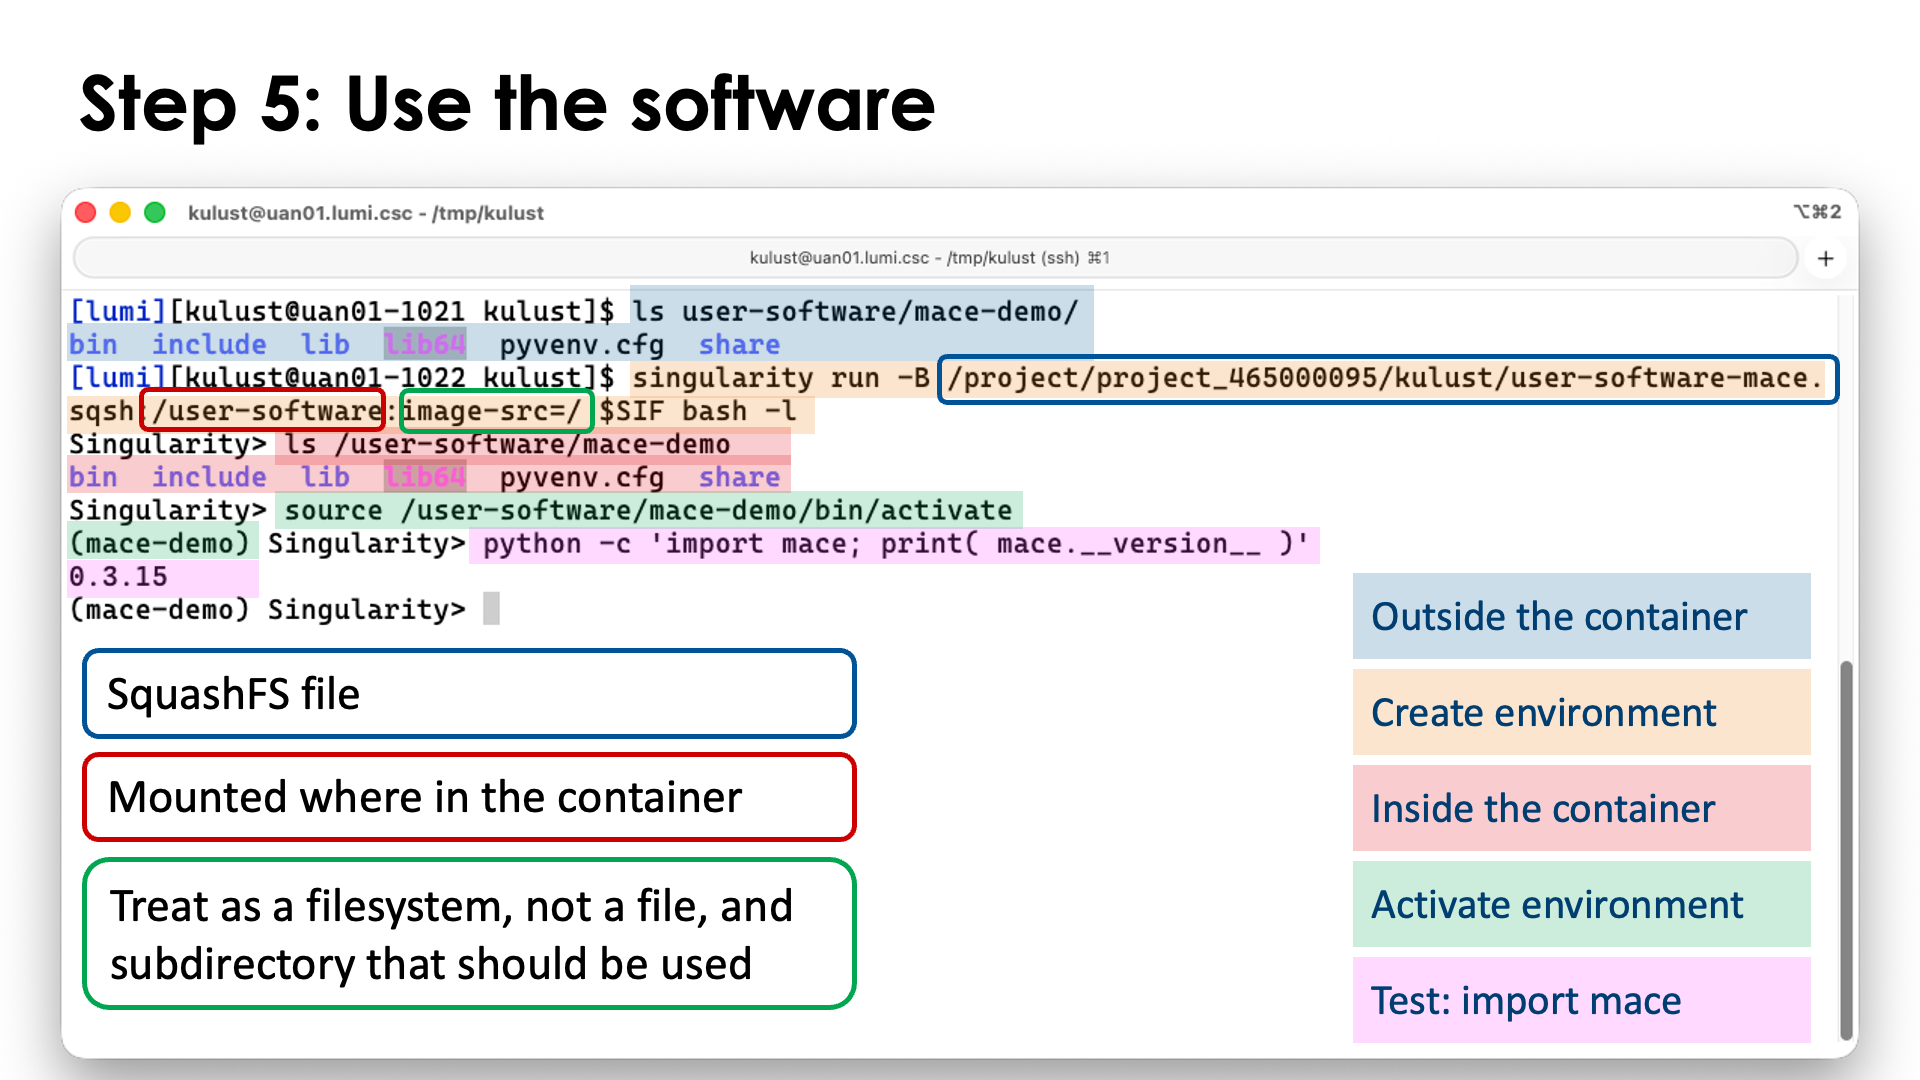
To use our newly installed packages, we can use singularity just as before in the container, but with two extra steps: We need to bind mount our SquashFS file, and we need to activate our newly created environment.
To enter the container, we now use
singularity run -B <SOME_DIR>/user-software.sqsh:/user-software:image-src=/ $SIF bash -l
The first part of the -B argument is our SquashFS file, the second part is where we want to bind mount it
in the container, and the third part tells that we should actually mount the SquashFS file as a filesystem,
not as a single file, and also tells where to start in the SquashFS file as it is possible to bind mount
only a part of that file.
Activating the virtual environment is done with
source /user-software/mace-demo/bin/activate
As a test that everything works, we can import the mace package and print its version:
python -c 'import mace; print( mace.__version__ )'
Extending containers with the unprivileged PRoot build process

A second way to extend containers is with the so-called unprivileged PRoot build. This is a solution with no equivalent in AppTainer that fully focusses on strategies using user namespaces and is also the reason why do not offer AppTainer on LUMI. With AppTainer, users would have to build on other hardware not offered by LUMI, e.g., their own Linux workstation or some cloud infrastructure.
The unprivileged PRoot builds do come with some restrictions compared to other build processes supported by
SingularityCE. These are clearly mentioned in the manual. E.g., the %pre section in the container definition file is not supported
and some bootstrapping processes are also unsupported. But it is perfectly possible to build a new container
based on an existing container that already has some base OS tools in it, or even other software. Hence
this is a suitable strategy to extend the containers that LUST offers with a
pre-installed version of the HPE Cray Programming Environment,
or the containers offered by the LUMI AI Factory.
The former are a good starting base if you want to install more traditional HPC software that needs to
interface with, e.g., Python, or uses libraries that are hard to install from sources and where you simply
want to download pre-compiled binaries for those libraries. The latter are a good choice if you don't want
to deal with the complexity of installing AI software yourself, but want to extend those installations with
additional packages or even external tools for, e.g., video processing (like FFmpeg).
Note that the CPE containers are based on OpenSUSE as the base OS, as the HPE Cray Programming Environment is currently only available for some SUSE and some Red Hat versions, as that is what HPE uses on its supercomputers. The LUMI AI Factory containers on the other hand are based on LTS releases of Ubuntu which offers a very rich ecosystem of other packages, but is not compatible with the HPE Cray PE.
Despite some restrictions of unprivileged PRoot builds, many things are still possible:
-
You can build from an existing container on the filesystem or from Docker Hub, even though not all SingularityCE bootstrap options work.
-
You can copy files and directories from the host so that we don’t need to bind them.
-
You can set environment variables that will be set whenever the container is initialised.
-
You can install additional OS packages, compile software, install additional Python packages, …
-
You can also define a
runscript(the script that defines whatsingularity runwill do).
The container build is steered by a definition file. That file consists of a header and multiple optional sections. A non-exhaustive list is:
-
The top part is called the header. the source for the container is specified. This can be an existing container already available as a SIF file on the LUMI filesystem, but it is also possible to, e.g., pull a container from Docker Hub and start from there. E.g., to start from the Ubuntu 24.04 container on docker, you'd use
Bootstrap: docker
From: ubuntu:24.04
and to start from a file available on a LUMI filesystem, you'd use
Bootstrap: localimage From: <PATH_TO_AND_NAME_FROM_THE_SIF_FILE> -
The
%filessection can be used to copy files and directories from LUMI to the container. Copying files during a build process can be a good replacement for bind mounting those files into the container, but you need to take two things into account:-
After an update of the LUMI, the versions that you copied into the container may no longer work properly. E.g., some libraries supporting a kernel extension may be for a very specific version of that kernel extension only, or if you'd copy Slurm binaries, they may wreak havoc when used with a different version of Slurm on LUMI.
-
You have to take software licenses into account. E.g., you cannot copy files from the HPE Cray PE and then take the container to a different supercomputer that does not have a license for that programming environment. This is also why we have built a small script into the CPE containers that we offer that will print a warning if it detects that it is not running on LUMI (and that warning has consequences for how to build on top of that container, as it requires access to the Slurm configuration).
-
-
The
%environmentsection can be used to set environment variables when a container is initialised.For the advanced user: Those lines find their way into a script in the container that is in
/singularity.d/env. The scripts in that directory are executed in "alphabetical" order but not in a full bash shell, and it is possible to inject other scripts also via the%filesor%postsections. -
The
%postsection is the section where you can put all commands that should be executed to install additional software in the container.These commands run in a clean environment, so you cannot see environment variables from the host. The container initialisation scripts are executed though, and any bind mount specified in the
singularity buildcommand will also be there. And this is where a problem can occur: Bind mounts work differently during the build process. You can only bind mount a file if that file is already present in the container (but of course you will then see the bind mounted version in%post), and a directory can only be bind mounted if there is already a file or directory at that place with the name of the directory that you want to bind mount. Most containers will not provide these mount points already, but there are two workarounds:-
You can perform a build process in two stages. In the first stage, you make no bind mounts but use the
%postsection to create empty files and/or directories where needed. -
Create an empty file (and/or empty directory) outside the container and use the
%filessection to copy those to where they are needed for the bindings.
-
-
The
%runscriptsection defines the runscript that will be used by the container. It is written to/.singularity.d/runscriptin the container.
There are many more sections, but a discussion of all those sections is beyond the scope of this introductory course. We refer the reader to the "The Definition File" page in the SingularityCE 4.1 manual
Let us illustrate how container builds work with some examples though.
Example 1: A python package in the LAIF container
We've seen how we can install additional Python packages in a virtual environment. This was a relatively quick process and certainly a good way to test package combinations. But with the LUMI AI Factory containers, it is also possible to install additional packages directly in the container. This process is slower, but you don't need to bind mount an additional SquashFS file anymore.
Let's go back to the mace-torch example used with virtual environments an install that package in
the virtual environment from the AI container. As the environment variable
NCCL_SOCKET_IFNAME always needs to be set on LUMI and has only one possible value,
hsn0,hsn1,hsn2,hsn3 or in short hsn, we will set that environment variable in
the container instead so that we don't need to specify it anymore elsewhere.
We'll also demonstrate how a definition file can be parameterised:
Bootstrap: localimage
From: {{ sif }}

%environment
    export NCCL_SOCKET_IFNAME='hsn0,hsn1,hsn2,hsn3'

%post
    pip install mace-torch
Store this script in mace.def.
There are three interesting elements in this example:
-
In the header, we define that the container will be build from an image already on LUMI, and we use the template
{{ sif }}as the name of the container from which we will start the build. As such, we can postpone the specification of the start container to the call ofsingularity buildand use the same definition file for several versions of the LAIF container that we will use. -
In the
%environmentsection we set theNCCL_SOCKET_IFNAMEenvironment variable. This piece of code will be copied into a script that is executed at container startup. -
In the
%postsection, we simply execute thepip installcommand to install themace-torchpackage in the virtual environment (which for this container is in/opt/venv).The LUMI AI Factory documentation will tell you to first activate the virtual environment, but that is not really needed. The
%poststep runs in the environment that the container would run in (except that no environment variables from the system are available) so the activation is already done during the initialisation.
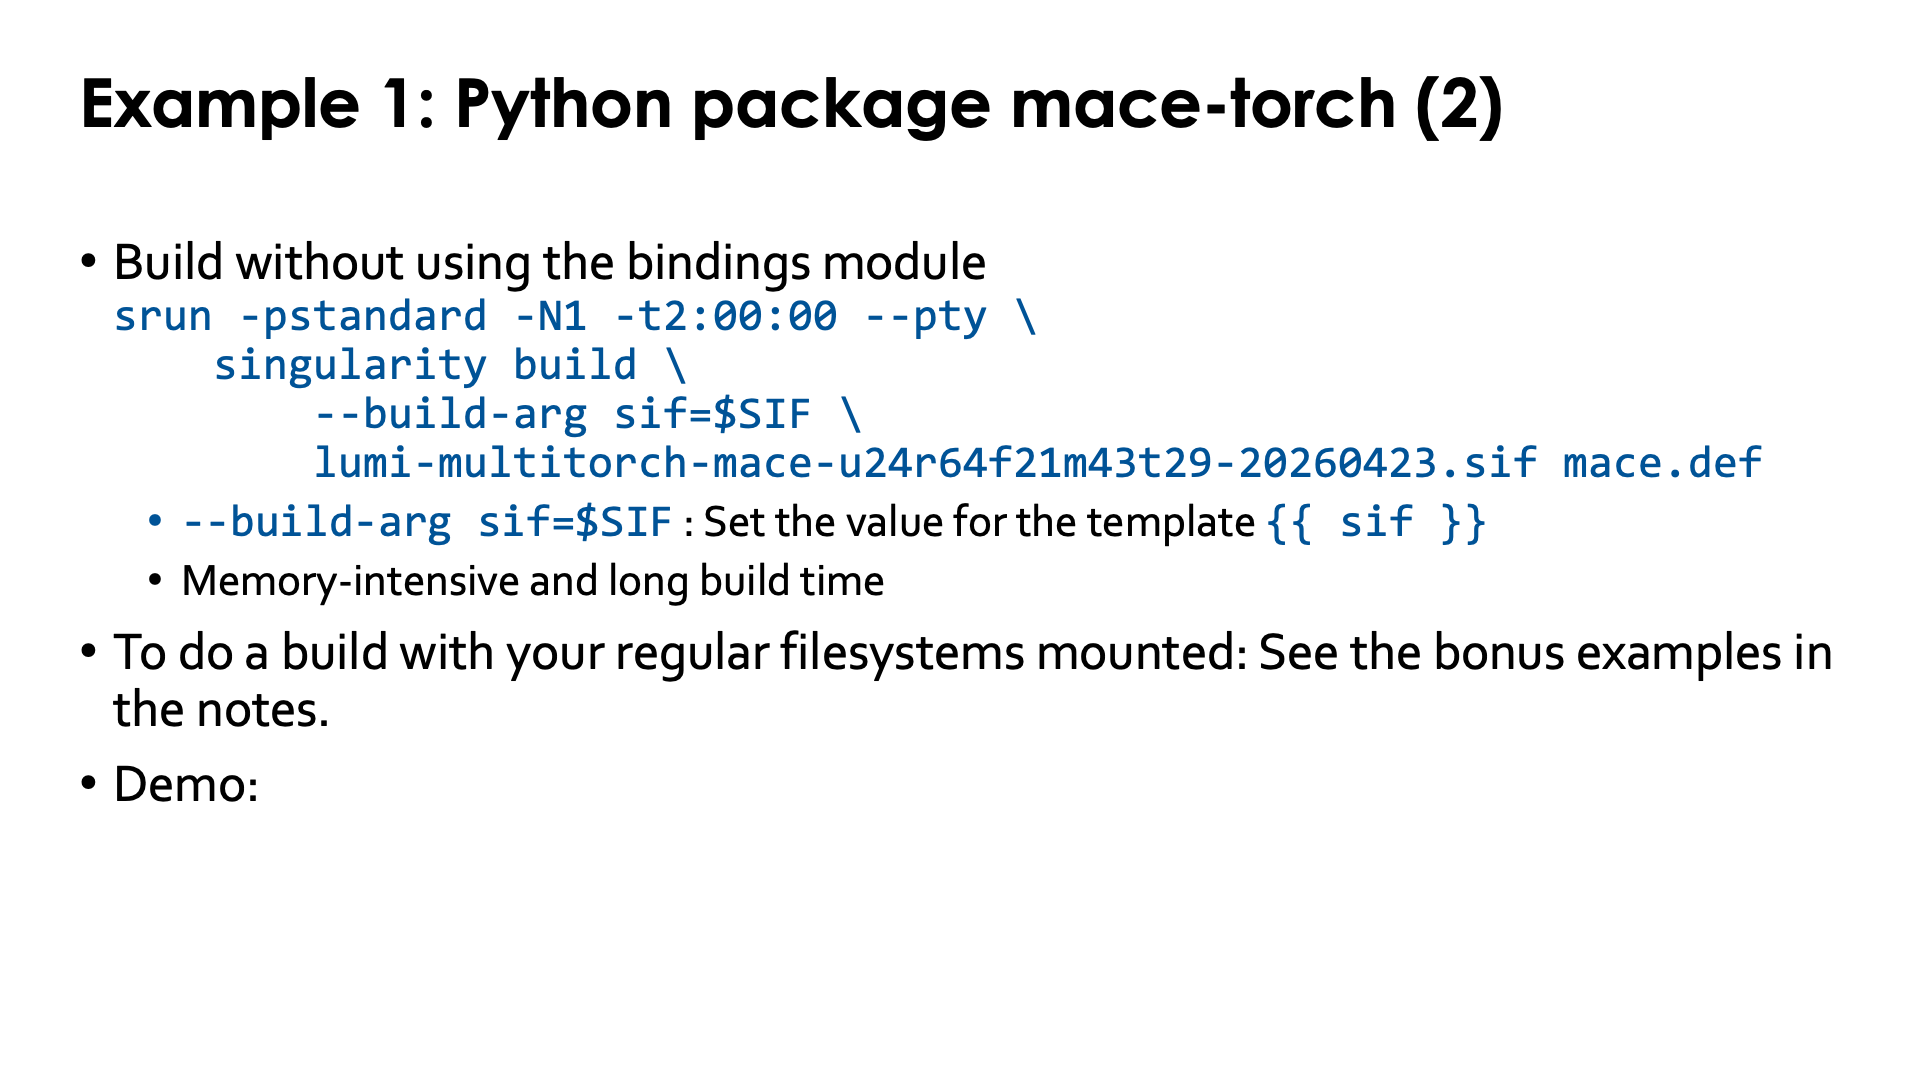
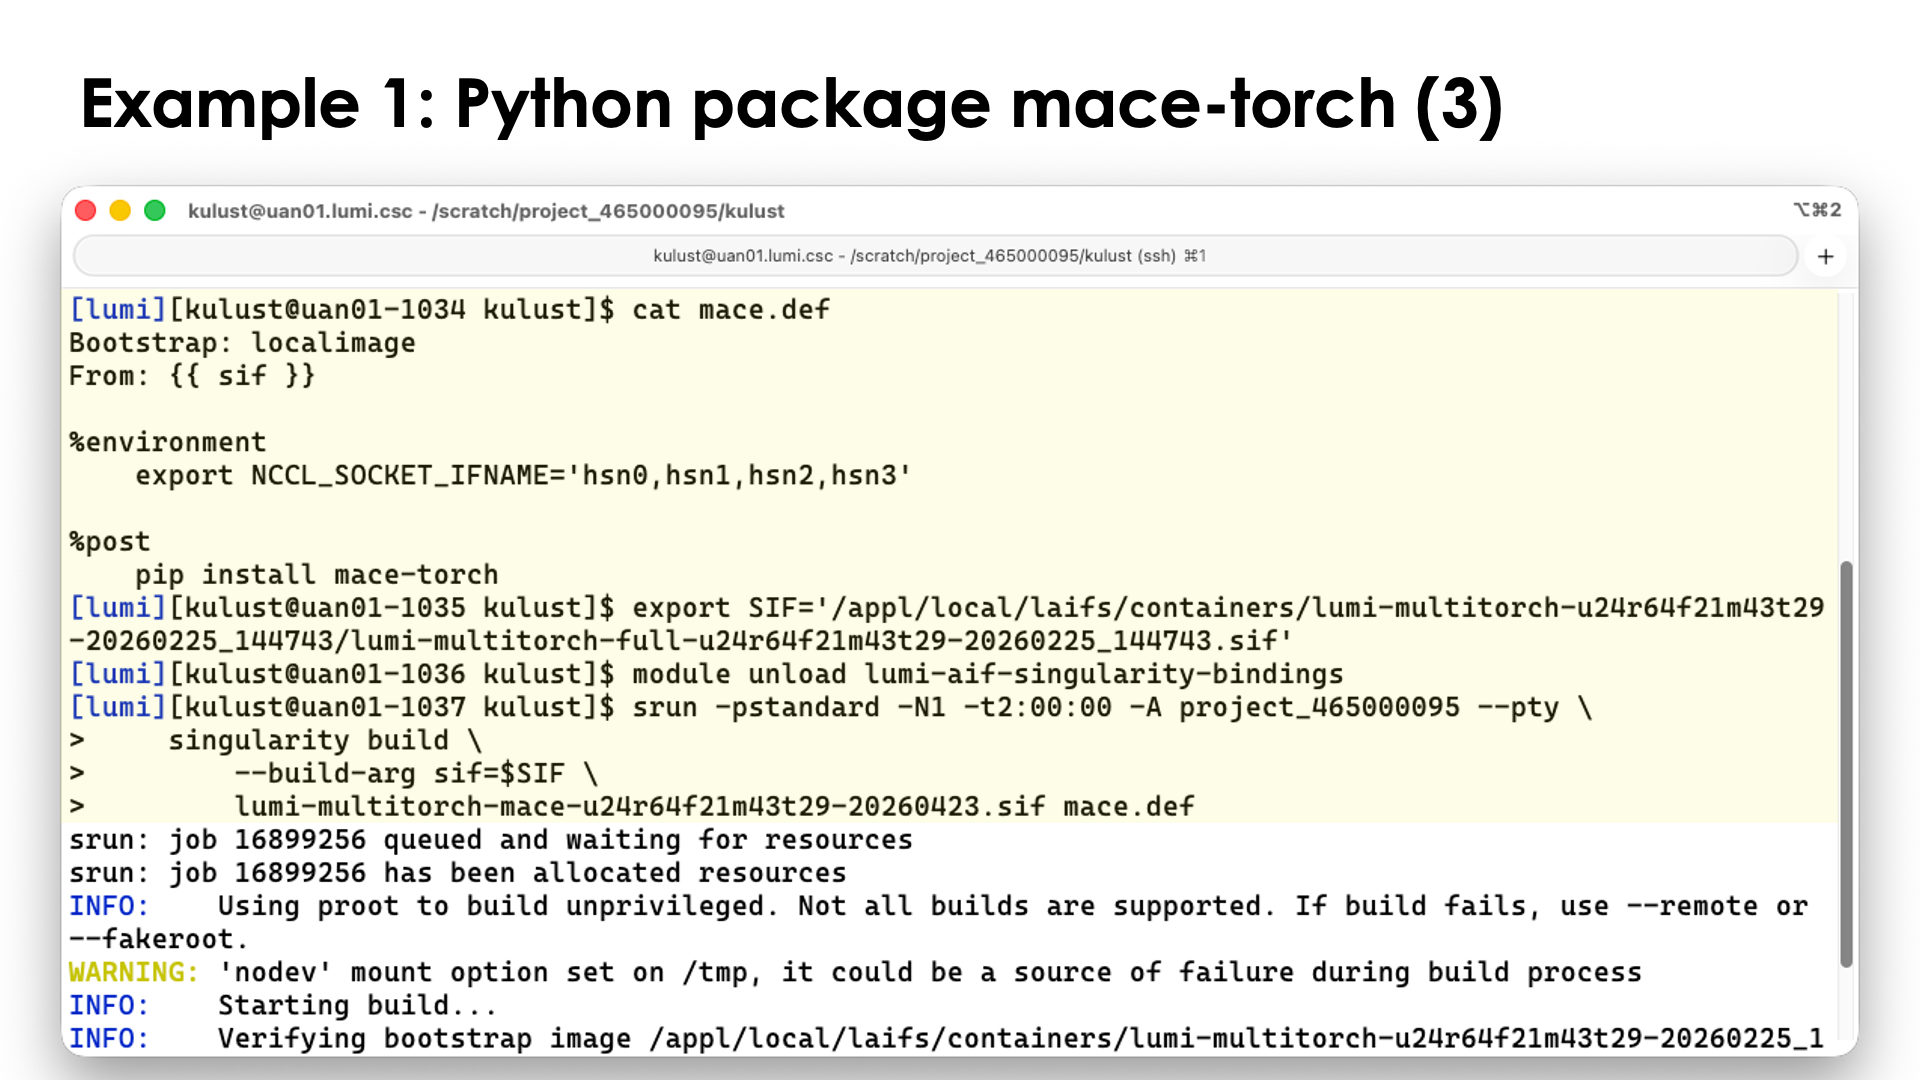
Building a container using this script can then be done as follows.
To make life easy, we again use the SIF environment variable to point to the container we want to extend:
export SIF='/appl/local/laifs/containers/lumi-multitorch-u24r64f21m43t29-20260225_144743/lumi-multitorch-full-u24r64f21m43t29-20260225_144743.sif'
Next, we must make sure that the bindings module is not loaded. As discussed before, in order to use bindings during the build step, mount points have to be present in the container and they are not. So just to be sure:
module unload lumi-aif-singularity-bindings
One module we do need though is the PRoot module. To load this module, execute
module load LUMI PRoot
or
module load CrayEnv PRoot
We are now ready to build our new container. Let's call it
lumi-multitorch-mace-u24r64f21m43t29-20260423.sif to follow the naming convention
of the containers from which we start, but of course, you can chose a much simpler name.
To build the container, we issue the command (split across multiple lines in bash style to make reading easier):
singularity build \
    --build-arg sif=$SIF \
    lumi-multitorch-mace-u24r64f21m43t29-20260423.sif mace.def
In the second line of this command, we set the value of the template {{ sif }} to whatever is
in the environment variable SIF. The third line and final two arguments of singularity build
are the name for the new container and the definition file that should be used.
If you have failed to unload the bindings module, you would now get an error message similar to:
FATAL: container creation failed: mount /var/spool/slurmd->/var/spool/slurmd error: while mounting /var/spool/slurmd: destination /var/spool/slurmd doesn't exist in container
It is also rather likely that you will run out-of-memory on the login nodes so we will
build on a compute node instead. Even though this is GPU software, it is not necessary to
use a GPU node, so for the demo we use the standard partition.
(Or you can set the environment variable SINGULARITY_TMPDIR to point to a location
with more space than /tmp, but that would then be on Lustre which would come
with serious performance consequences.)
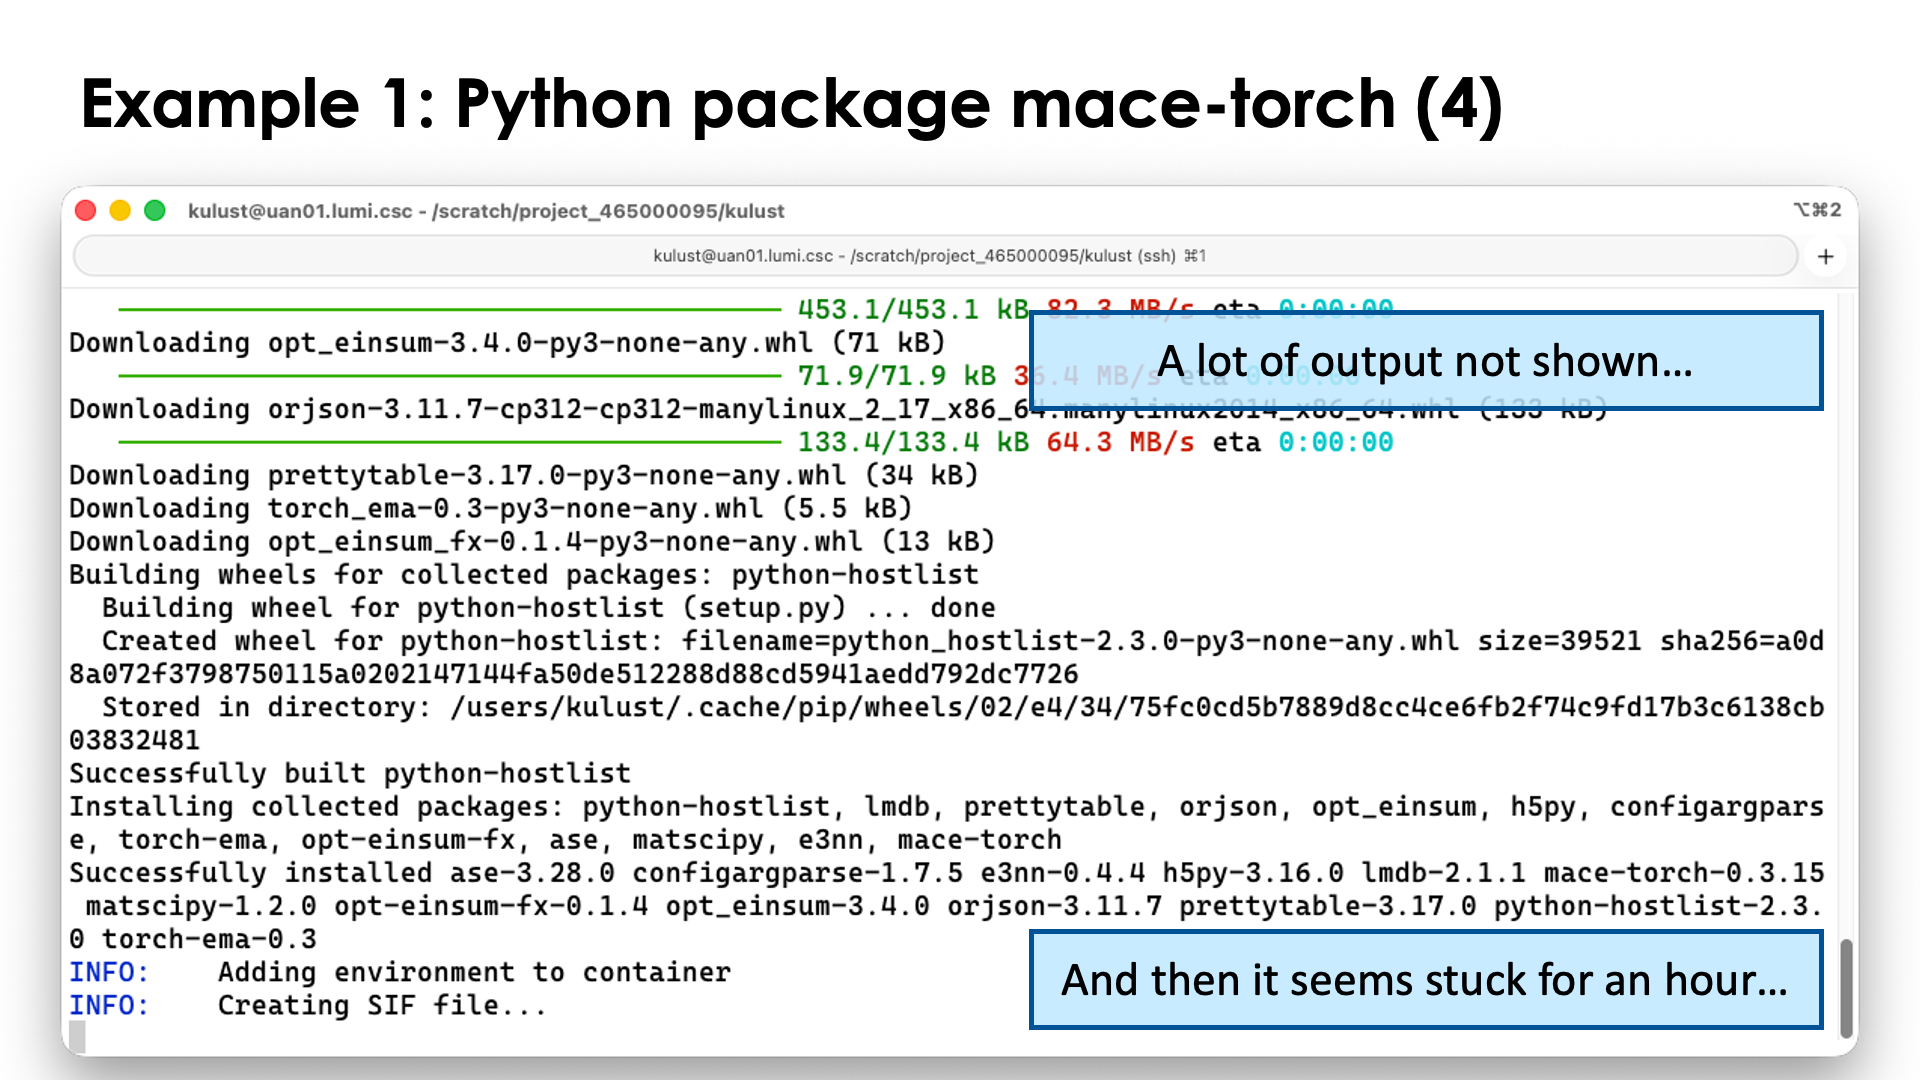
srun -pstandard -N1 -t2:00:00 -A project_465000095 --pty \
    singularity build \
        --build-arg sif=$SIF \
        lumi-multitorch-mace-u24r64f21m43t29-20260423.sif mace.def
We can now check the contents of the container. For this we don't necessarily need the bindings. Enter the container with
singularity run lumi-multitorch-mace-u24r64f21m43t29-20260423.sif bash -l
and check the output of the following commands:
ls -l /opt/venv/bin/mace_run_train
ls /opt/venv/lib/python3.12/site-packages/mace*
python -c 'import mace; print(mace.__version__)'
to convince yourself that the mace package is installed where we expect it
(in the /opt/venv virtual environment) and is found by Python.
Example 2: Install an Ubuntu application in the container

The containers have a rather limited environment and you may want to
install your favourite tools in the container. In this example, we will
install a better editor, vim, in the container.
In this example, we will take the base container from the LUMI AI Factory community on Docker Hub. As this is just for demonstration purposes, we will not build on top of the full container to save some time, but of course, the full container is also on Docker Hub.
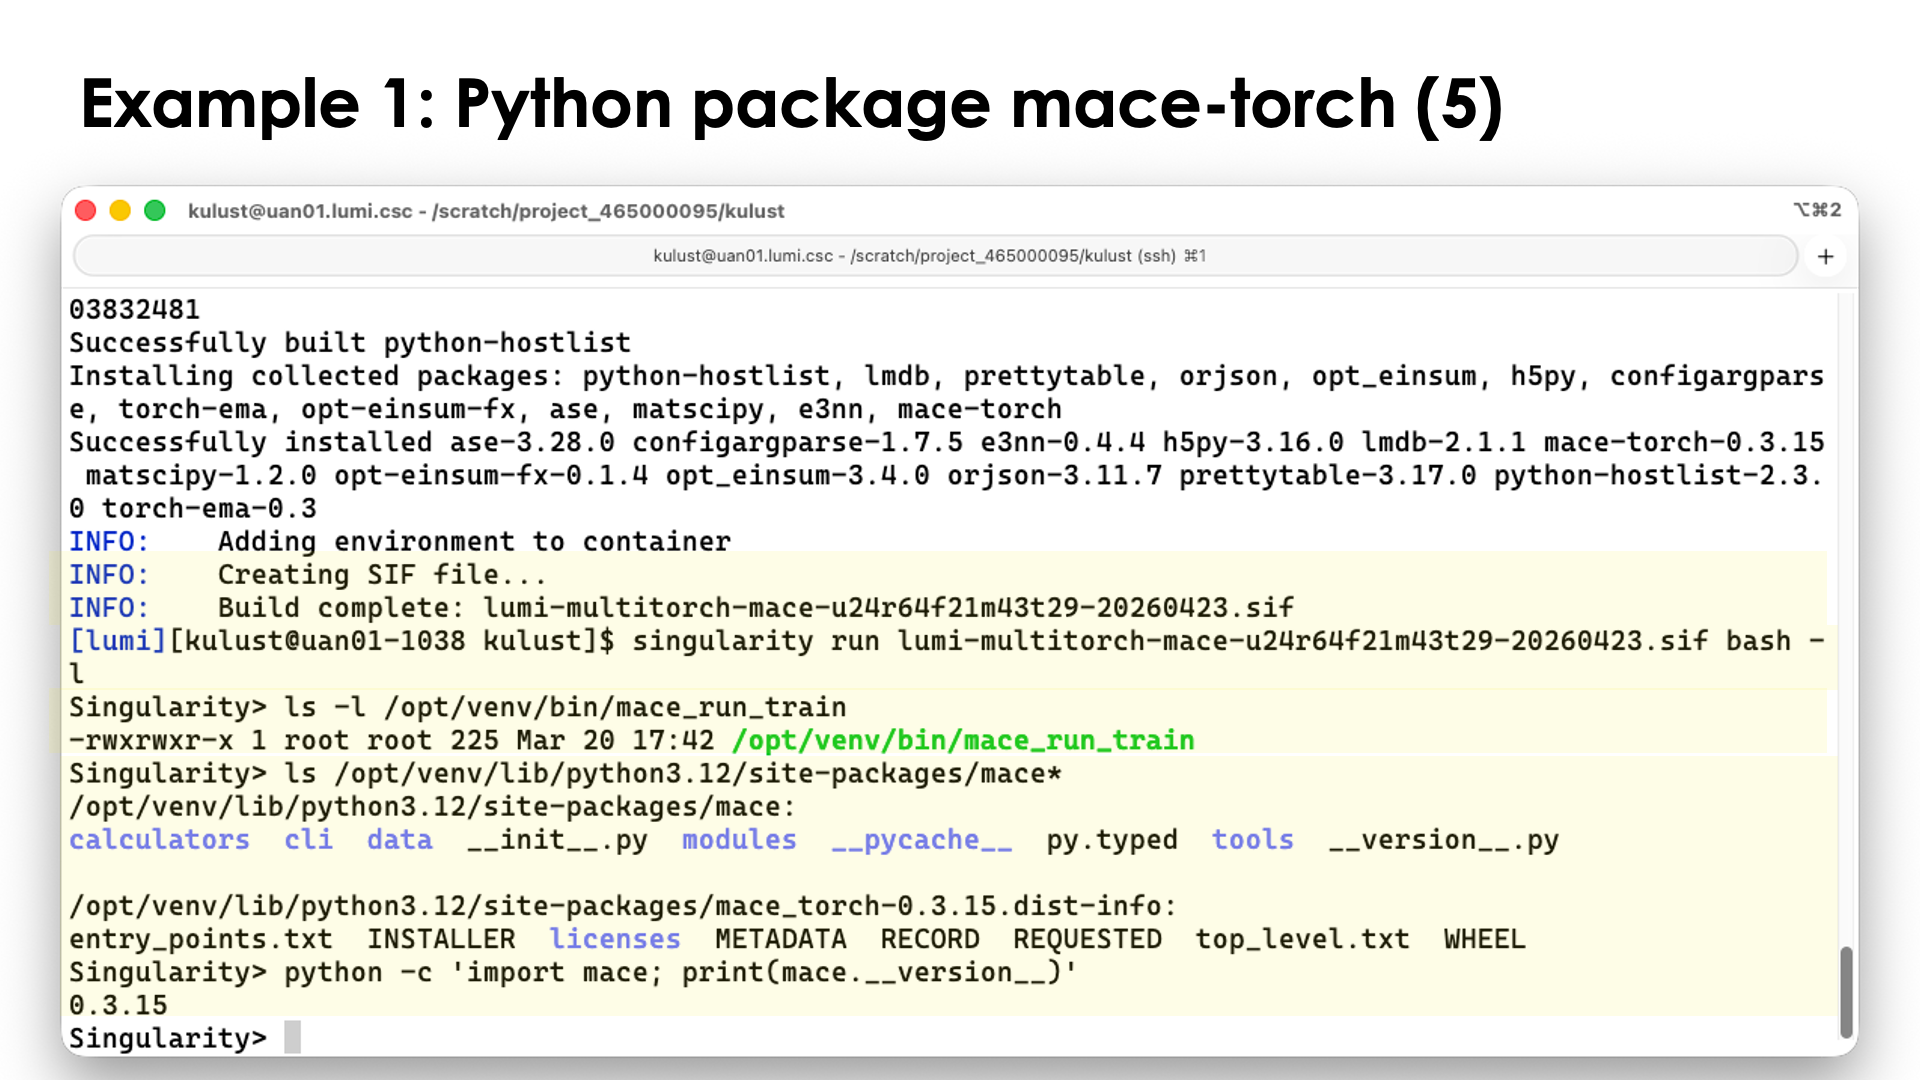
Bootstrap: docker
From: docker.io/lumiaifactory/lumi-multitorch:mpich-u24r64f21m43t29-20260225_144743

%post
    apt update
    apt install -y vim
Copy this piece of code to userexts.def.
In the header, the Bootstrap: line now instructs to use docker as a source and specify the image
that we will use in the the From: line.
In the %post section, we run two commands to install packages on Ubuntu. The first one,
apt update, ensures that the container has an up-to-date list of Ubuntu packages available.
The apt install -y vim command then installs the package. Note the -y flag.
If we would not use this flag, the installation process would get stuck when the apt
commands asks if it is OK to install all packages. Note that this command will also automatically
install all dependencies of the vim package. For containers based on OpenSUSE, you'd have
to use the zypper command instead which also functions slightly differently.
You can install a new container with
singularity build \
    lumi-multitorch-user-u24r64f21m43t29-20260423.sif userexts.def
Building from an image already on LUMI will be faster though than building from a new image fetched from Docker Hub.
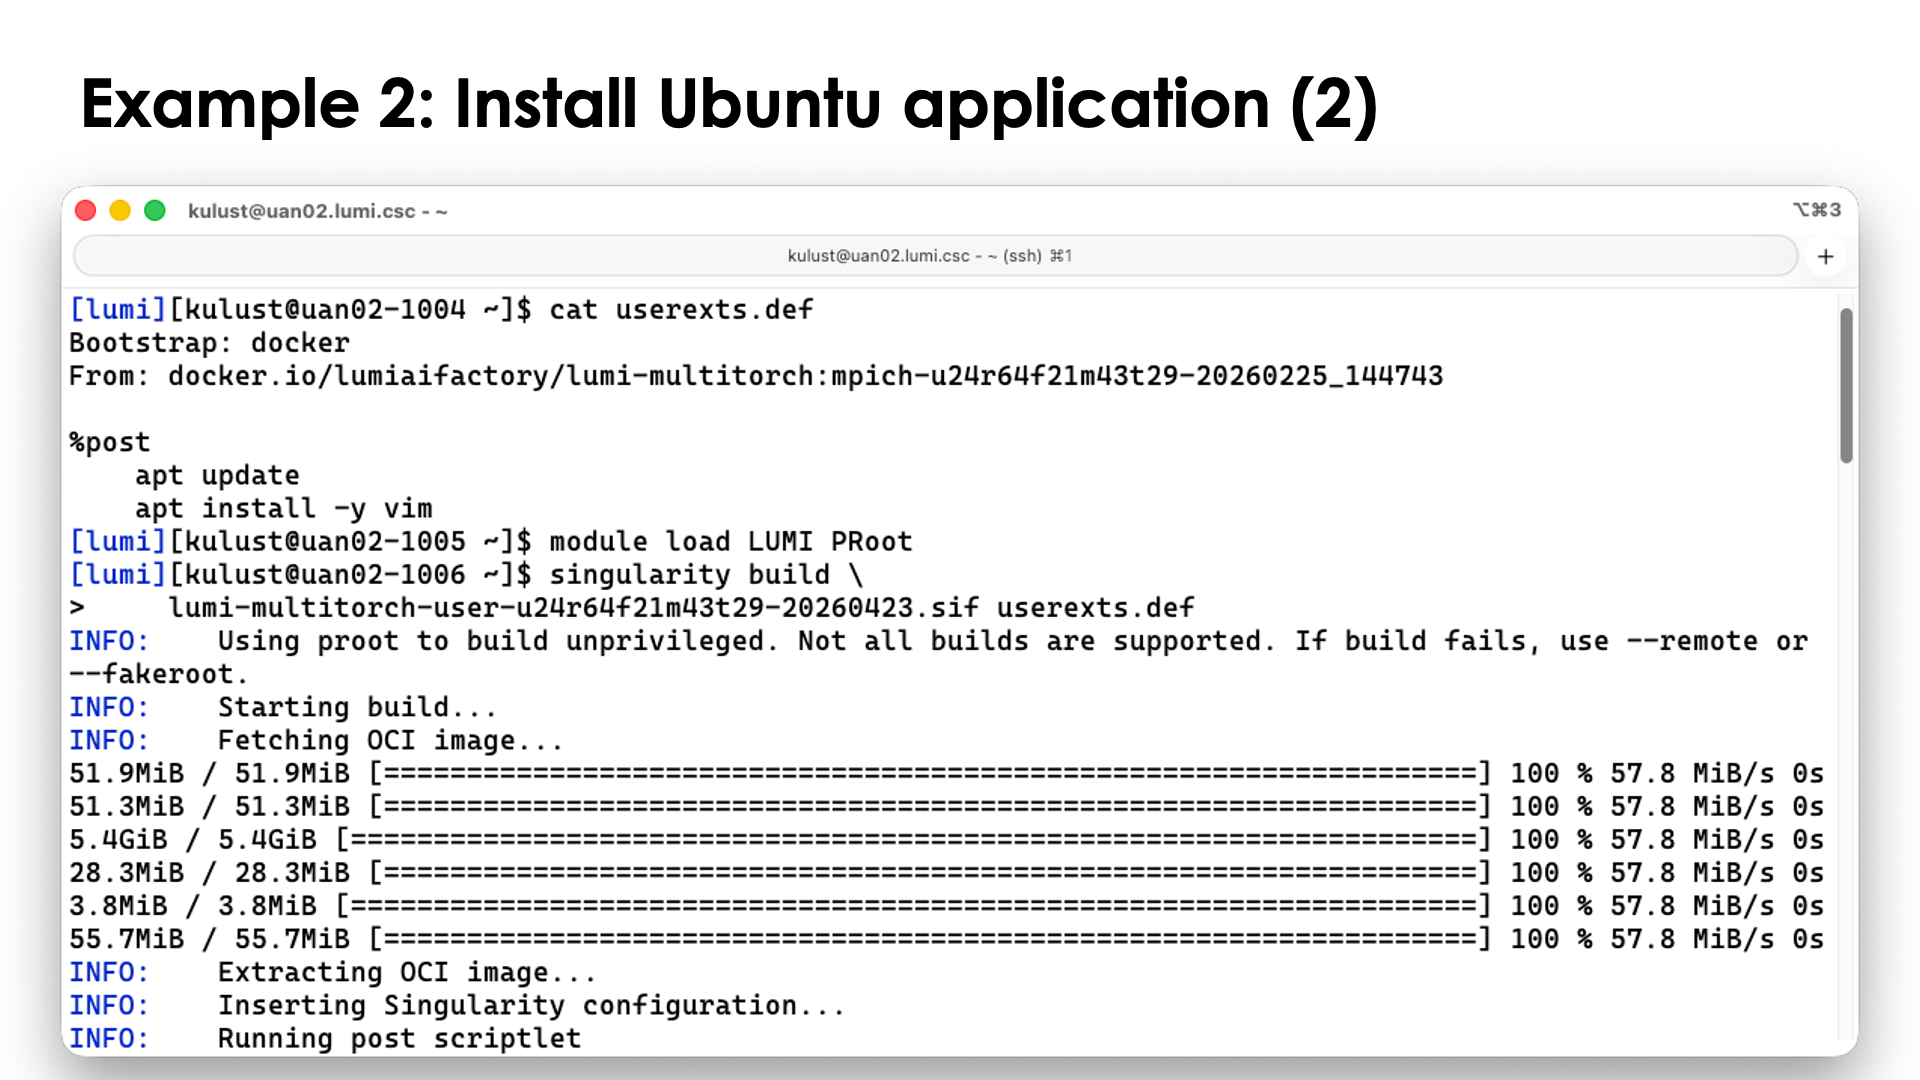
After the build, try
singularity run lumi-multitorch-user-u24r64f21m43t29-20260423.sif \
    bash -c 'vim --version'
to convince yourself that vim is in the container.
Though many Ubuntu packages can be installed that way, this does not hold for all packages.
We've noticed that in particular GUI packages or other packages that have GUI dependencies
may fail, and this holds for, e.g., ffmpeg and HandBrake, even if you just try to install
the command line tools with the handbrake-cli package. These packages require libraries that
in turn need special users or groups to be set up, and if those users or groups are not already
supported in the /etc/passwd and /etc/group file of LUMI, this becomes very tricky or
impossible. If they are in those files, you can try with copying those files into the container
in the %files section so that they are used during the build. During regular runs of the
container, singularity will create special versions that are only available in the container,
but they do no harm.
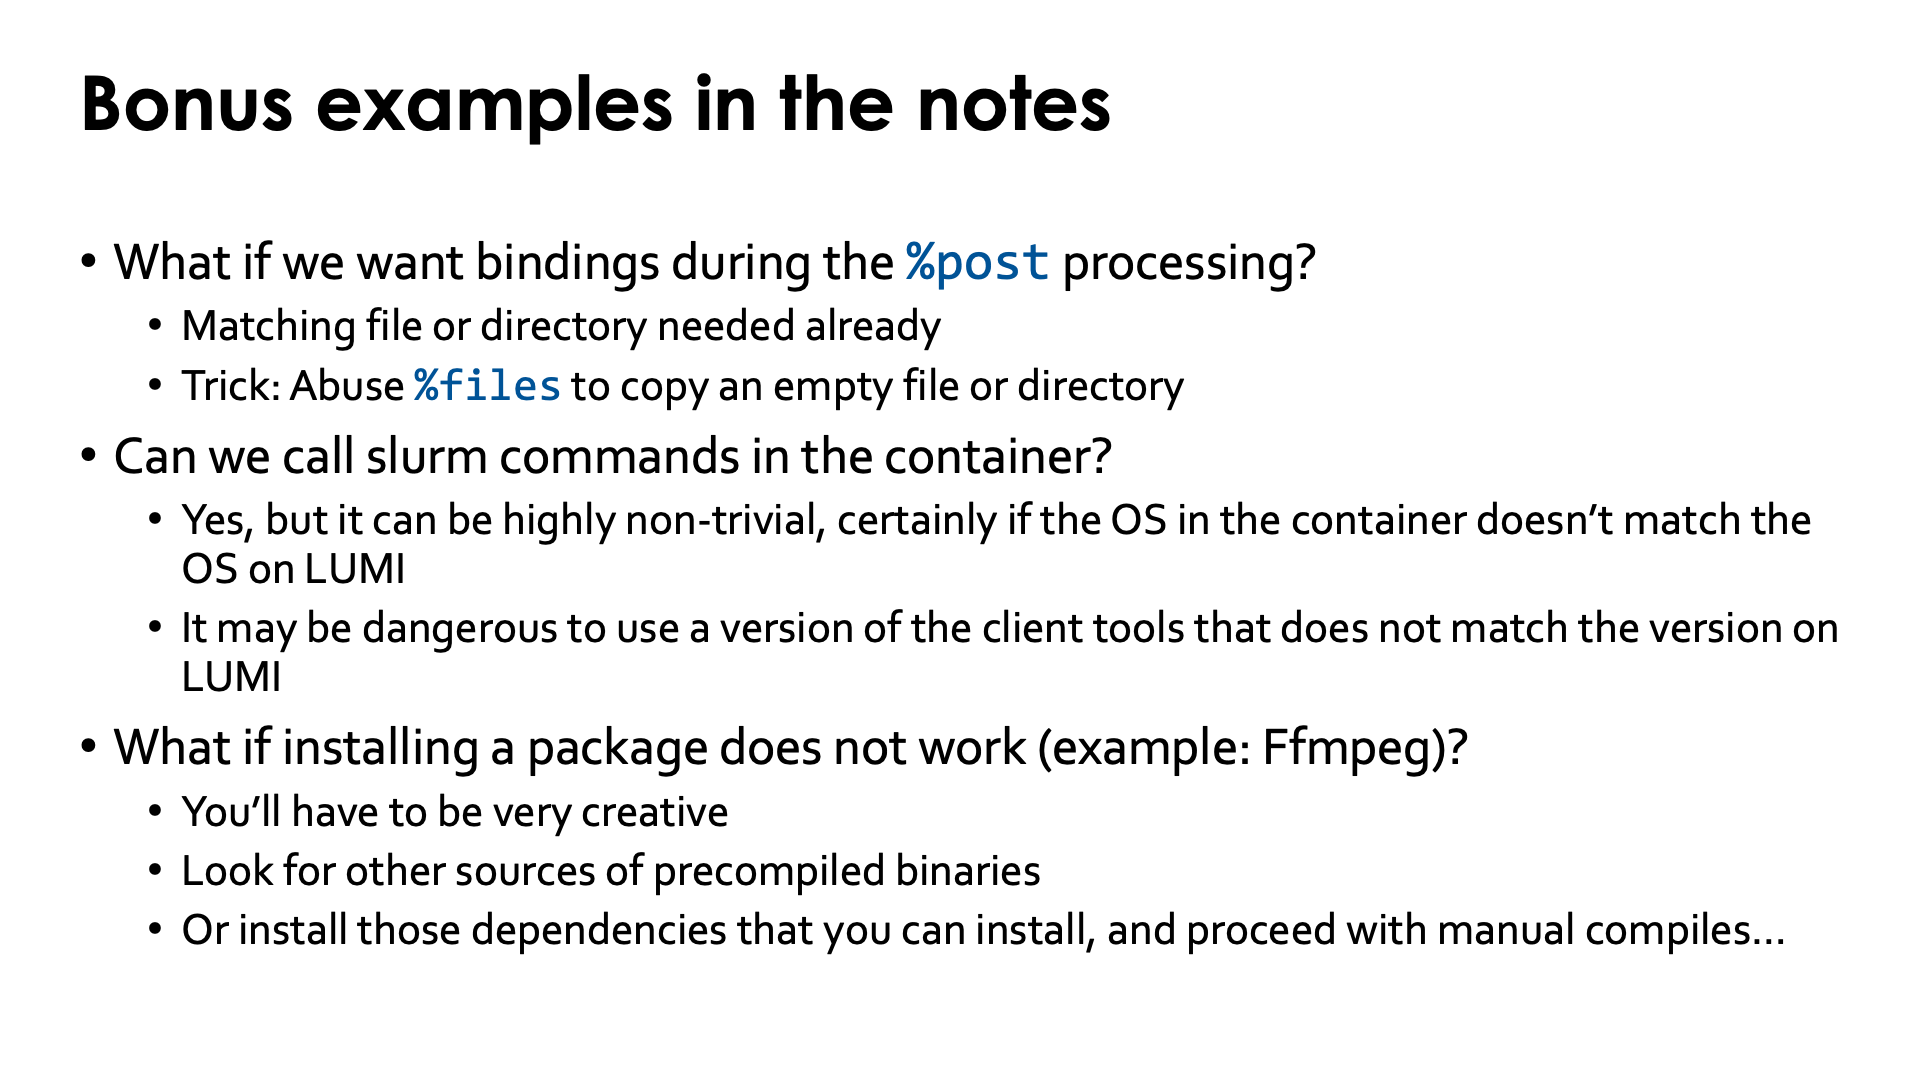
Bonus example: Bindings
To illustrate that bindings work differently during the %post phase then when running
a container, consider the following example based on a very simple Ubuntu container.
First, we pull the container from docker to create a base singularity image:
singularity pull docker://ubuntu:24.04
Now load the bindings module from the LUMI AI Factory:
module load Local-LAIF lumi-aif-singularity-bindings
This module will set SINGULARITY_BIND to tell singularity to bind mount
/var/spool/slurmd which is a directory that is needed by MPI libraries to
communicate with Slurm, and a number of directories to provide all Lustre filesystems
on LUMI. The module is very generic and can be used with other containers also
if these are the effects that you want.
Now check the container:
singularity shell ubuntu_24.04.sif
and check:
ls /scratch
ls /pfs/lustref1
ls /appl/lumi
and notice that all these commands work as expected and show the same output as they do outside the container.
Now consider the near trivial definition file
Bootstrap: localimage
From: ubuntu_24.04.sif

%post

    echo "If you see fine /build_results.echo in the container, everything was OK..." >/build_results.echo
and store this in the file bindings-fail.def.
Now try to build with this definition file:
singularity build bindings.sif bindings-fail.def
and after printing some lines on the screen, singularity will show an error message:
FATAL:   container creation failed: mount /var/spool/slurmd->/var/spool/slurmd error: while mounting /var/spool/slurmd: destination /var/spool/slurmd doesn't exist in container
FATAL:   While performing build: while running engine: exit status 255
even though we could run the container from which we start the build without issue.
Now try the following definition file:
Bootstrap: localimage
From: ubuntu_24.04.sif

%files

    EMPTY_DIR /var/spool/slurmd
    EMPTY_DIR /pfs
    EMPTY_DIR /scratch
    EMPTY_DIR /projappl
    EMPTY_DIR /project
    EMPTY_DIR /flash
    EMPTY_DIR /appl

%post

    echo "If you see this file, everything was OK..." >/build_results.echo
and store this in the file bindings-good.def. In the %files section we copy an empty directory
from the system that can then serve as a mount point for the directories that we will bind mount
during %post. So let us first create that empty directory:
mkdir EMPTY_DIR
Now run the build again:
singularity build bindings.sif bindings-good.def
and notice that the build works without issues.
Now if we would bind mount some files instead, the same idea can be used, but then by copying empty files: Create an empty file in the directory from which you want to run the build:
touch EMPTY_FILE
and use lines in %files similar to
%files
    EMPTY_FILE /etc/slurm/slurm.conmf
Let us check if the container still works as expected:
singularity shell bindings.sif
and then, e.g.,
ls -l /pfs
ls -l /appl/lumi
ls -l /var/spool/slurmd
and notice that all those commands work and produce the output that you may expect.
Let us now unload the bindings module
module unload lumi-aif-singularity-bindings
and enter the container again:
singularity shell bindings.sif
Now try the commands:
ls -l /
ls -l /var/spool
and notice that /var/spool/slurmd, /pfs, /scratch, /projappl, /project, /flash and
/appl all exist, but most will be owned by root and be unreadable. If you were running the
container from a subdirectory of one of those, you may be the owner of that directory.
The other solution of course is to do a two-step build. First build a container
without using any bindings, and create the bind mounts in the %post step
(and then you can set permissions to make them world-readable),
and then in a second step use the container from the first step as the
start container for further builds.
Special case: Building on top of the ccpe containers
Usually you don't need many bind mounts during the build.
There is one exception though: Our
ccpe containers
with the Cray programming environment want to find the Slurm configuration
file /etc/slurm/slurm.conf in the container.
Instead of bind mounting that file, you can just copy the file from LUMI in the container:
%files
    /etc/slurm/slurm.conf
and then delete it again at the end of the %post section:
rm -f /etc/slurm/slurm.conf`
Please don't leave that file in the container as (a) we want the container to produce a warning when run on another system and (b) some sysadmins may be very unhappy if users try to run Slurm commands from that container on another system and forget to bind mount the correct Slurm configuration file.
Bonus example: Support for Slurm commands in Ubuntu
To add support for Slurm commands in a container based on Ubuntu, the following elements are certainly needed in the definition file:
Bootstrap: docker
From: ubuntu:24.04

%files
    /etc/passwd
    /etc/group

%post
    # First we install tools that we will need later on
    apt update
    # Split over multiple commands for readability
    apt install -y lz4 libmunge2 libnghttp2-14 curl
    apt install -y libldap-common libjson-c5
    apt install -y lua5.3 liblua5.3-0 lua-posix
    # Symbolic links that exist in SUSE 15 SP6 to libraries
    # that we copied to run the Slurm clients
    cd /usr/lib/x86_64-linux-gnu
    ln -s liblua5.3.so.0.0.0 liblua5.3.so.5
    # OPTIONAL PART BELOW:
    # In case you want to clean up go reduce image size:
    apt-get clean
    /bin/rm -rf /var/lib/apt/lists/*
    /bin/rm -f /usr/lib/x86_64-linux-gnu/liblua5.1*
    /bin/rm -f /usr/lib/x86_64-linux-gnu/liblua5.2*
    /bin/rm -f /usr/lib/x86_64-linux-gnu/liblua5.4*
    /bin/rm -rf /usr/lib/x86_64-linux-gnu/lua/5.1
    /bin/rm -rf /usr/lib/x86_64-linux-gnu/lua/5.2
    /bin/rm -rf /usr/lib/x86_64-linux-gnu/lua/5.4
In the %files section, we add the /etc/passwd and /etc/groups file from LUMI to
the container. This is not ideal. Ideally we would create a merge of those files in
the bare container (but they are hard to copy as as soon as we run singularity, new
ones will be created with some additional users and groups) and the one from LUMI,
create those as a file outside the container and then copy as we cannot change those
files during %post.
In %post we first install a number of additional libraries that are needed by the
various Slurm libraries and commands but are missing from the base Ubuntu container.
If you use this procedure to add to another Ubuntu container, the list may change a bit
as some packages may be present already, and if Slurm is updated on LUMI, the list may
change also. To figure out which ones are missing, first create an empty Ubuntu container,
then run a shell in the container bind mounting all Slurm tools you want to use and the
/usr/lib64/slurm subdirectory and then use the ldd tool to chech all libraries that
are loaded by those commands and libraries in /etc/lib64/slurm. That list may not be
complete as libraries and commands can also load extra libraries when running that are
not pre-linked and shown by ldd. We've tried to make this list as complete as we
could and tested several Slurm commands, but cannot exclude that the list may be
incomplete.
Next there is the line
ln -s liblua5.3.so.0.0.0 liblua5.3.so.5
This deals with a difference between Ubuntu and SUSE 15 SP6, where in the latter
liblua5.3.so is offered with a different strategy for the version numbering part of the name.
The final block does some clean-up, but that is optional. It can help to slightly reduce the size of the container.
To run with this container, a lot of bindings are needed and we cannot simply use
the lumi-aif-singularity-bindings module anymore:
export SINGULARITY_BIND='/pfs,/scratch,/projappl,/project,/flash,/appl,/etc/slurm,/var/spool/slurmd,/var/run/munge,/usr/lib64/slurm,/usr/bin/sacct,/usr/bin/salloc,/usr/bin/sbatch,/usr/bin/sinfo,/usr/bin/squeue,/usr/bin/srun,/usr/bin/sstat'
We now also need to bind also the Slurm configuration from /etc/slurm, /var/run/munge
used by the munge library, /usr/lib64/slurm with many libraries used by Slurm,
including some plugins specific for the Cray EX supercomputers, and the various
Slurm tools that we want to be available in the container. There are more tools,
but these are probably the most useful ones. And adding more tools may also requiring
adding more libraries.
Note that the salloc command will not work in a container!
EasyConfigs to create a module for this container.
The following EasyConfig will create a recipe for a module similar
to the lumi-aif-singularity-bindings module for the LUMI AI Factory
containers:
easyblock = 'Bundle'

name = 'singularity-slurm-bindings'
version = '1.0.0'

description = """
Singularity bindings for containers with Slurm support.

Note that this is done by simply setting SINGULARITY_BIND, making this approach
incompatible with other bindings modules. Which is an issue when used with the
LUMI AI Factory containers as those also need another environment variable to
be set for proper Slurm support for the MPI implementation in those containers.
"""

homepage = '()'

toolchain = SYSTEM

env_mod_extra_vars = {
    'SINGULARITY_BIND' : ','.join([
                              # LUMI filesystems
                              '/pfs',
                              '/scratch',
                              '/projappl',
                              '/project',
                              '/flash',
                              '/appl',
                              # Slurm configuration
                              '/etc/slurm',
                              # Communication with system services
                              '/var/spool/slurmd',
                              '/var/run/munge',
                              # Slurm libraries and plugins
                              '/usr/lib64/slurm',
                              # Slurm commands
                              '/usr/bin/sacct',
                              '/usr/bin/sbatch',
                              '/usr/bin/sinfo',
                              '/usr/bin/squeue',
                              '/usr/bin/srun',
                              '/usr/bin/sstat'
                          ]),
    # Uncomment the next line for the LUMI AI Factory containers
    # 'SLURM_MPI_TYPE'   : 'pmi2',
}

env_mod_category = 'tools'
To install this module, copy this script to singularity-slurm-bindings-1.0.0.eb,
then, after setting up your EasyBuild user environment as explained in the
"Software Stack" chapter, load and run
module load LUMI partition/container EasyBuild-user
eb singularity-slurm-bindings-1.0.0.eb
Note that this module cannot be used in combination with other bindings modules
that we offer, as each tries to set its own SINGULARITY_BIND environment variable.
An nicer EasyConfig but currently without advantages is
easyblock = 'Bundle'

name = 'singularity-slurm-bindings'
version = '1.0.0'

description = """
Singularity bindings for containers with Slurm support.

Note that this is done by simply setting SINGULARITY_BIND, making this approach
incompatible with other bindings modules. Which is an issue when used with the
LUMI AI Factory containers as those also need another environment variable to
be set for proper Slurm support for the MPI implementation in those containers.
"""

homepage = '()'

toolchain = SYSTEM

env_mod_extra_vars = {
    # Uncomment the next line for the LUMI AI Factory containers
    # 'SLURM_MPI_TYPE': 'pmi2',
}

env_mod_extra_paths = {
    'SINGULARITY_BIND': {
        'paths': [
            # LUMI filesystems
            '/pfs',
            '/scratch',
            '/projappl',
            '/project',
            '/flash',
            '/appl',
            # Slurm configuration
            '/etc/slurm',
            # Communication with system services
            '/var/spool/slurmd',
            '/var/run/munge',
            # Slurm libraries and plugins
            '/usr/lib64/slurm',
            # Slurm commands
            '/usr/bin/sacct',
            '/usr/bin/sbatch',
            '/usr/bin/sinfo',
            '/usr/bin/squeue',
            '/usr/bin/srun',
            '/usr/bin/sstat'
        ],
        'delimiter': ',',
        'prepend': False,
        'var_type': 'PATH',
    }
}

env_mod_category = 'tools'
Here SINGULARITY_BIND is treated the same way as PATH and other similar
variables to which you can add and remove entries. But this would only help
if all modules dealing with bindings would work that way. Each module could
then add extra capabilities. So for now you can as well use the first variant.
Bonus example: FFmpeg
FFmpeg is a very popular tool for video conversion. Unfortunately, it is a very hard package to install on LUMI. E.g., installing the Ubuntu package does not work. It is a full-featured version that requires dependencies that are not compatible with the LUMI environment and in fact even installing in the container will fail. Our solution for this example is to download a precompiled statically linked version that works on most Linux variants. Unfortunately, the site we use here seems to have stopped compiling the newest versions.
We'll downlaod from a GitHub site periodically generates builds from the FFmpeg master branch. The downside is that they don't follow specific FFmpeg versions, but simply build whatever is in the main branch of the GitHub repository at that time, so you don't know if you have an officially released version or some intermediate one that may be less tested.
Bootstrap: docker
From: ubuntu:24.04

%post
    # First we install tools that we will need later on
    apt update
    apt install -y wget xz-utils

    # Prepare a work directory to download and uncompress the library
    mkdir -p /tmp-ffmpeg && cd /tmp-ffmpeg
    wget https://github.com/BtbN/FFmpeg-Builds/releases/download/latest/ffmpeg-master-latest-linux64-gpl.tar.xz
    tar -xf ffmpeg-master-latest-linux64-gpl.tar.xz

    ls

    # Copy the relevant binaries to their expected location
    cp ffmpeg-master-latest-linux64-gpl/bin/* /usr/bin

    mkdir -p /usr/share/man/man1
    cp ffmpeg-master-latest-linux64-gpl/man/man1/* /usr/share/man/man1
    mkdir -p /usr/share/man/man3
    cp ffmpeg-master-latest-linux64-gpl/man/man3/* /usr/share/man/man3

    mkdir -p /usr/share/ffmpeg
    cp ffmpeg-master-latest-linux64-gpl/presets/* /usr/share/ffmpeg

    # Clean up a bit
    cd / && rm -rf /tmp-ffmpeg
Save this script as ffmpeg.def.
In this example, we use a lightweight Ubuntu container from Docker Hub as builds
with this container are very quick. However, the same strategy would also work with
the LUMI AI Factory containers.
The first two commands install two tools that we need later on: wget to download
the sources and xz-utils for the command that tar uses to uncompress the sources.
The two apt commands would not be needed with the LAIF containers as they already
contain those packages (as they were used to build those containers also).
Next we create a work directory where we will store and then unpack the download.
We then copy the executables, manual pages and some presets to the locations that
are usually used for those files (though more steps are needed in this particular
base container to be able to use the man pages).
Finally, we delete the temporary directory with
the download again.
Now build the container with
singularity build ubuntu-ffmpeg.sif ffmpeg.def
This build will finish rather quickly and can be done without issues on the login nodes of LUMI.
You can verify the build with
singularity exec ubuntu-ffmpeg.sif ffmpeg -decoders
which executes the command ffmpeg -decoders in the container that we just created.
Bindings are not essential for this test, but the bindings module from the LAIF would
work here too to give the container access to all your files.
Another solution would be to download dev packages for the dependencies for the features of FFmpeg that you really need, ensure there is an appropriate compiler in the container, and then compile and install the package by hand. This is cumbersome, but unfortunately may be the only option for some packages as prebuild packages are usually built for use on workstations with typical features available on a workstation, and not for a supercomputer environment.
Alternative download site with fixed versions...
Another popular site is a site from John Van Sickle, but it looks like that site is not updated anymore. That version is even fully statically linked and can be installed as follows:
Bootstrap: docker
From: ubuntu:24.04

%post
    # First we install tools that we will need later on
    apt update
    apt install -y wget xz-utils

    # Prepare a work directory to download and uncompress the library
    mkdir -p /tmp-ffmpeg && cd /tmp-ffmpeg
    wget https://johnvansickle.com/ffmpeg/releases/ffmpeg-release-amd64-static.tar.xz
    tar -xf ffmpeg-release-amd64-static.tar.xz

    # Copy the relevant binaries to their expected location
    cp ffmpeg-7.0.2-amd64-static/ffmpeg /usr/bin
    cp ffmpeg-7.0.2-amd64-static/ffprobe /usr/bin

    # Clean up a bit
    cd / && rm -rf /tmp-ffmpeg
Relevant documentation for this section:
-
"The Definition File" in the SingularityCE 4.1 manual
Note that the
%setupsection cannot be used with the PRoot build process. The manual also says at some point that%precannot be used, but that simply does not exist in singularity. There are other restrictions also that are clearly mentioned on the "Unprivivileged proot builds" section.
Conclusion: Container limitations on LUMI
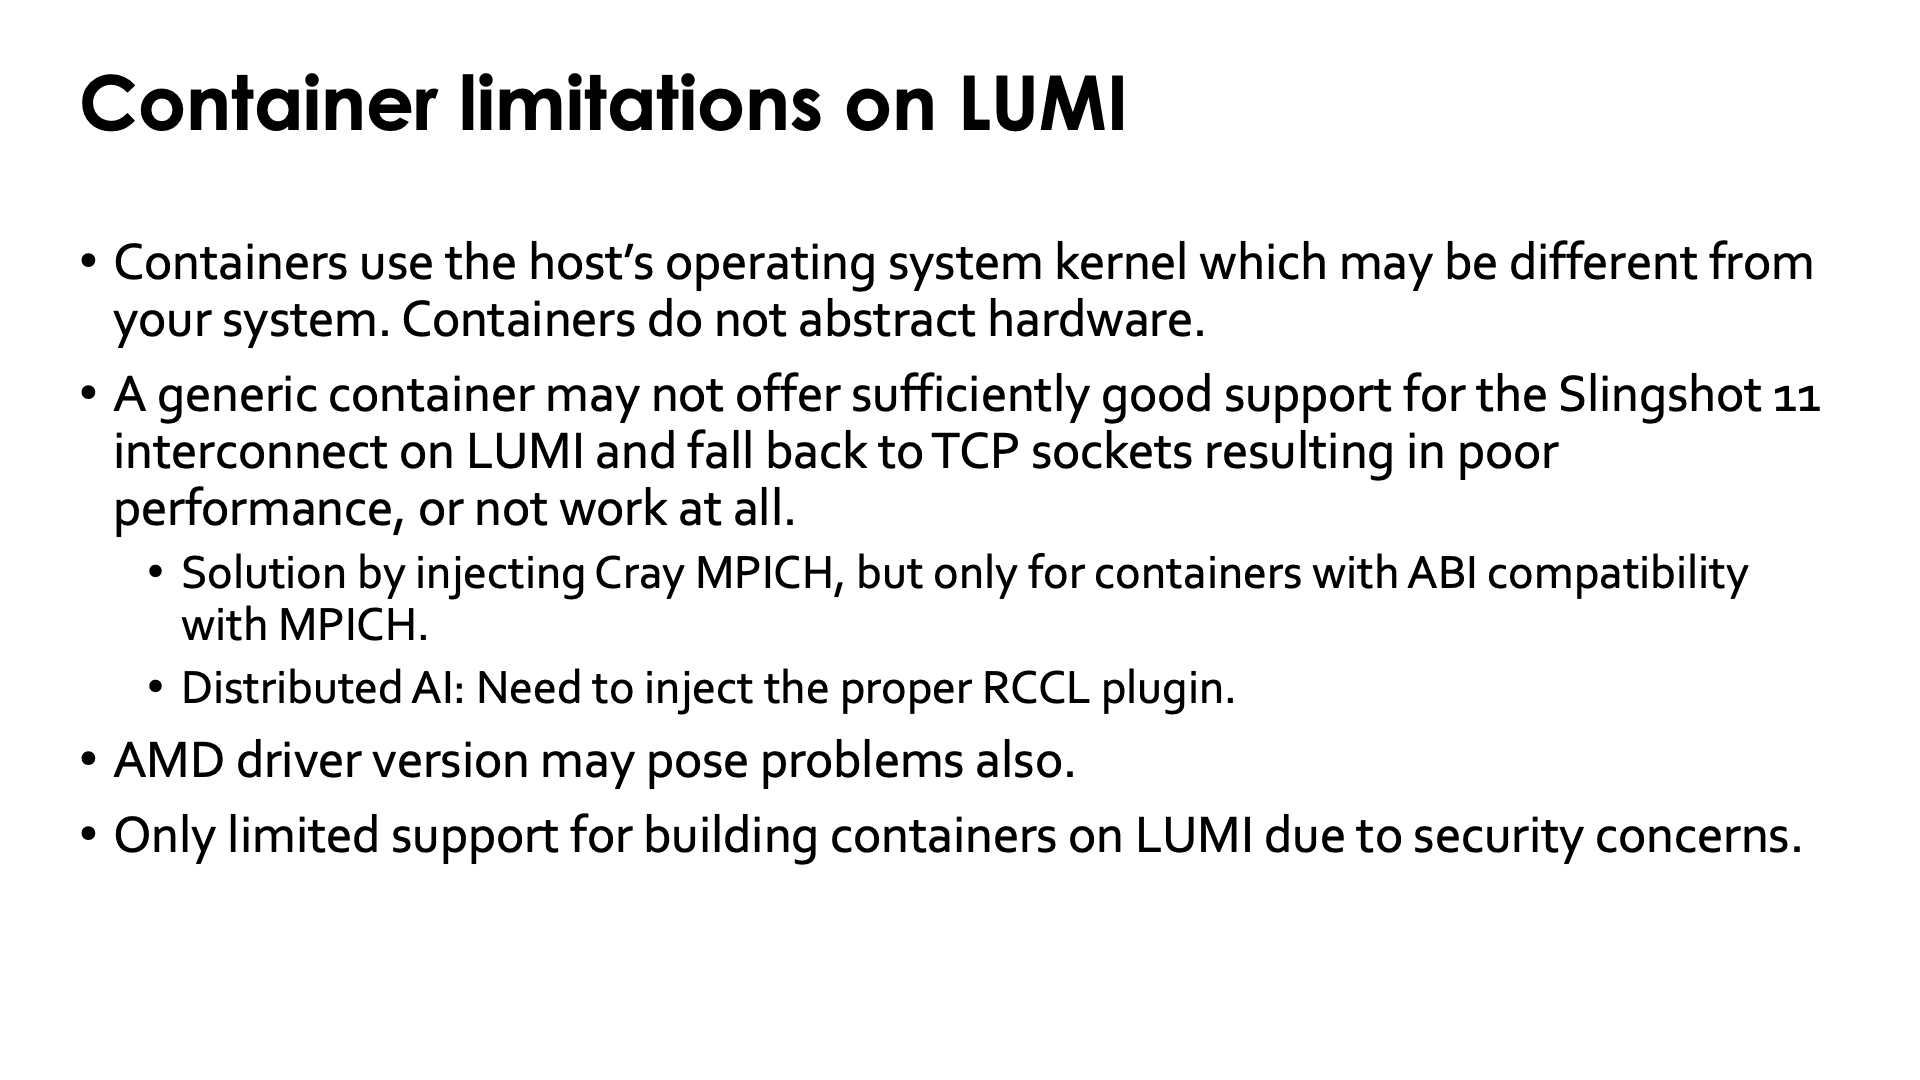
The idea of "bring your own userland and run it on a system-optimised kernel" idea that proponents of containers promote, has two major flaws
-
Every set of userland libraries comes with certain expectations for kernel versions, kernel drivers and their versions, hardware, etc. If these expectations are not met, the container may not work at all or may work inefficiently.
This is particulary true for ROCm™ support as each version of the ROCm™ libraries only works with a limited range of GPU driver versions. If the ROCm™ libraries in the container are too old or too new for the driver on the system, the container will not work. As the ROCm™ ecosystem is maturing, the range of driver versions that are compatible with each ROC™ version is growing, but this issue will likely never be completely solved.
-
Support for specific hardware is not done in the kernel alone. Most of the optimisations for hardware on an HPC system are actually in userland.
-
As most of the time of an application is spent in userland, this is where you need to optimise for a specific CPU and GPU. If a binary is not compiled to benefit from the additional speed of new instructions in a newer architecture, no container runtime can inject that support.
-
Support for the SlingShot network, is in the libfabric library and its CXI provider, which are userland elements (and the same holds for other network technologies).
Container promoters will tell you that is not a problem and that you can inject those libraries in the container, but the reality is that that strategy does not always work, as the library you have on the system may not be the right version for the container, or may need other libraries that conflict with the versions in the container.
Likewise, for containers for distributed AI, one may need to inject an appropriate RCCL plugin to fully use the Slingshot 11 interconnect.
-
The support for building containers on LUMI is currently limited due to security concerns. Any build process that requires elevated privileges, fakeroot or user namespaces will not work.